Do you really know which buttons and links people are clicking on your website? GA4 has two ways to help you figure this out, so the best option really depends on what you’re trying to track.
Enhanced Measurement (GA4’s built-in feature) is good for simple things like file downloads or external link clicks. But if you want to track specific elements, like a “Book call” button or a promotional banner, you’ll have to use Google Tag Manager. Let’s go through both methods, so you can be sure which to use and when.
But first… why even track clicks?
Finding out what visitors click on shows you what they’re interested in, and what’s working or failing in your strategy. Wouldn’t you like to be certain your main call-to-action button is actually driving conversions, or if it’s being ignored? Or if the special offer banner you made to be eye-catching is truly seen?
Each click represents a decision by the visitor, and understanding those choices helps you:
-
Optimize what’s working
Imagine you have “Book call” buttons in three locations: hero section, sidebar and footer. The hero placement gets 10 times more engagement than the footer, so now you know: either move the footer button to a better location, or test different copy there.
-
Fix what’s not working
If your “Book call” button gets 12 clicks per 1000 page views, that’s a 1.2% click rate. Knowing that industry benchmarks suggest 3-5% for similar CTAs, something would definitely be wrong. Low click rates on important elements might mean poor placement, unclear copy, or design issues.
-
Measure campaign effectiveness
Let’s say you’re running two promotional banners: one for a whitepaper download, one for a webinar signup. After two weeks, the whitepaper banner has 350 clicks while the webinar banner has 90. Both got equal placement and traffic. This data tells you which content format resonates with your audience, so in the future, you can prioritize downloadable resources over live events because you have evidence that it works best.
Which tracking method fits your needs?
GA4’s Enhanced Measurement handles common click scenarios automatically. It tracks when someone downloads a PDF from your website or clicks a link that takes them to another domain. All you have to do is turn it on once, and it works across your entire website.
But here’s what Enhanced Measurement can’t do: track clicks on specific buttons, internal navigation elements, or promotional banners. For those, you need Google Tag Manager’s custom triggers, which let you track any element by targeting its unique attributes.
In other words, use Enhanced Measurement if you need:
- File download tracking (common file types like PDFs, spreadsheets, documents, and media files).
- Useful context captured automatically, including parameters like link_url, link_domain, link_classes, or link_id.
- Outbound link clicks.
- A quick setup with no custom configuration.
Or use Google Tag Manager if you need:
- Specific button tracking (like “Add to cart” or “Book call”).
- Internal link clicks (navigation, sidebar links, footer elements).
- Custom event parameters beyond what GA4 provides.
- Tracking elements that aren’t traditional HTML links.
Quick insight: most websites end up using both. Enhanced Measurement handles the basics, and GTM tracks business-critical interactions.
Option 1: Track clicks with Enhanced Measurement
To enable Enhanced Measurement in GA4, follow these steps:
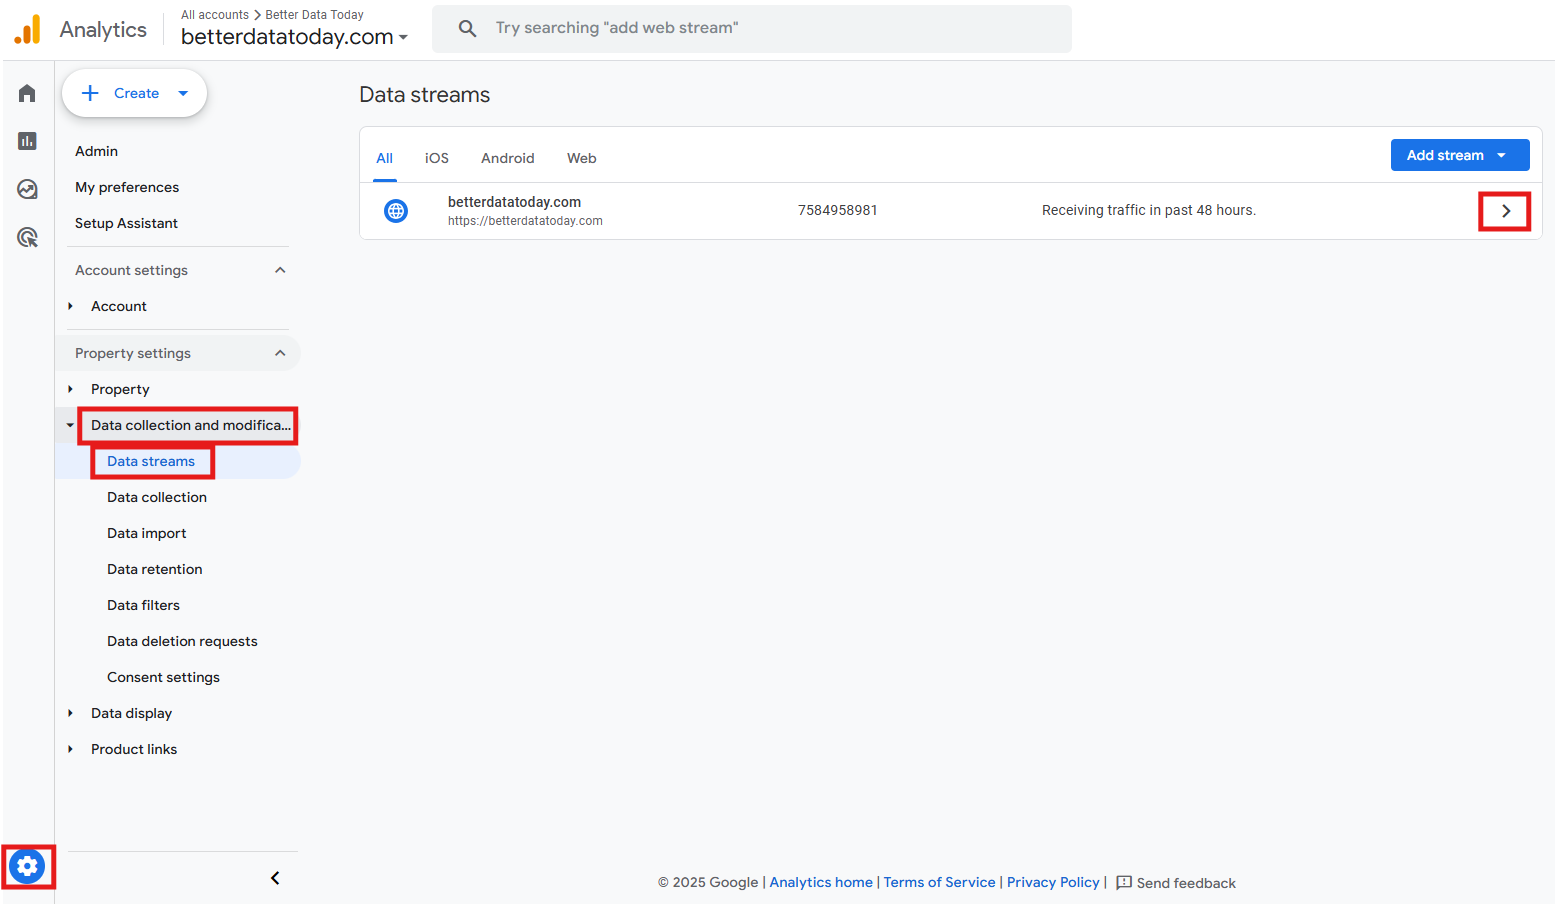
- Go to Admin > Data collection and modification > Data streams > select your web data stream.
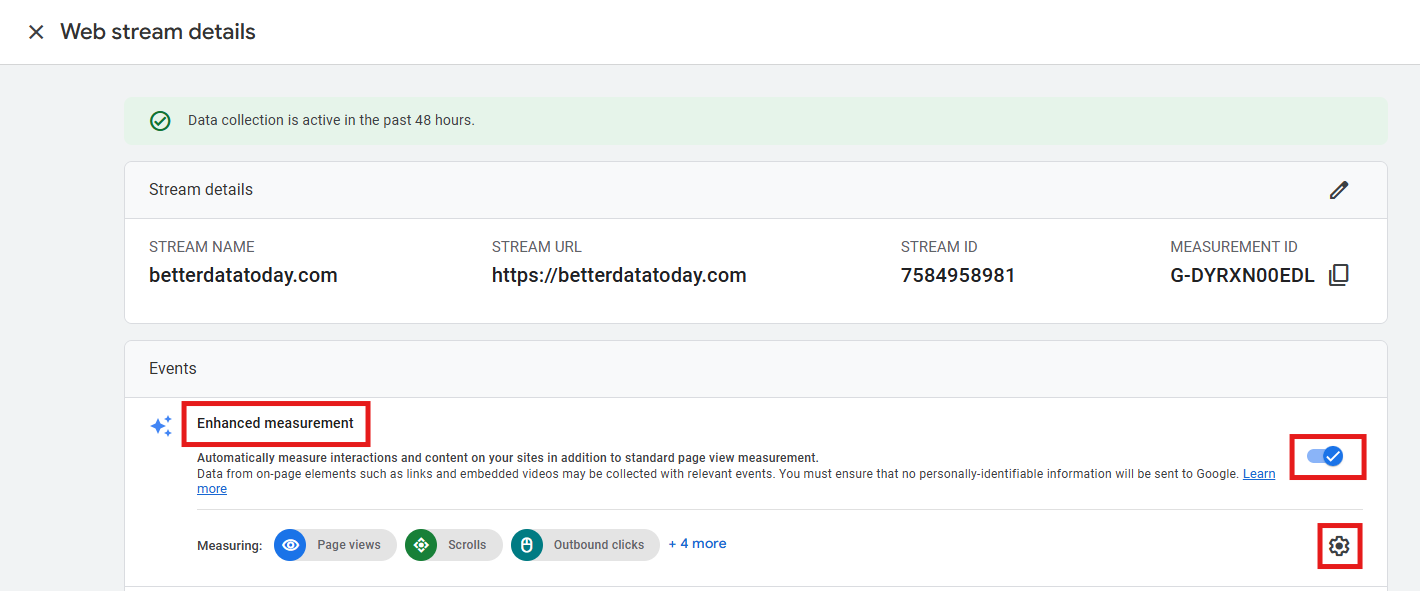
- Right at the top, you’ll see the Enhanced Measurement section with a toggle switch. If it’s already on, great. If not, turn it on. You can also click the gear icon to customize which events are tracked.
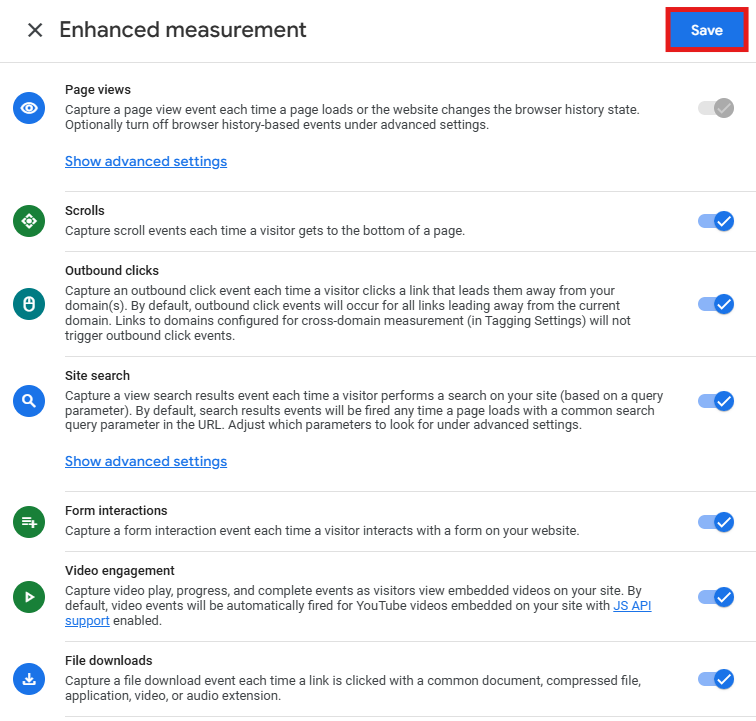
- You can toggle individual events on or off. Make sure you Save in the end.
For outbound link tracking, there’s another important configuration: if your business operates across multiple domains, you need to tell GA4 which domains are yours. To do that:
- Back in the web stream details, scroll down to the Google tag section and click Configure tag settings.
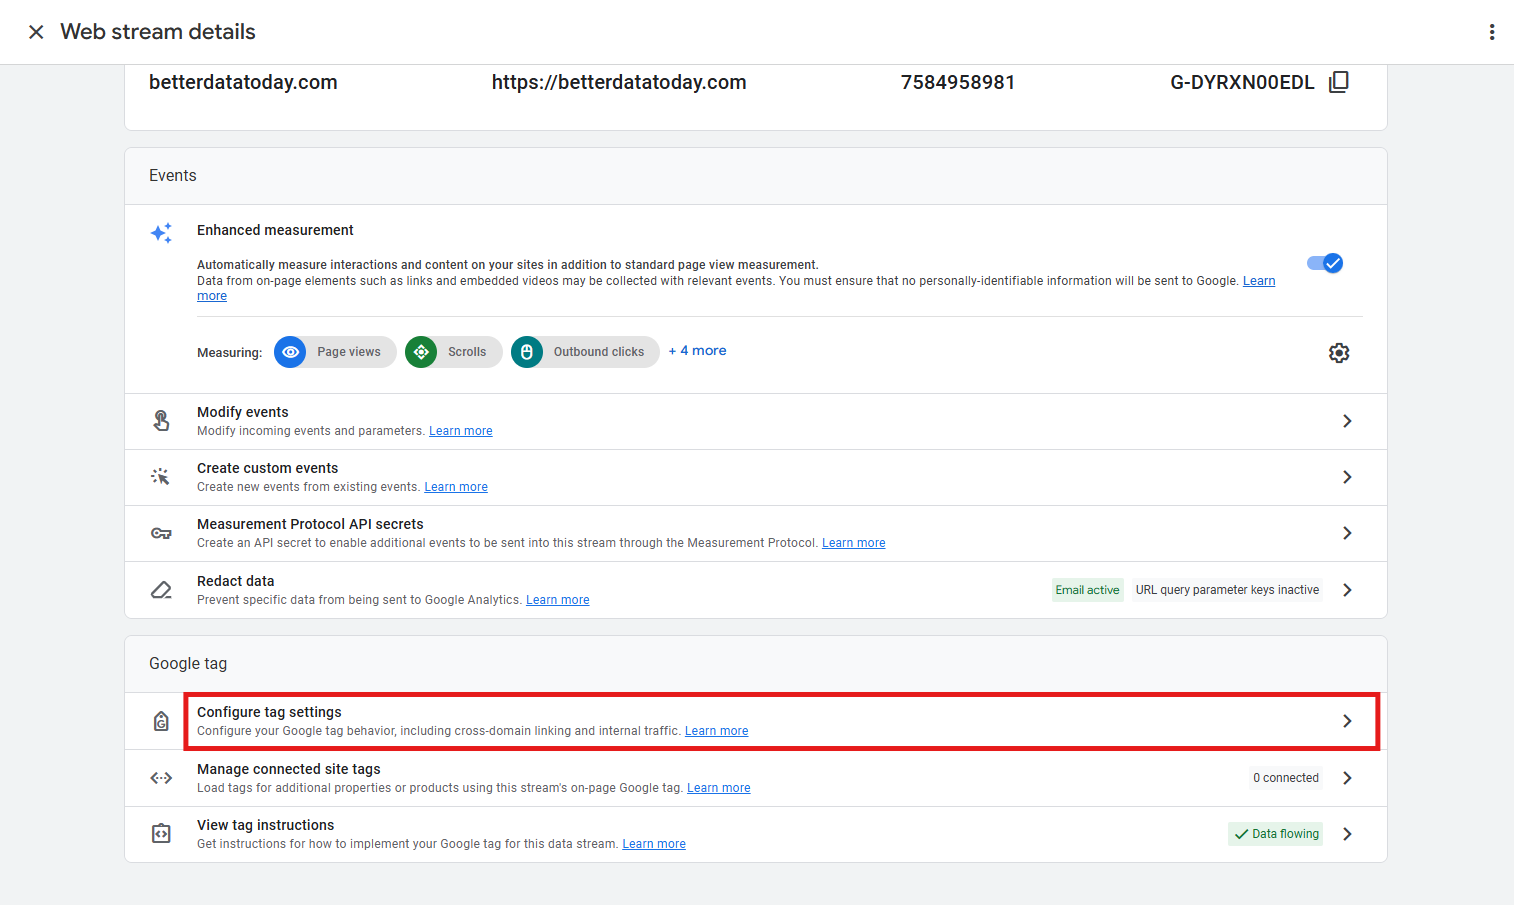
- Under Settings, click Configure your domains.
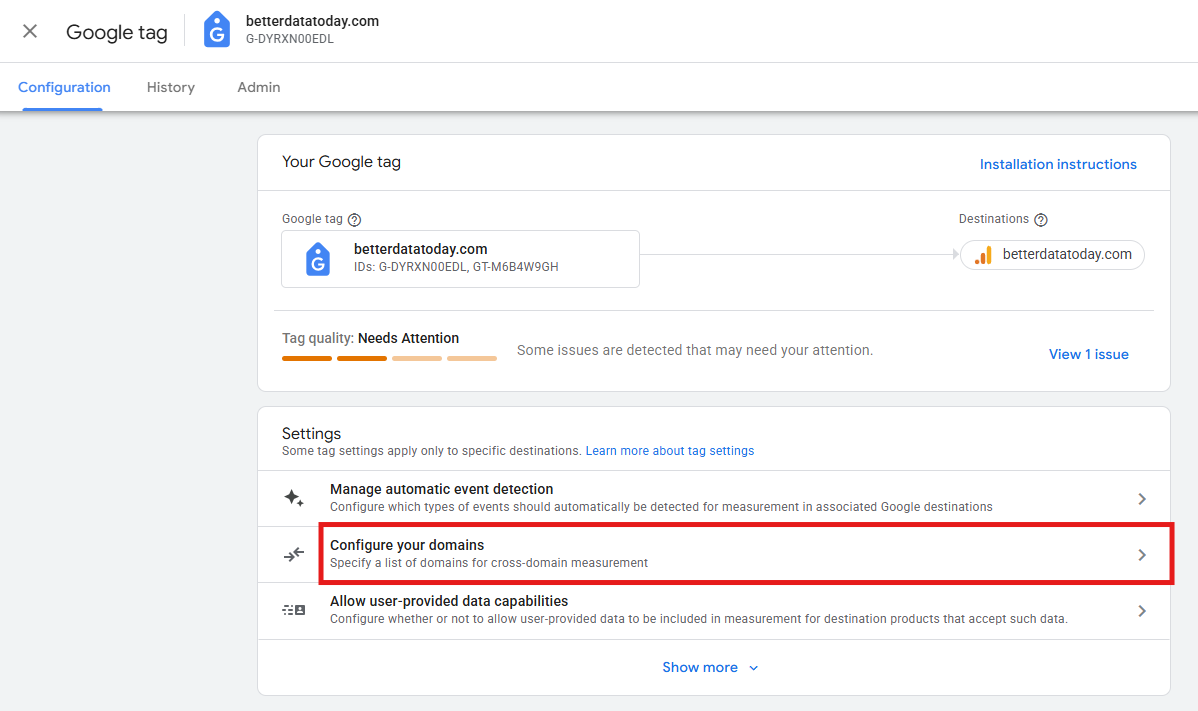
- Add all your domains and save. This prevents GA4 from treating navigation between your own websites as outbound clicks.
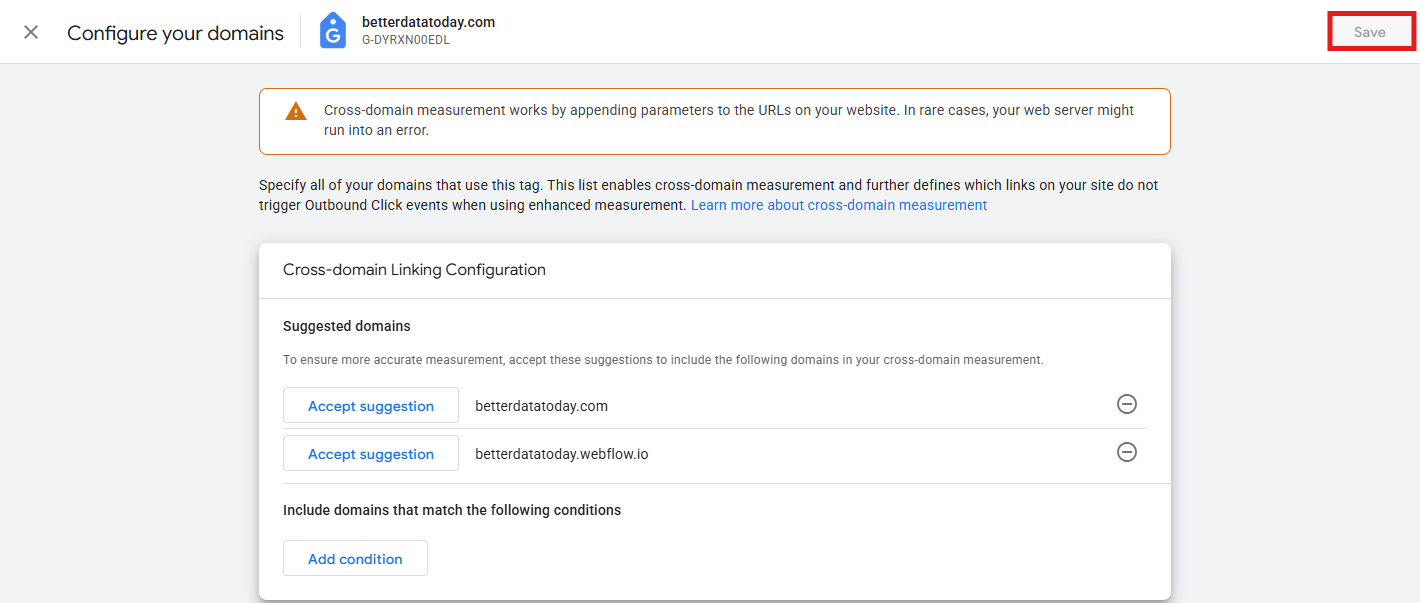
That’s it. Once enabled, GA4 starts collecting these clicks immediately.
Option 2: Track custom clicks with Google Tag Manager
GTM gives you precise control over which clicks you track and what data you capture. As an example, we’ll walk through tracking “Book call” button clicks, but the same process works for any element on your website.
The six-step workflow:
Every GTM click tracking setup follows the same pattern:
- Enable a click trigger.
- Enable click variables.
- Find your element’s unique identifier.
- Create a precise trigger.
- Build a GA4 event tag.
- Test before publishing.
Let’s work through each step.
Step 1) Enable a click trigger
GTM doesn’t track clicks by default, so you need to tell it to start listening. To do that:
- Go to Triggers > New.
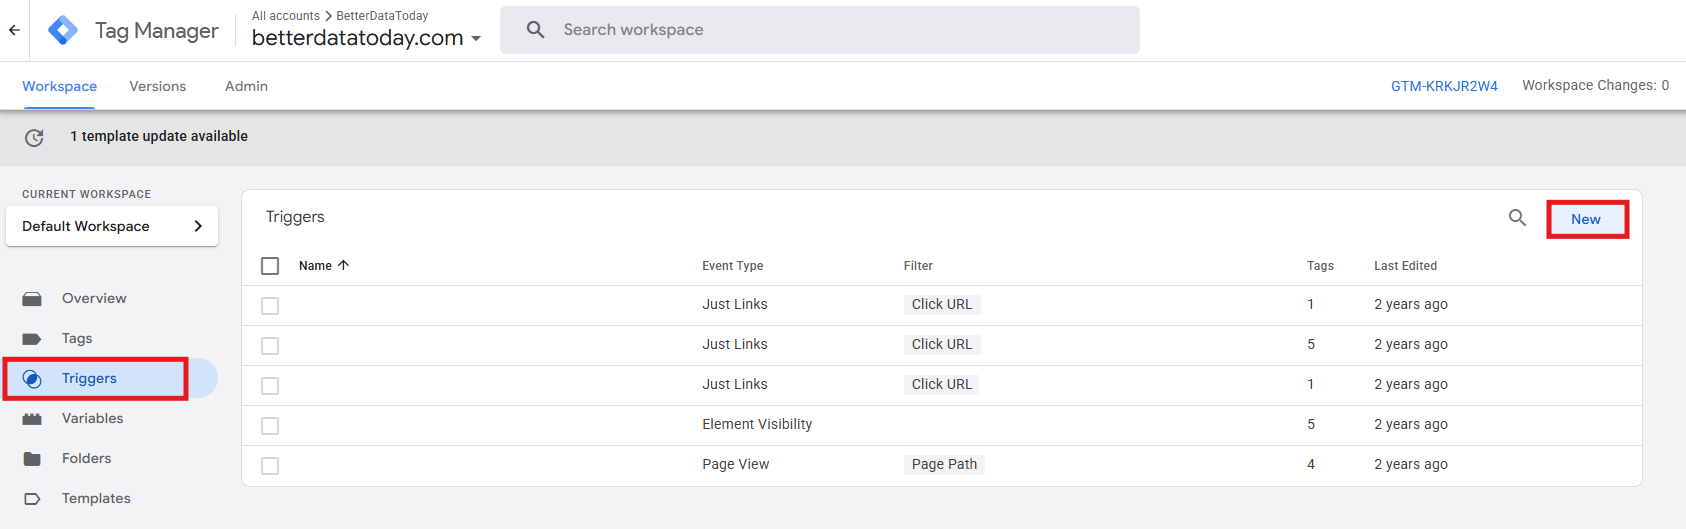
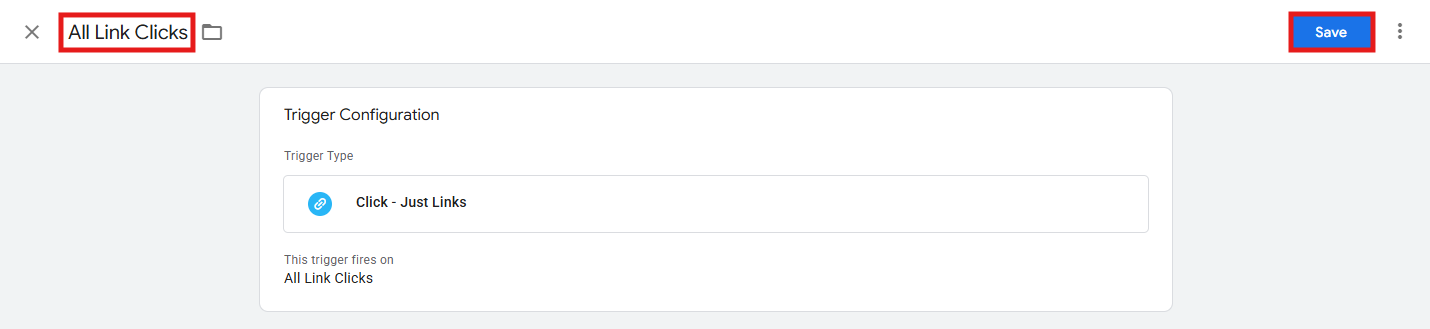
- Click Trigger Configuration > Select either Just Links (if you’re tracking standard links) or All Elements (if you’re tracking buttons or other elements) > select All Clicks.
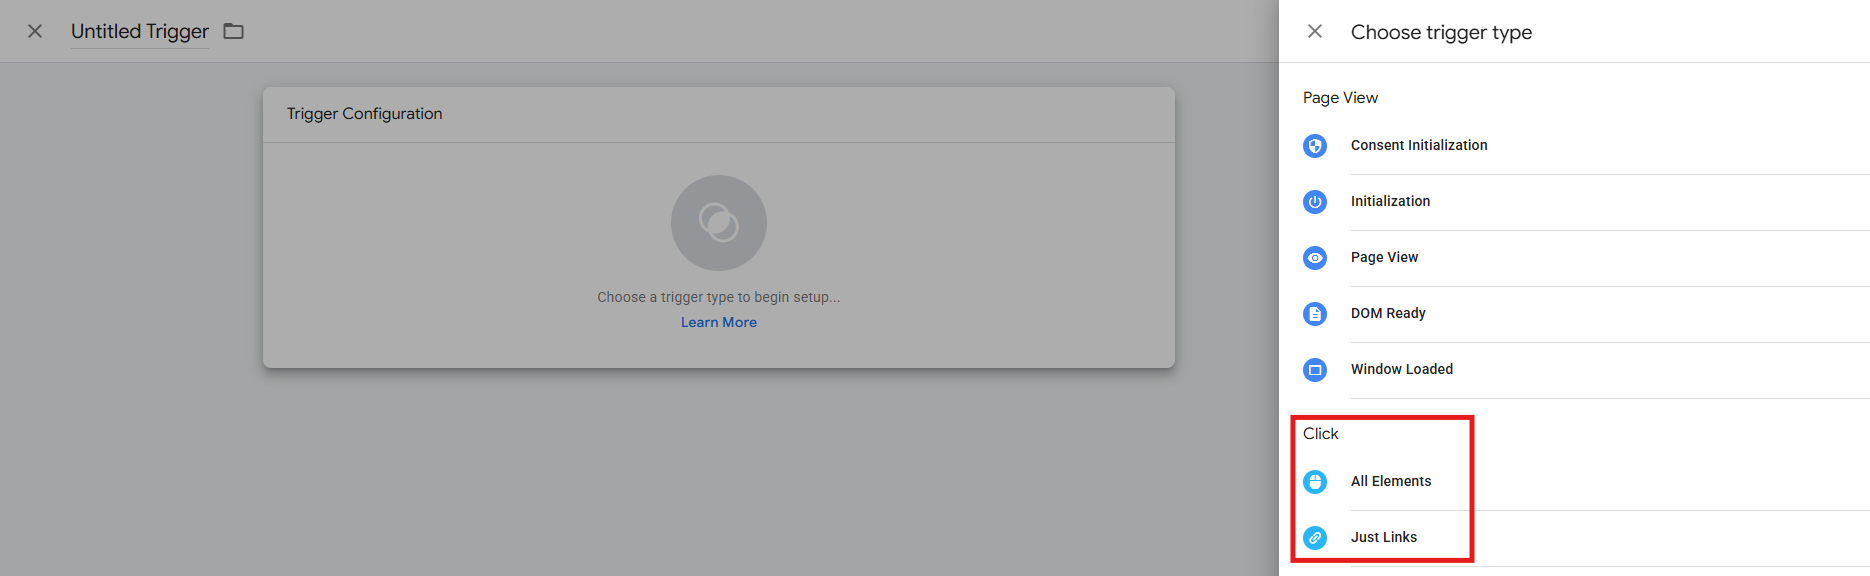
- Name it something like “All Link Clicks” or “All Element Clicks” and save it.
Step 2) Enable click variables
To turn on all click-related variables:
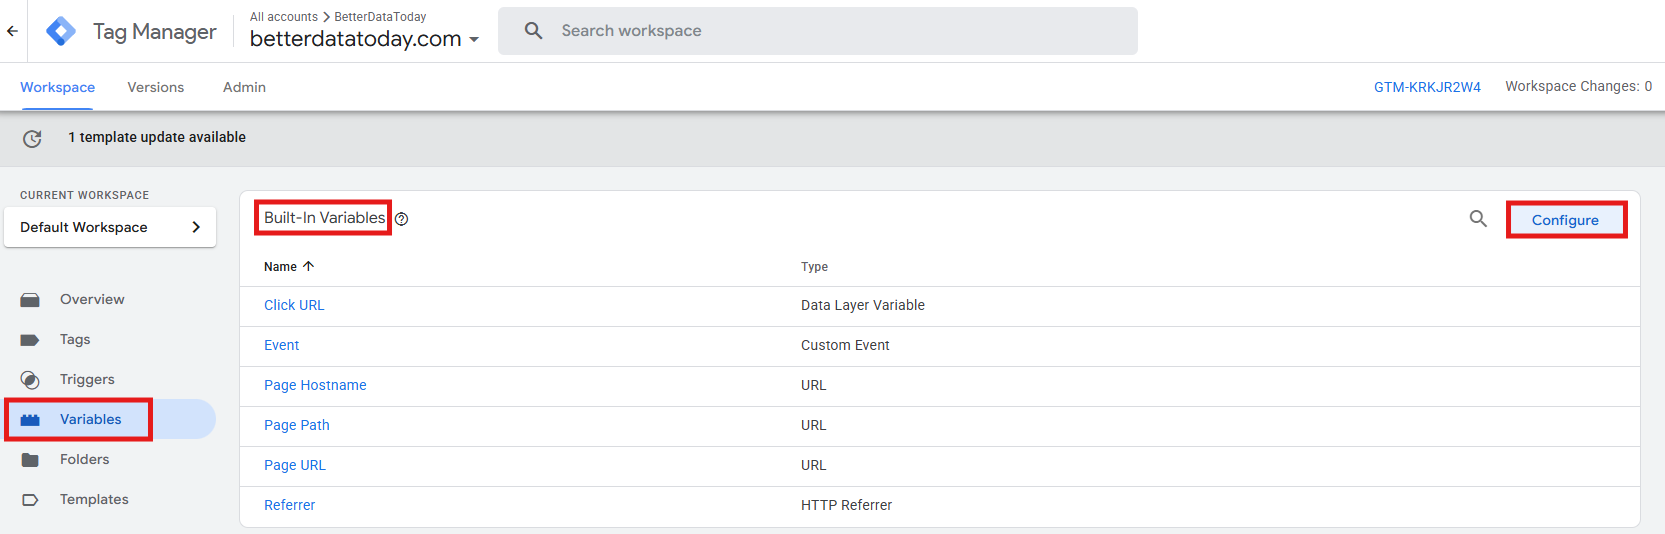
- Go to Variables > Configure in the Built-in Variables section.
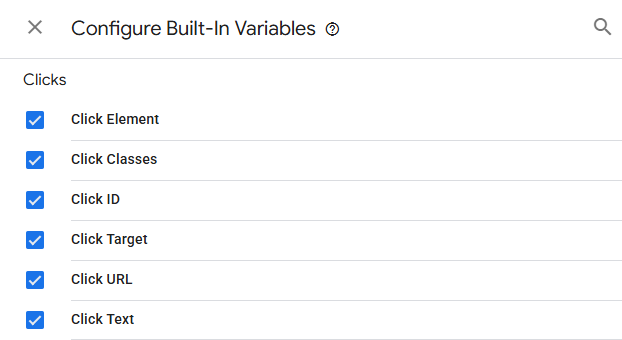
- Enable all the variables under the Clicks category. Now GTM will populate these variables with information about each click.
Step 3) Find your element’s unique identifier
You’ll now use Preview mode to identify your target element (e.g., a “Book call” button):
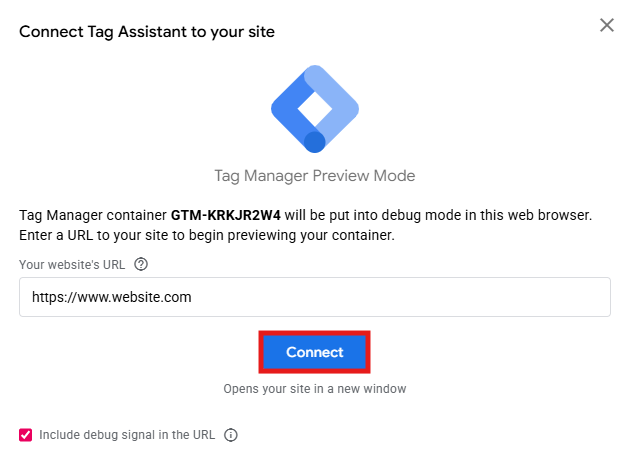
- In GTM’s interface, click Preview at the top left.

- When Tag Assistant opens up, enter your website URL and click Connect.
- Once Preview mode loads, go to the website page with your target element and click it. Back in the Preview panel, you’ll see a Link Click or Click event appear. Click on it, then go to the Variables tab.
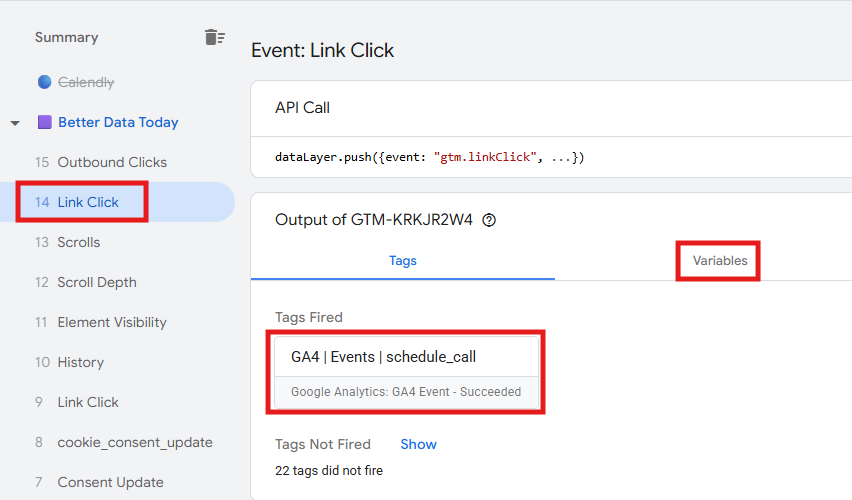
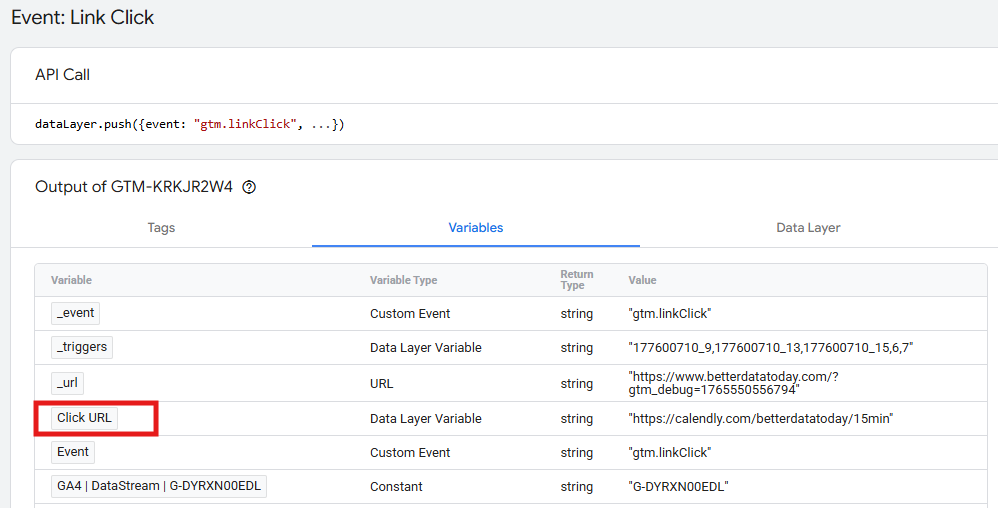
- Look through the click variables to find something unique that identifies your element. Common identifiers include:
- Click ID (the id attribute in HTML).
- Click Classes (CSS classes).
- Click Text (the button’s visible text).
- Click URL (for links).
In this example, the “Book call” button has Click URL. Take note of the value, since you’ll need it for the next step.
Step 4) Create a precise trigger
Now you’ll create a trigger for that specific element:
- In GTM’s interface, go back to Triggers and click New.
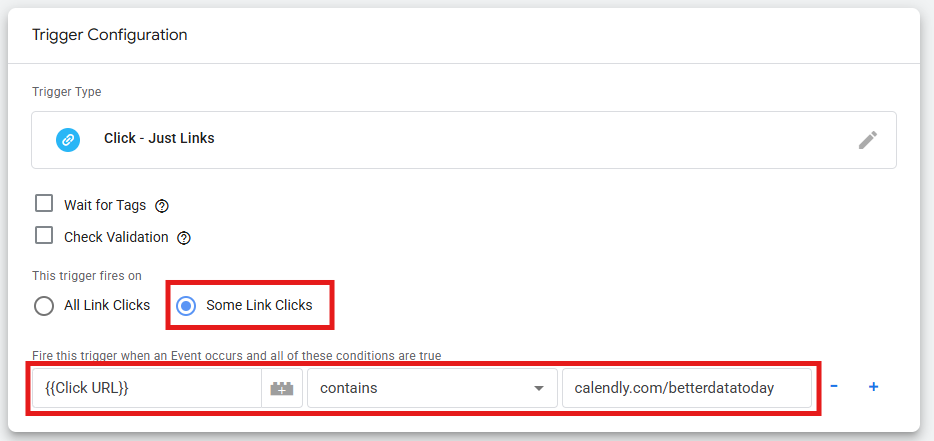
- Choose the same type you enabled in Step 1 (Just Links or All Elements).
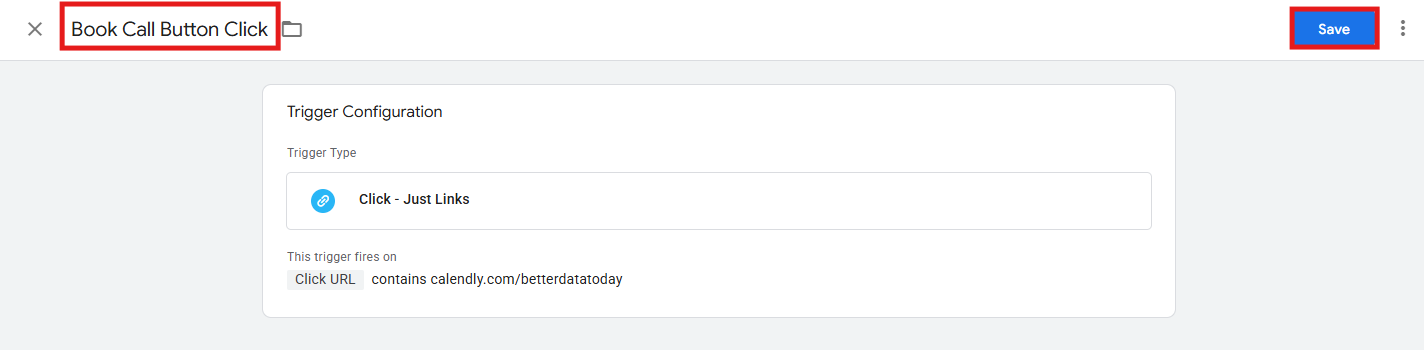
- This time, before saving it, select Some Clicks instead of All Clicks. Add a condition using the identifier you found in Step 3 (e.g., Click URL contains /book-call).
- Name your trigger something descriptive, like “Book Call Button Click”, and save it.
Step 5) Build a GA4 event tag
Before actually creating the tag, you need to set up a constant variable for your Measurement ID (instead of hardcoding it in every tag):
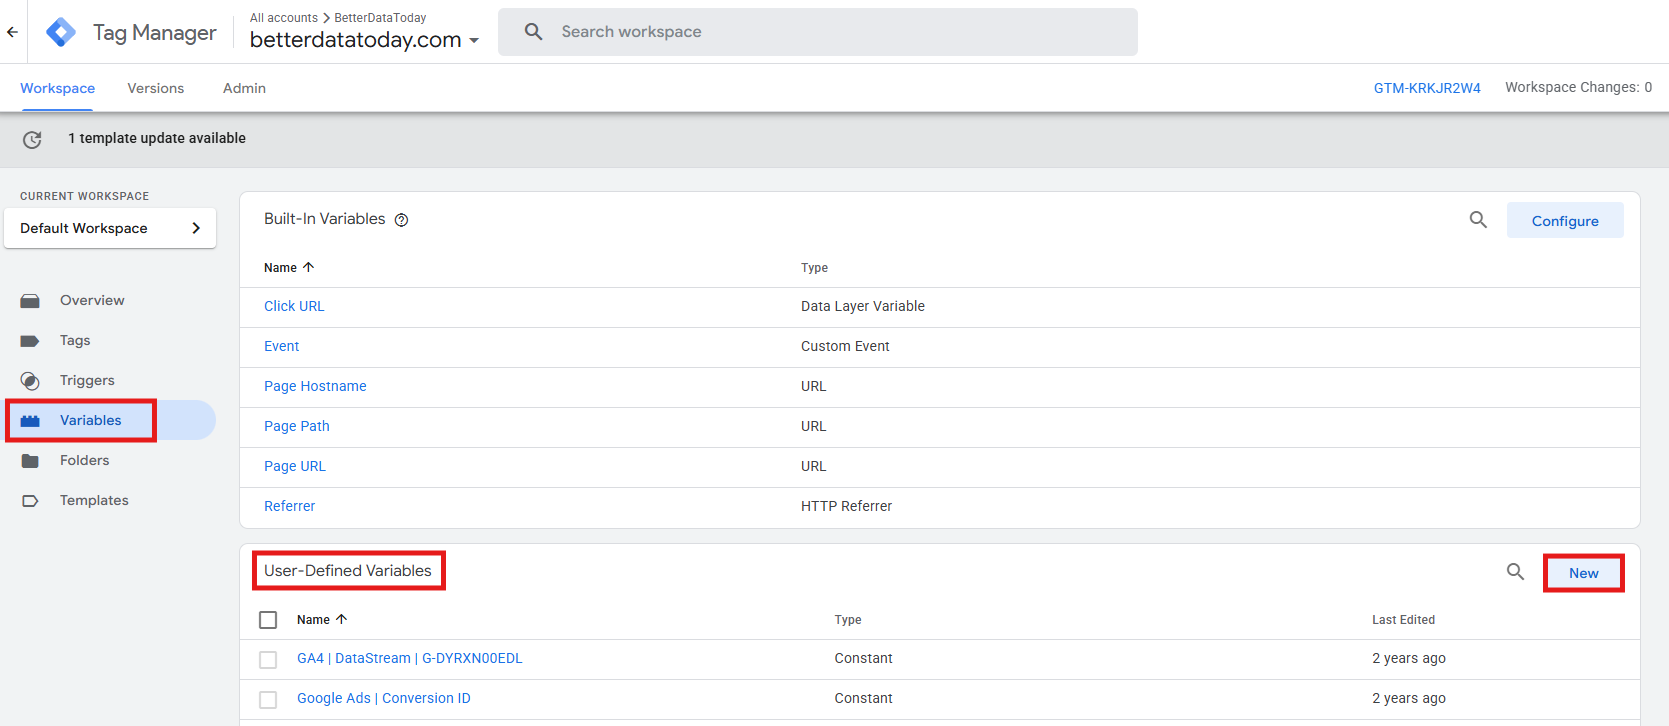
- Go to Variables > User-Defined Variables > Click New.
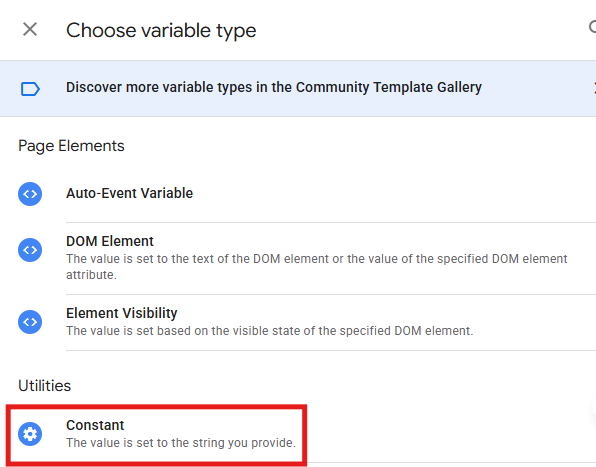
- Under Variable Configuration, choose Constant.
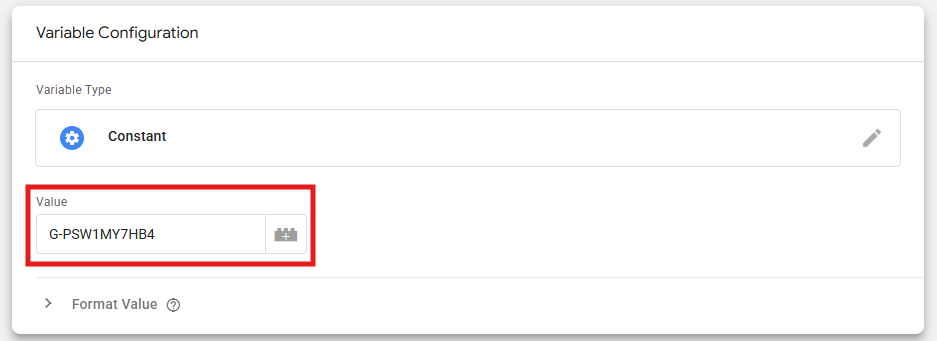
- In Value, paste your GA4 Measurement ID (find it in GA4 under Admin > Data collection and modification > Data streams > your web stream).
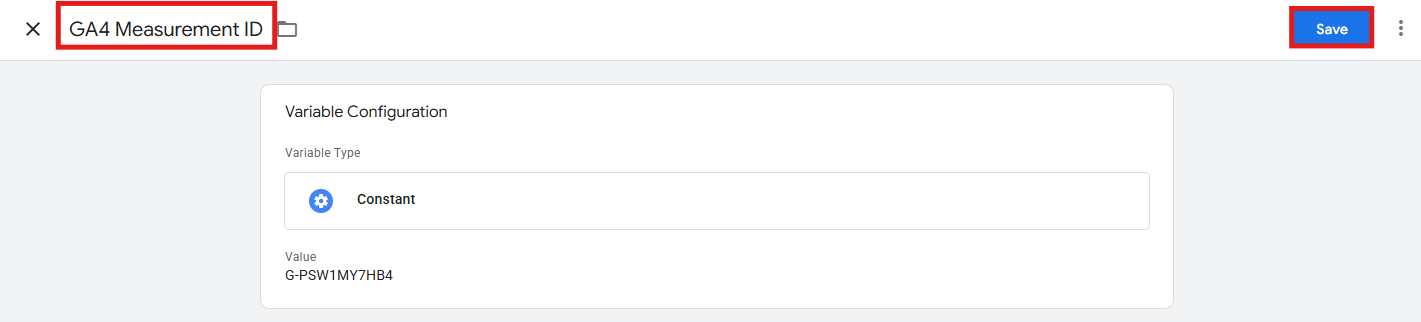
- Name the variable “GA4 Measurement ID” and save.
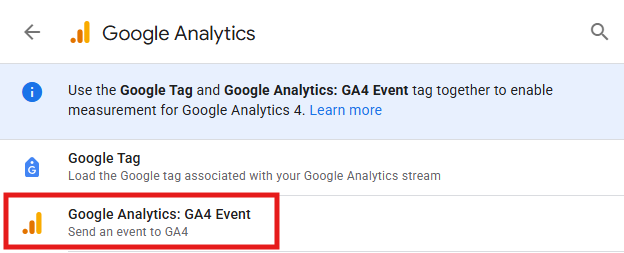
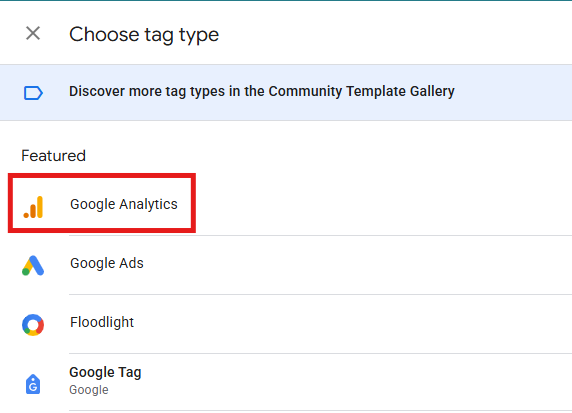
- Now create your tag. Go to Tags > New > Tag Configuration > Google Analytics > Google Analytics: GA4 Event.
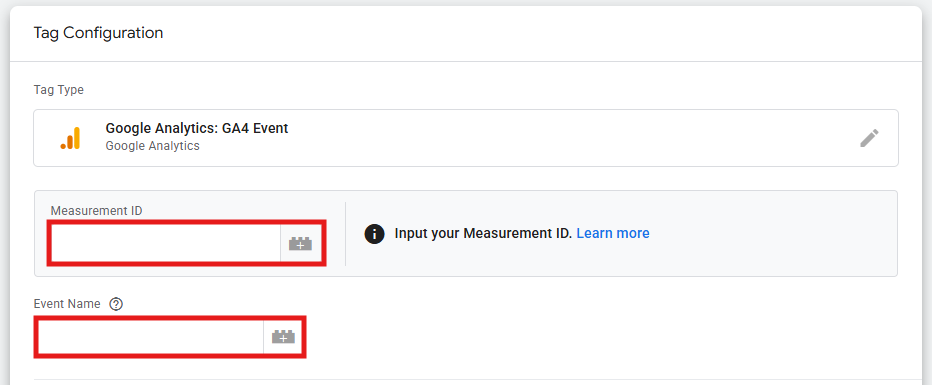
- Pick your Measurement ID variable from the list and enter your event name. We recommend using lowercase with underscores, like book_call_click.
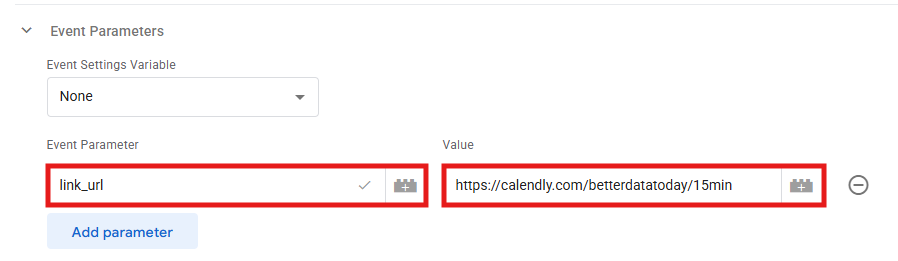
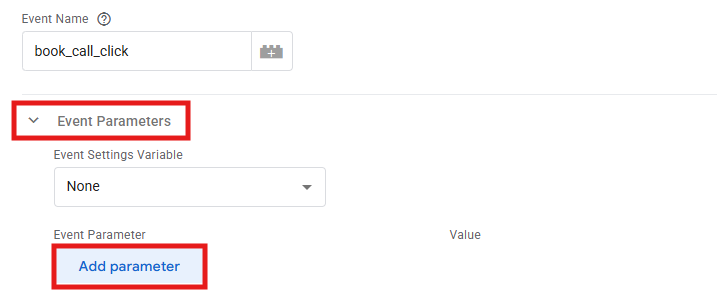
- Now add some event parameters to give you more context about the click. Expand the Event Parameters section and click Add Parameter.
-
Add whatever makes sense for your tracking plan and helps you understand the interaction, but useful ones to include are:
- link_url with value {{Click URL}}
- link_text with value {{Click Text}}
- page_location with value {{Page Path}}
You can send up to 25 custom parameters per event.
-
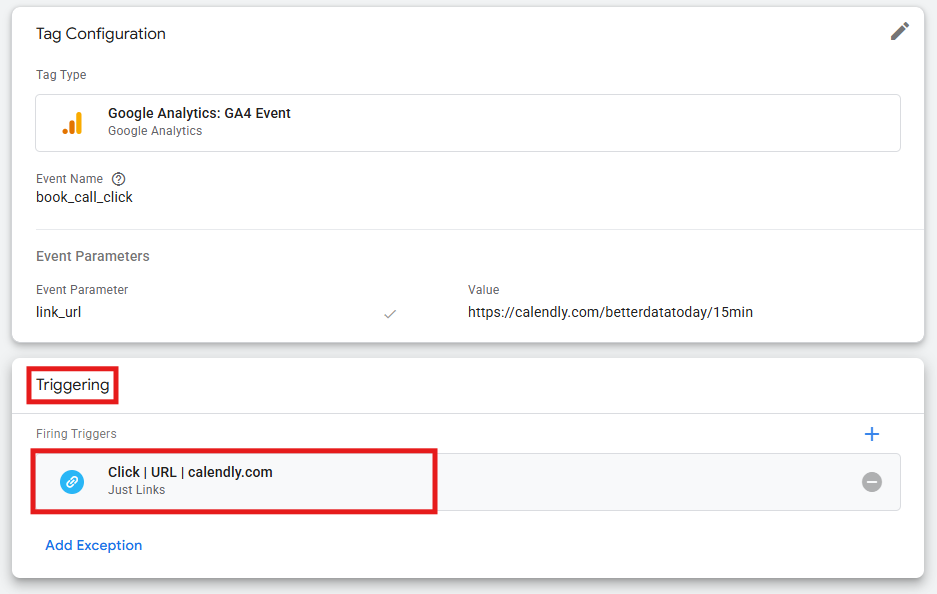
Under Triggering, assign your “Book Call Button Click” trigger to this tag.
-
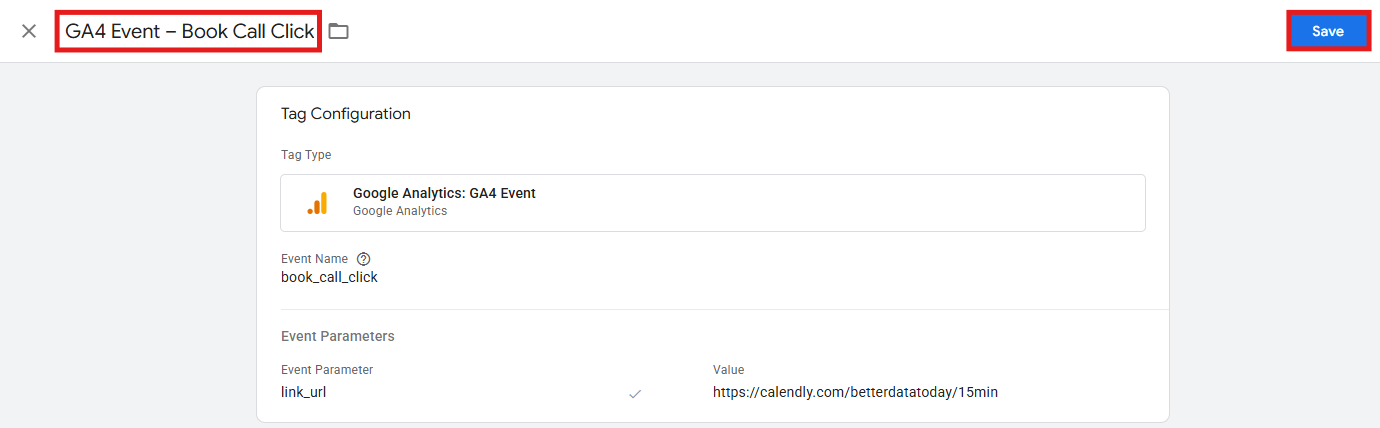
Name your tag something clear like “GA4 Event – Book Call Click” so you can easily find it later in GTM, and save.
Step 6) Test before publishing
Your tag is now configured, but don’t publish it yet. Testing catches problems before they reach your live data, so first make sure everything is running smoothly:
- Refresh Preview mode and click your target element.
- Check the Preview panel to confirm your tag fires.
- Then open GA4’s DebugView (Admin > Data display > DebugView) and verify the event appears with all its parameters.
- Once everything looks right, click Submit in GTM’s interface (at the top right) to publish your changes.
- Optionally, after you publish your GTM changes, go to GA4 > Reports > Realtime overview. Click around on your website and you should see your custom event appear there too.
Keep in mind: standard parameters like link_url appear in GA4 reports automatically, but if you created custom parameters (like page_location), you’ll need to register them as custom dimensions in GA4. We go through the steps of this process in articles like “Google Analytics 4 setup checklist for new adopters” or “Key event rate in GA4: what it measures and what it misses”.
What if something is not working?
Don’t freak out if data is not showing up properly. Below are common issues that may come up at this point, and ways to diagnose them.
1) The tag doesn’t fire
Your trigger conditions might be too strict or the click variables aren’t matching. Go back to Preview mode and click the element again. Then look at the Variables tab. Do the actual values match your trigger conditions exactly? Are all letters capitalized the same way? Did you add “https://” at the beginning of the link? Either adjust your trigger condition to match the actual variable value, or switch to a different identifier. If Click Classes isn’t reliable, try Click ID or Click URL instead.
2) The event appears in DebugView but the parameters are missing
Check two things: (1) in your GA4 tag, are you wrapping variable names in double curly braces? It should be {{Click URL}}, not Click URL; (2) in Preview mode, click on your fired tag and look at the Variables section. Do the variables you’re referencing actually have values? If Click Text is blank in Preview mode, it’ll be blank in GA4 too. So, switch to a different variable that actually captures data. Go back to your tag configuration and verify every parameter is using the correct variable syntax.
3) Multiple tags fire
In this scenario, you probably have overlapping trigger conditions. For example, one trigger fires on “All Link Clicks”, while another trigger fires on “Click URL contains X”. Both conditions are true for your link, so both tags fire. To solve this, first ask yourself: are these conditions mutually exclusive, or could multiple be true at once? Then make your triggers more specific, or use trigger exceptions (e.g., “Click URL does NOT contain X”).
4) The event shows in DebugView but not in Realtime reports
DebugView and Realtime reports use different data sources. This usually means that DebugView is working because you have Preview mode enabled, but your GTM container hasn’t been published yet, so real-time traffic doesn’t see the tags. To fix this, click Submit in GTM to publish your container. Wait a couple of minutes, then test again without Preview mode.
5) Parameters show in DebugView but not in custom reports
If you see your custom parameter in DebugView but it’s not available when building reports, you haven’t registered it in GA4 as a custom dimension yet. Go to Admin > Data display > Custom Definitions and register it. Allow up to 24 hours for data to populate.
Common tracking scenarios
Now that we’ve covered both options to track clicks in GA4, let’s look at how to apply these methods to specific situations:
-
Tracking multiple similar buttons
If you have several “Add to cart” buttons, for example, across product pages, you don’t need separate events for each one. Create a single add_to_cart_click event and use parameters to differentiate them. You can add parameters like: product_name (using a variable that captures product info) or button_location (to show which page the click happened on).
-
Tracking promotional banners
Banners often use background images with click handlers rather than standard links. Use the “All Elements” trigger and look for a unique class or ID on the banner container. Send parameters like banner_position (header, sidebar, footer) and banner_campaign to understand which promotions drive engagement.
-
Email and phone clicks
Track “mailto:” and “tel:” links by creating a trigger where Click URL contains “mailto:” or “tel:”. These are technically outbound clicks, but GA4’s Enhanced Measurement might not catch them depending on how they’re coded.
-
Internal navigation
If you want to understand how people use your main menu or footer links, create a trigger based on a shared class that those links have. Use the link_text and link_url parameters to see which menu items get the most clicks.
What to avoid in click tracking
Tracking clicks seems straightforward, but there are a few unnecessary actions that may lead to chaotic data:
-
Don’t track everything
The goal is simply to get valuable insights, not to capture exhaustive information. If you can’t explain why you need certain data, you probably don’t need to track it.
-
Don’t use unstable identifiers
CSS classes often change during website redesigns. If possible, coordinate with your developers to add permanent IDs to important elements.
-
Don’t send the same parameter in different events with different meanings
If button_type means one thing in your book_call_click event and something else in your newsletter_signup event, your reports will be confusing.
-
Don’t forget to document your tracking
Six months from now, you won’t remember why you’re tracking a specific element or what the parameter names mean. Keep detailed notes on your tracking plan.
Final thoughts
Click tracking in GA4 is about understanding the interactions that drive business decisions, so it comes down to choosing the right tool for the job: either Enhanced Measurement to handle common scenarios automatically, or Google Tag Manager to achieve precision.
Invest in a good setup now, and in a few months or years, when you’re deciding whether to redesign your homepage or trying to figure out why conversions dropped last quarter, you’ll have real data to guide you. Click tracking is only valuable if you can actually interpret the data when it’s time to make decisions.