If you’re here, we assume you’re already using GA4 and GTM on your website – you’re already halfway there! In this article, we explain what server-side tagging is, how it improves your data quality and governance, and how to implement it from start to finish. Are you ready to get started?
What’s the difference between GTM client-side and server-side tagging?
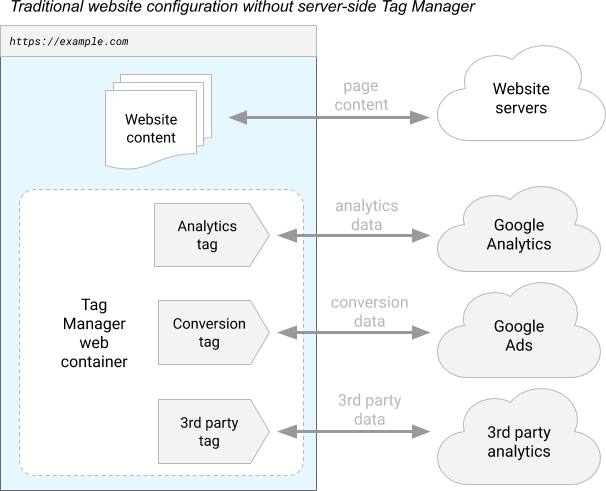
With client-side tagging, the more conventional approach, Google Tag Manager collects data on your website and sends it directly from the browser to marketing platforms like GA4, Google Ads, and many others.
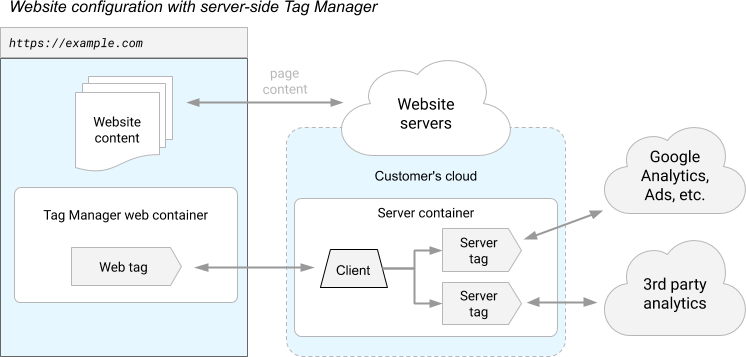
With server-side tagging, the browser first sends this information to an endpoint on a server you control – typically a GTM server container reached through a custom subdomain or a same-origin path on your main domain (we cover both options further down). This server receives the data, cleans it or adds to it, and then sends it on to GA4 and your other platforms. You can think of it as a central hub that manages data between your website and your analytics tools.
So why is this a good plan, and what are the advantages?
-
Better data quality
Because requests go to your own domain first (whether through a subdomain or a same-origin path), they’re less likely to be blocked than third-party endpoints, and you can set more reliable first-party cookies.
-
Better data governance and privacy
You have complete control over which data is sent to your marketing platforms. You can remove Personally Identifiable Information (PII), standardize UTM parameters, or add business-specific information to the data before it leaves your website.
-
Faster navigation
Running fewer third-party scripts in the browser, especially when sending data to many marketing platforms, will reduce your website’s loading time.
-
Centralized control
One server can send the same clean event to GA4, Google Ads, and other platforms, so you don’t need to repeat complex logic in the browser.
-
Easier monitoring
With all your events passing through one server, you have a single place to check logs, spot errors, and confirm data is flowing correctly.
Keep in mind: the way GA4 shows reports won’t change; only the way the data gets to GA4 will.
When should you use server-side tagging?
There are several scenarios where it’s worthwhile. Do any of these apply to you?
- You have a lot of traffic and want to make sure ad blockers don’t ruin your data.
- You need to be compliant (for example, you must remove PII or carefully control cookies).
- Your front-end has a lot of tags, and you want to move some of the work off the browser.
- You plan to send data to multiple platforms (GA4 and Google Ads, for example) and want a single, controlled place to send it.
Essentially, server-side GA4 with GTM is worthwhile when accurate, dependable data is essential to your business. However, if your website is small, doesn’t have many tags, and you don’t face compliance restrictions, then start with client-side tagging and consider server-side later if you start to have problems (or if your website grows).
Key components
In a server-side architecture, these are the main components and their roles:
A. GTM web container (client-side):
- Decides when to send an event and sends it using the Google tag.
- Points GA4 events to your server container URL, so they reach your own domain first.
B. First-party domain:
- Points to your GTM server container on Google Cloud Platform (GCP). It’s first-party, so it looks like your website to the browser.
- It’s more resilient to generic blockers and enables better cookie behavior than calling third-party endpoints.
C. GTM server container (server-side):
- Receives the browser’s events and optionally cleans or enriches the data.
- Forwards those events to GA4 with server-side tags.
D. GA4 property:
- Receives the final events.
- Powers your reports, audiences, and BigQuery export just like a browser-only setup.
Data flow (step-by-step)
Here’s how all the different parts of a server-side architecture work together and manage data:
To illustrate even more clearly how different this is from client-side, here’s Google’s example of a traditional website configuration without server-side tagging…
… and an example of a website configuration with server-side tagging:
Implementation guide
1) Setting up the GTM server container
The first step is to create the server container in Google Tag Manager:
-
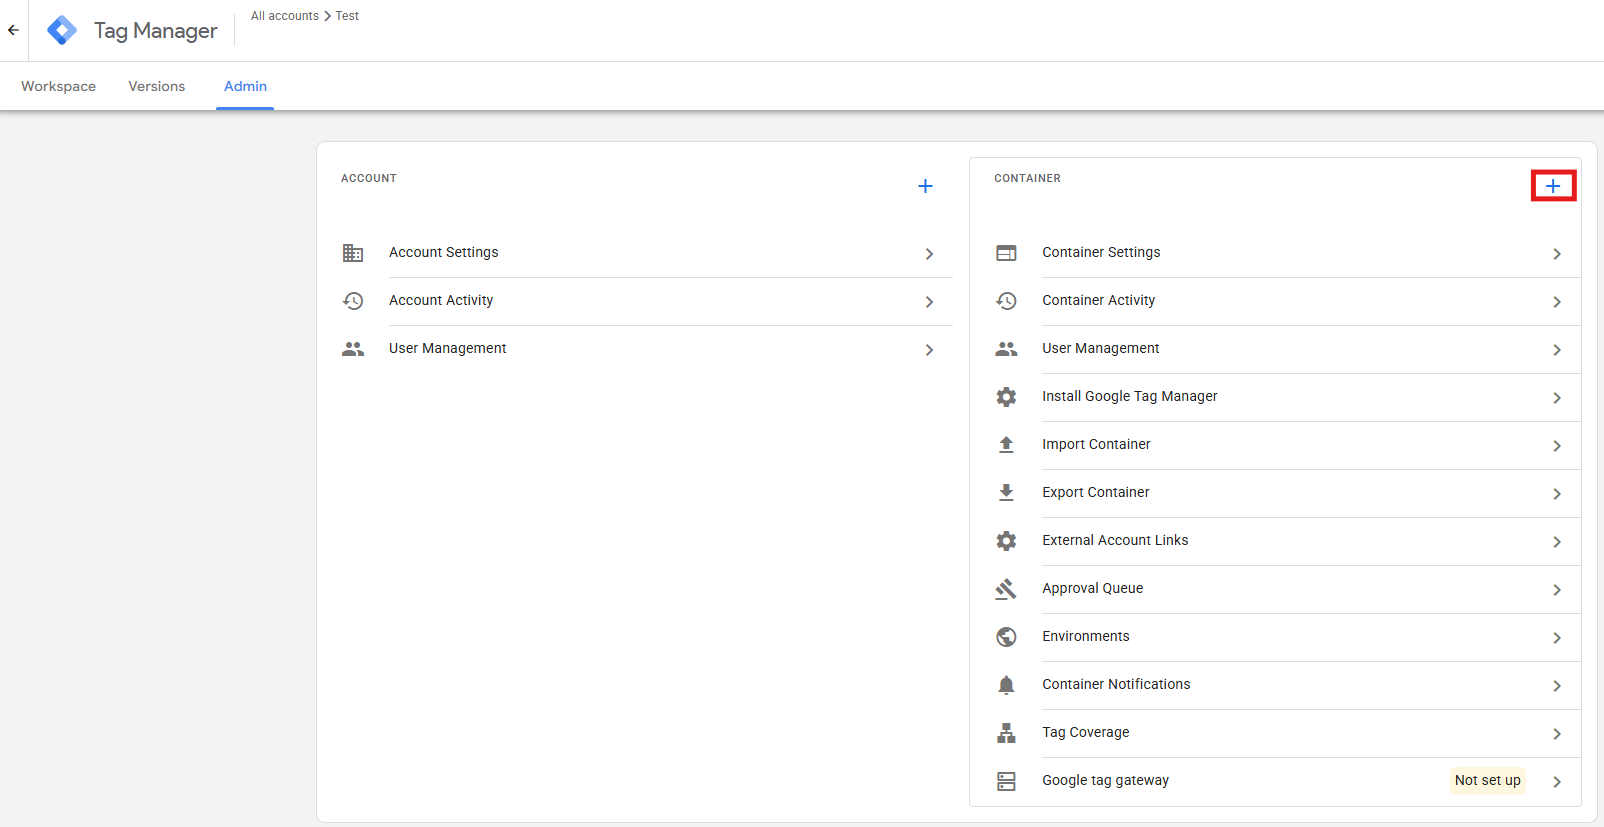
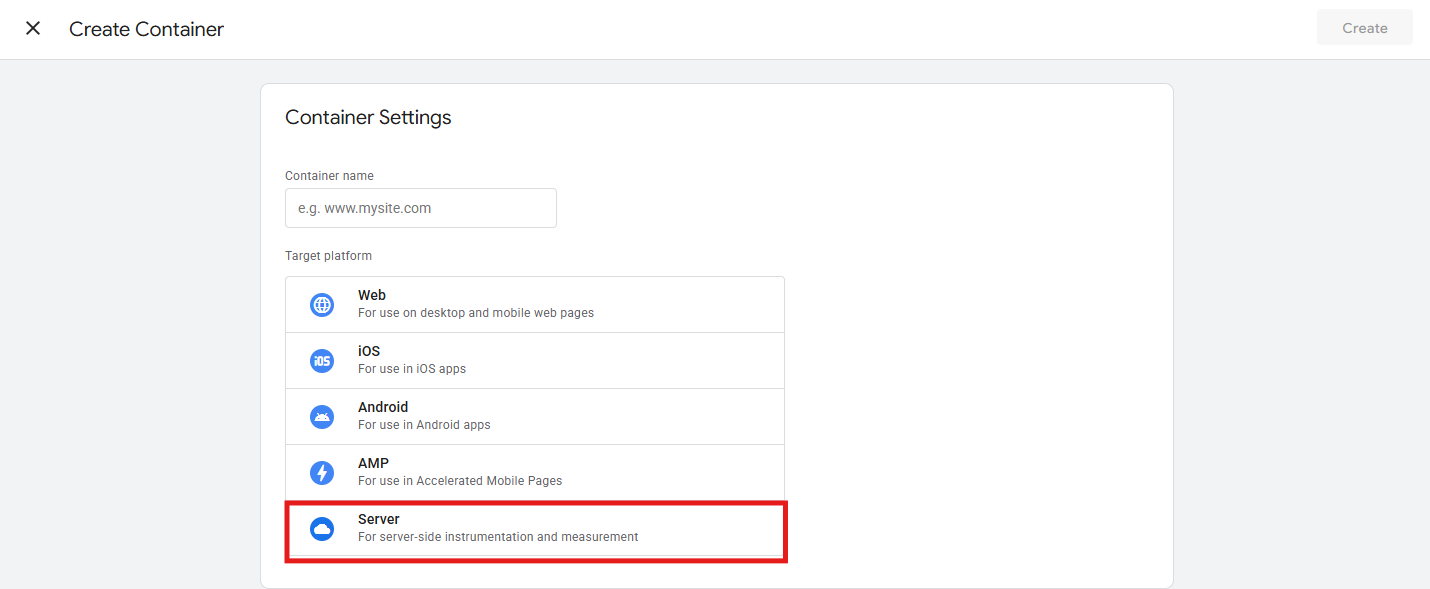
Go to the Admin tab and click on + to create a container.
-
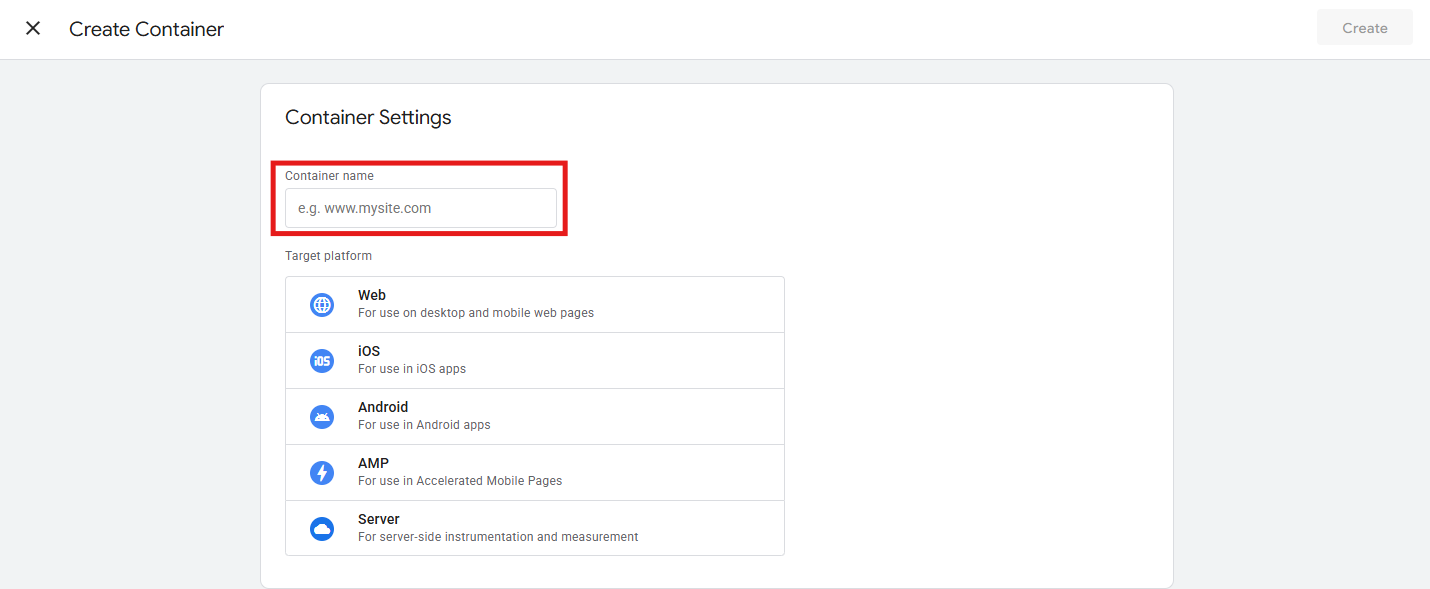
Define the container name.
-
Under Target platform, choose Server and click Create at the top.
-
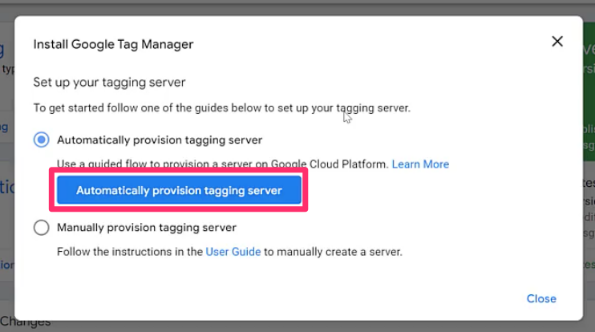
A message will pop up regarding the setup of your tagging server. Click Automatically provision tagging server to use Google Cloud Platform’s Cloud Run as the hosting provider, which is the default and simplest setup (if you wish to use other hosting options like AWS or Azure, proceed with the manual process).
-
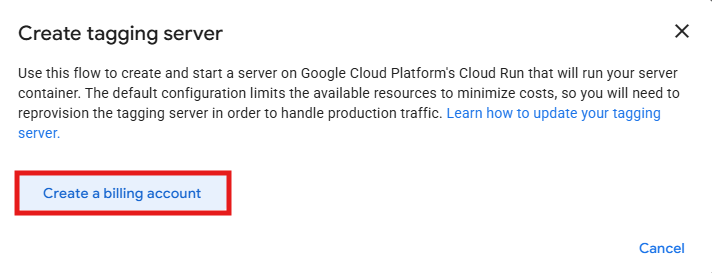
If you don’t already have a GCP project and billing account, create them now by clicking Create a billing account, which will take you to Google Cloud Run.
-
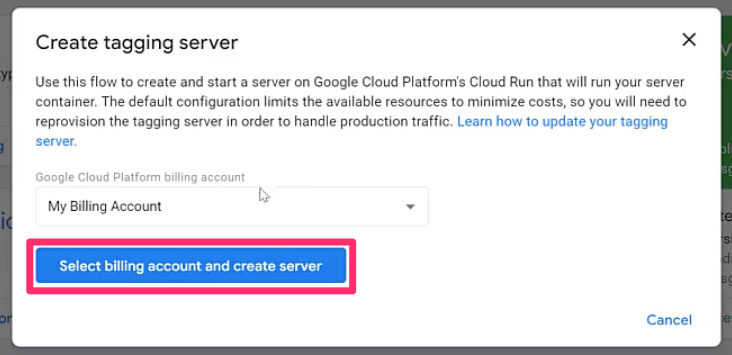
When you finish that process, back in GTM, select the billing account you just created, enable required APIs, choose a region, and proceed.
-
Then, you’ll get a pop-up message in your GTM container with important data about your tagging server (like Container Configuration, GCP Project ID, and Default URL), which you can check at any time by clicking the container ID. That temporary URL is exactly what you need to point to your first-party domain in the next section.
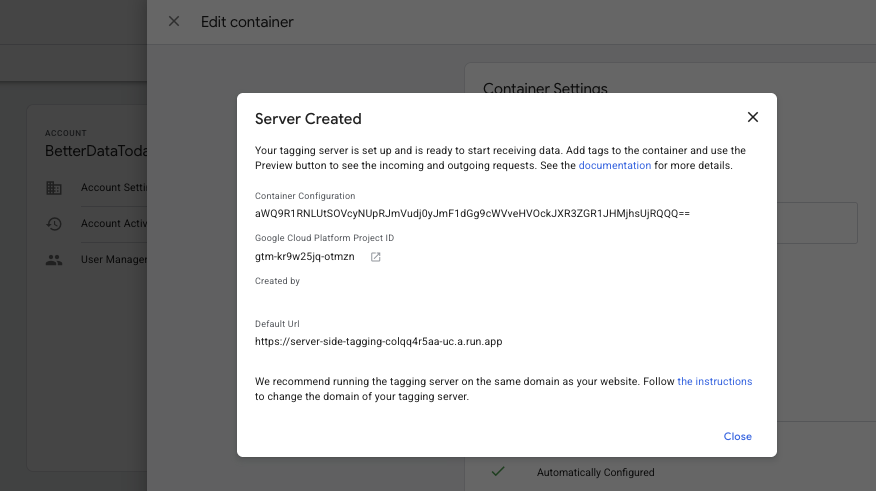
2) Configure a first-party domain for the server
To ensure your cookies are durable and your requests are treated as true first-party, the tagging server should be hosted on the same domain as your website rather than on the default Cloud Run URL. You can do this in one of two ways.
Option A: Custom subdomain via DNS
This uses Google’s domain mapping tool to map a subdomain directly to your Cloud Run service:
-
In the server container, go to Admin > Container Settings.
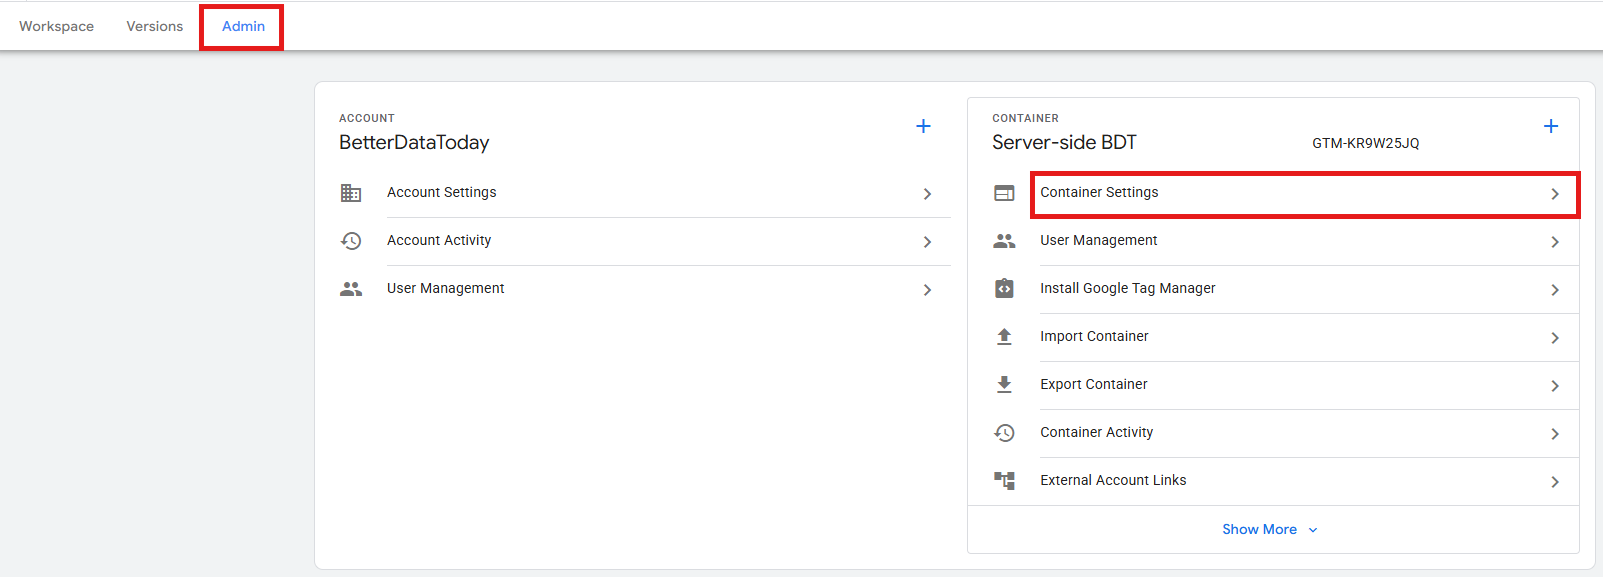
-
Under Server container URLs, remove all previous URLs (this is necessary because all server container URLs must share the same path). Then, click Add URL and enter yours, including the path prefix. In the end, save.
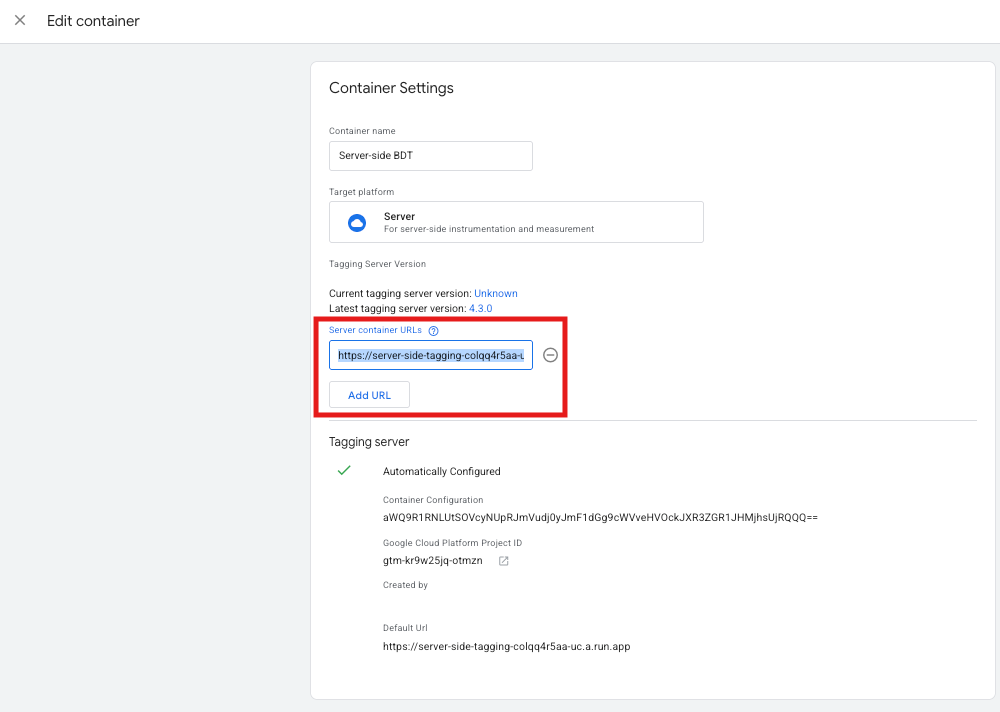
Keep in mind: if you don’t see Add URL in Container Settings yet, finish the automatic provisioning in step 1) and reopen the container.
-
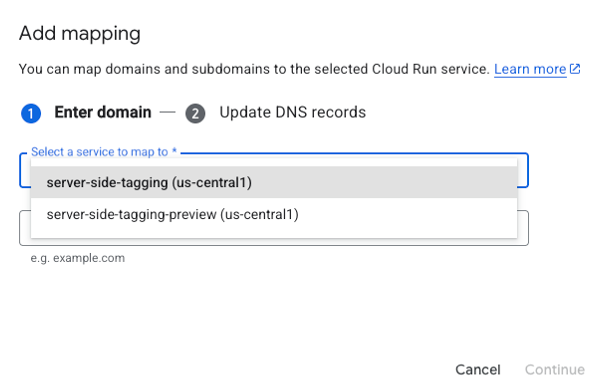
In the Google Cloud console, go to Cloud Run > Domain mappings > click Add mapping.
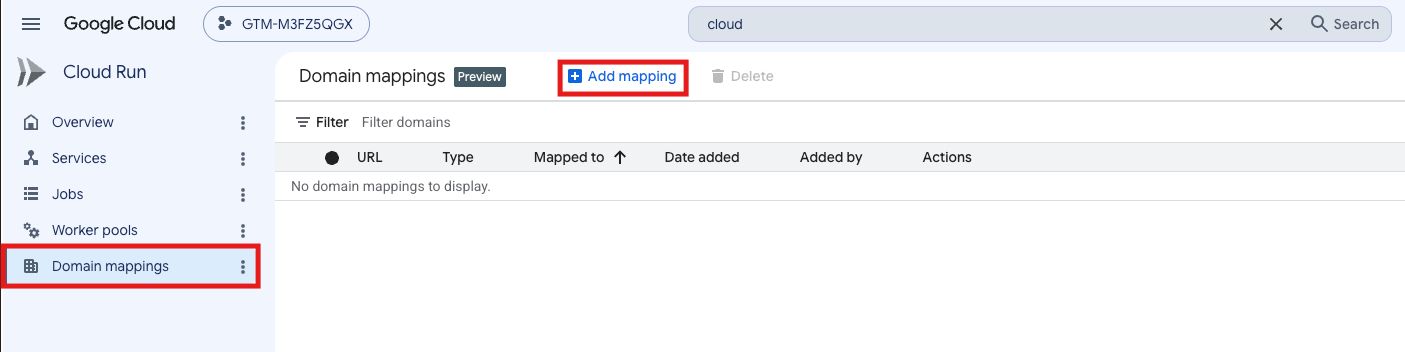
-
Select the service you want to map.
-
Select your verified domain, then specify the subdomain you want to use. Click Continue.
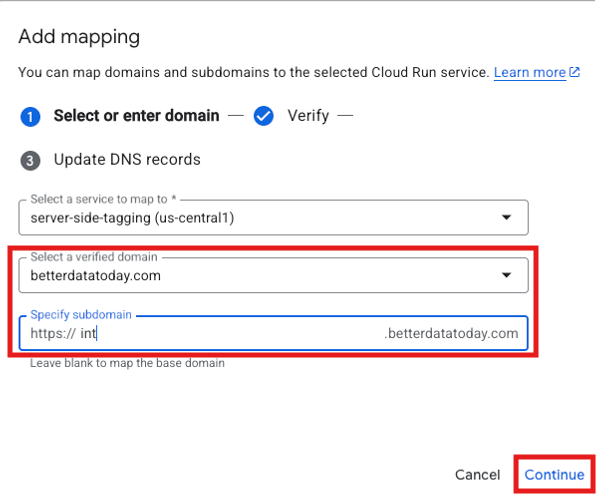
Keep in mind: if you haven’t verified the root domain with Google before, you’ll be shown a TXT record to add at your DNS host (this is the Verify step you see in the image above). Create those records at your DNS provider exactly as shown and wait until it verifies. If the domain’s already verified, then this step is skipped automatically.
-
Cloud Run will then show you the DNS record to add (typically a CNAME pointing to ghs.googlehosted.com). Add it at your DNS provider.
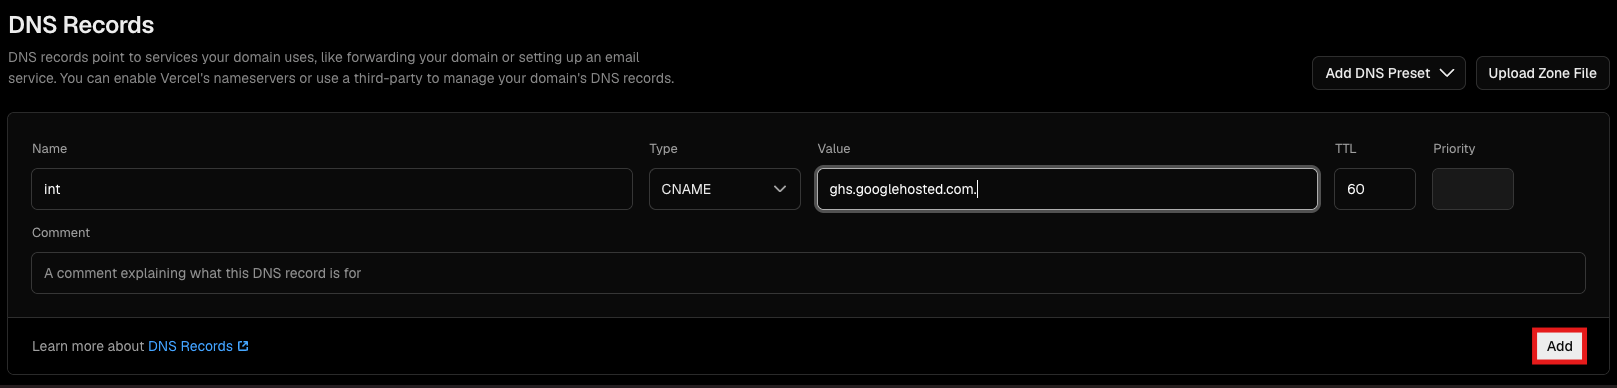
Keep in mind: TLS (Transport Layer Security) certificates will be automatically provisioned by Google once DNS resolves. This typically takes about 15 minutes, but Google allows up to 24 hours, so don’t assume something is broken if it’s not instant.
-
Then, for a health check before proceeding, visit your subdomain. You should see a minimal response. If the Cloud Run URL works but your custom domain doesn’t, DNS is still propagating or misconfigured. In that case, double-check the previous steps.
-
Next up is pointing GTM to your new subdomain. In your GTM server container, go to Admin > Container Settings.
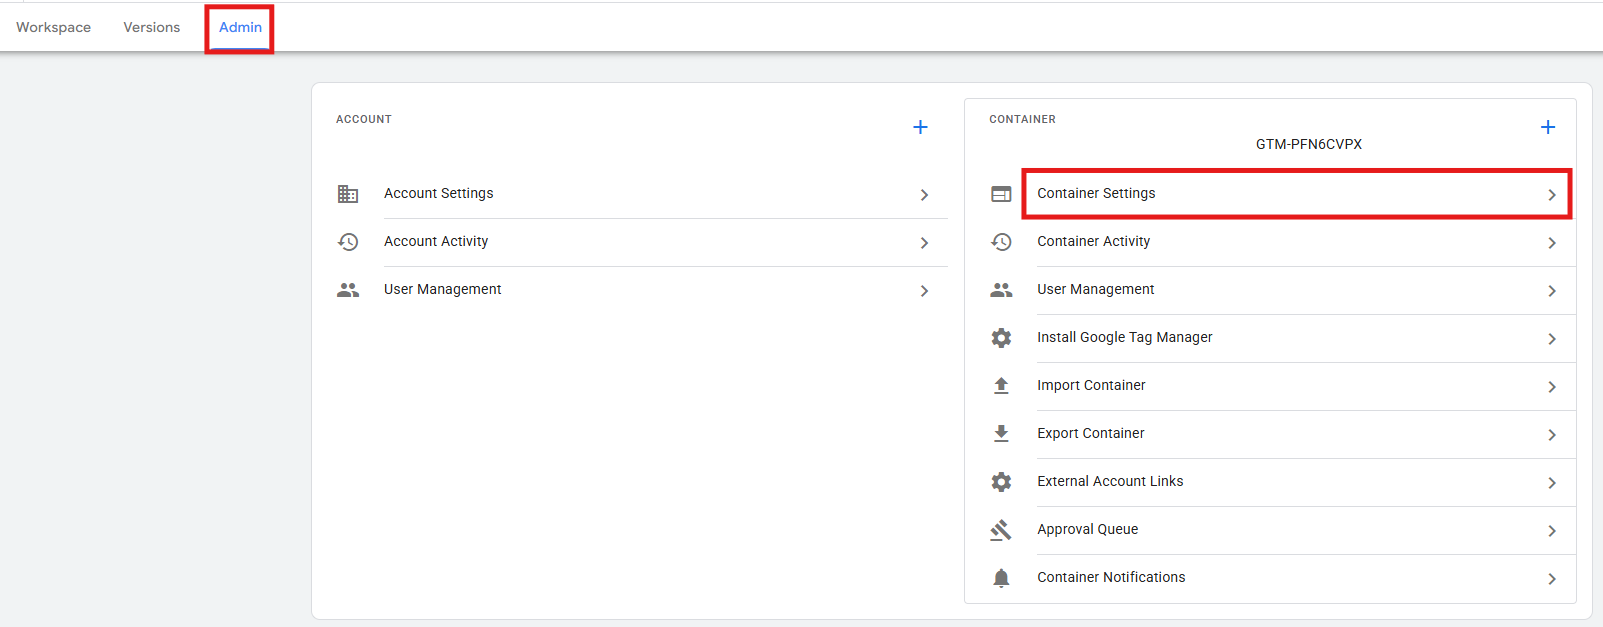
Set Server container URLs to your subdomain. Finish by clicking Save.
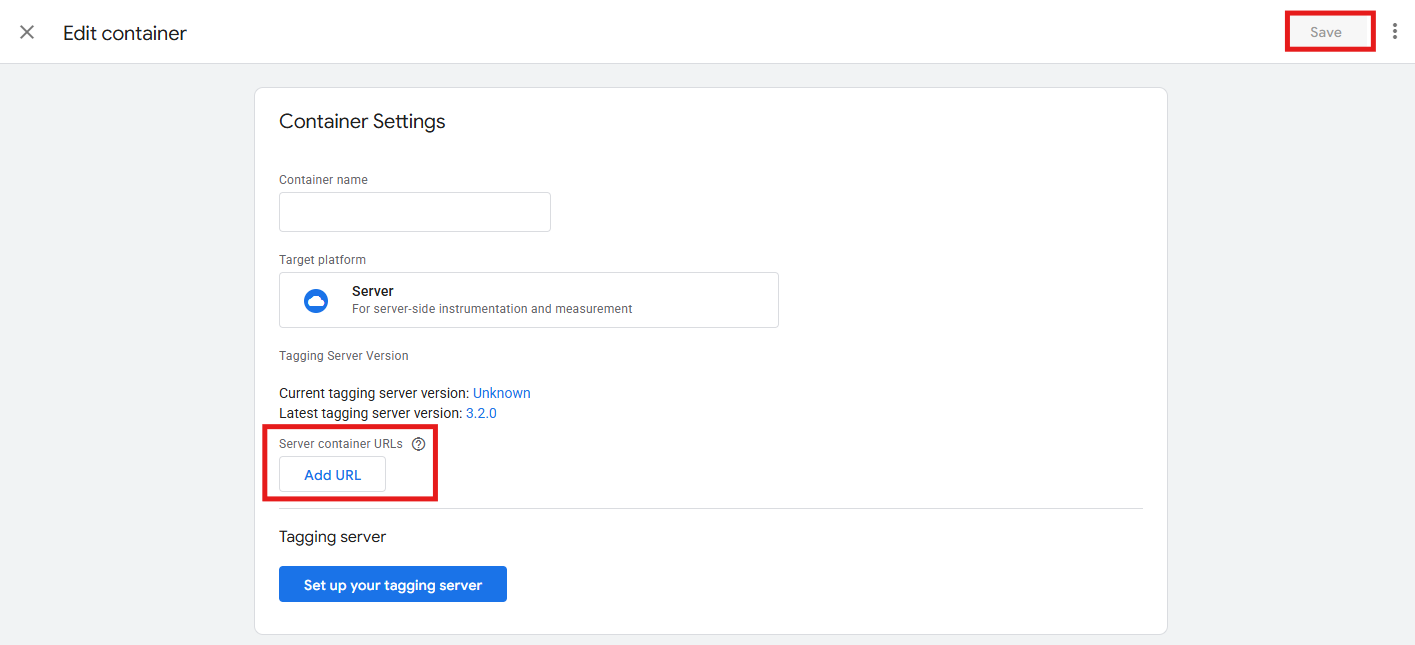
Option B: Same-origin via reverse proxy
Alternatively, you can have your hosting platform’s proxy or rewrite layer route requests via a path on the main domain (instead of a subdomain), without the need for DNS records. The example below uses Vercel, since that’s a common setup, but the same principle applies if you’re working with Cloudflare Workers, Nginx, or any platform that supports request rewrites:
-
First, add the rewrite. At the root of your project, edit (or create) your hosting platform’s rewrite config – for Vercel, that’s vercel.json:
{
  "rewrites": [
    {
      "source": "/data/:path*",
      "destination": "https://your-cloud-run-service-url.a.run.app/data/:path*"
    }
  ]
}
If a config file already exists with other settings, just add the “rewrites” key to it (don’t overwrite the rest).
-
Commit and push, so Vercel deploys to production.
-
Then, test the proxy. Open your domain in a browser like this “yourdomain.com/data/healthy”. The expected response is “ok”. A 404 or your site’s own error page means the rewrite isn’t live yet, or the path is being caught by your site’s own routing. In that case, check the deployment logs and confirm vercel.json is at the project root. Also, test with the “www” variant if that’s the canonical host (the URL you put in GTM must match whatever the site actually serves without redirecting).
-
Now, to point GTM to the new path, in the server container, go to Admin > Container Settings > Add your new same-origin URL (e.g., https://yourdomain.com/data) to the server container URLs. Keep your existing URL in the list for now as a safety net, and set the new path as the default. In the end, save.
-
Now verify that Preview works through the new path. In sGTM, go to Preview (the debug panel should show “connected”). In another tab, open your website and trigger a few events. Confirm they appear in the debugger and are claimed by the right client (GA4, etc.).
-
Then, you need to point the web-side tags to the new path. In the web container (or your gtag snippet), replace every reference to your old server URL with the new same-origin path. Consider:
- Google tag: update the server_container_url field.
- Any first-party gtm.js loading through the old domain.
- Any Meta CAPI (or other tags) that reference the server URL directly.
-
Publish the web container. Then, to make sure everything is working as it should, open the website in an incognito window and accept consent. Go to DevTools > Network and check for requests going to your new path and returning 200/204.
-
Confirm events arrive with correct data in Server Preview and in GA4 DebugView (here, confirm that geo data reflects your real location, which confirms IP forwarding is working through Vercel).
-
Check that cookies are being set server-side on your root domain, where applicable.
-
After a few days of clean data, remove the old URL from GTM’s Container Settings. Optionally, remove the old subdomain’s Cloud Run mapping and DNS records, or leave it in place as a fallback, since it costs nothing to keep.
Pro tip: if anything misbehaves, point the web container back to the old URL and republish. Both URLs hit the same server, so no data model changes are involved.
Comparing both options:
| Custom subdomain (DNS) | Same-origin (reverse proxy) | |
|---|---|---|
| Setup requirements | DNS access to your domain host | A hosting platform that supports rewrites (e.g., Vercel) |
| DNS records needed | Yes (TXT for verification, CNAME for the mapping) | None |
| Safari cookie durability | Capped at 7 days unless the server’s IP range matches your website’s | Not subject to the same IP-matching cap, since requests share the exact origin |
| Propagation/setup time | 15–60 minutes for DNS and TLS provisioning (sometimes longer) | Effectively immediate (live as soon as the deploy finishes) |
| Ongoing maintenance | DNS and TLS renewal (usually automatic, but tied to your DNS provider) | Tied to your hosting platform’s proxy/rewrite configuration |
| Portability | Works the same regardless of where the site is hosted | Depends on your hosting platform supporting path-based rewrites |
| Bandwidth/cost impact | None beyond existing Cloud Run costs | Tagging traffic counts against your hosting platform’s bandwidth (negligible for most sites, but worth watching on high-volume stores) |
3) Point your web GTM to the server
Now you’ll start sending GA4 events to your new first-party domain first, rather than sending them straight to Google. Proceed like this:
-
In your GTM web container, go to Tags and open your Google tag.
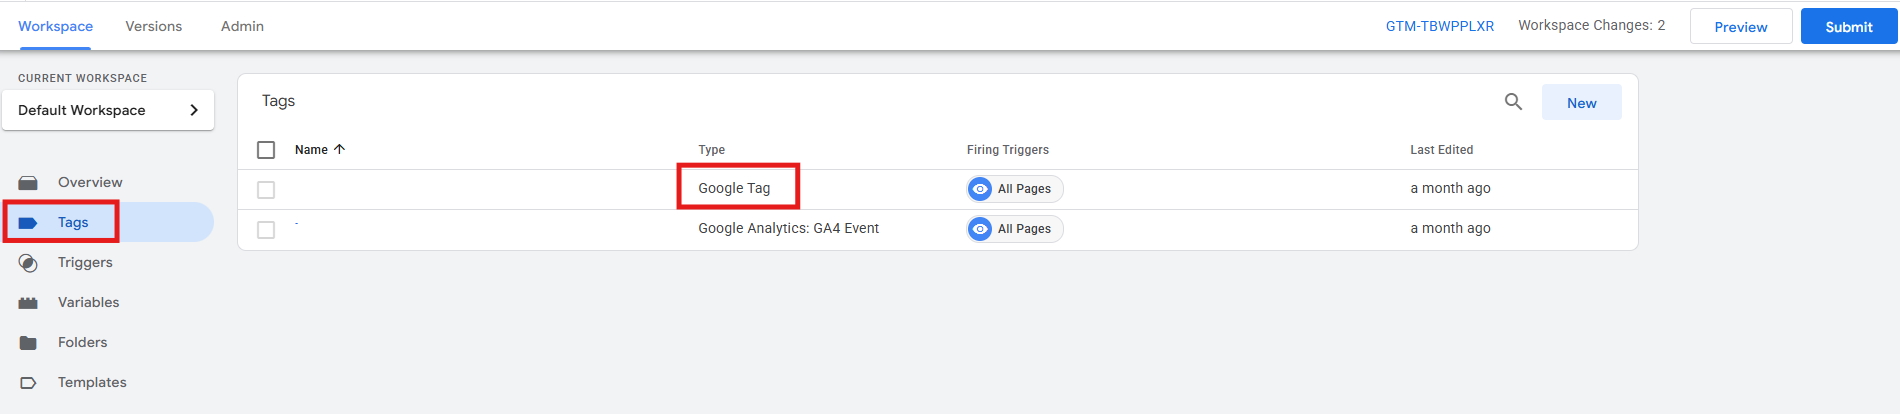
-
Under Tag Configuration > Configuration settings, add the server_container_url parameter. The value should be the URL of your server. In the end, save.
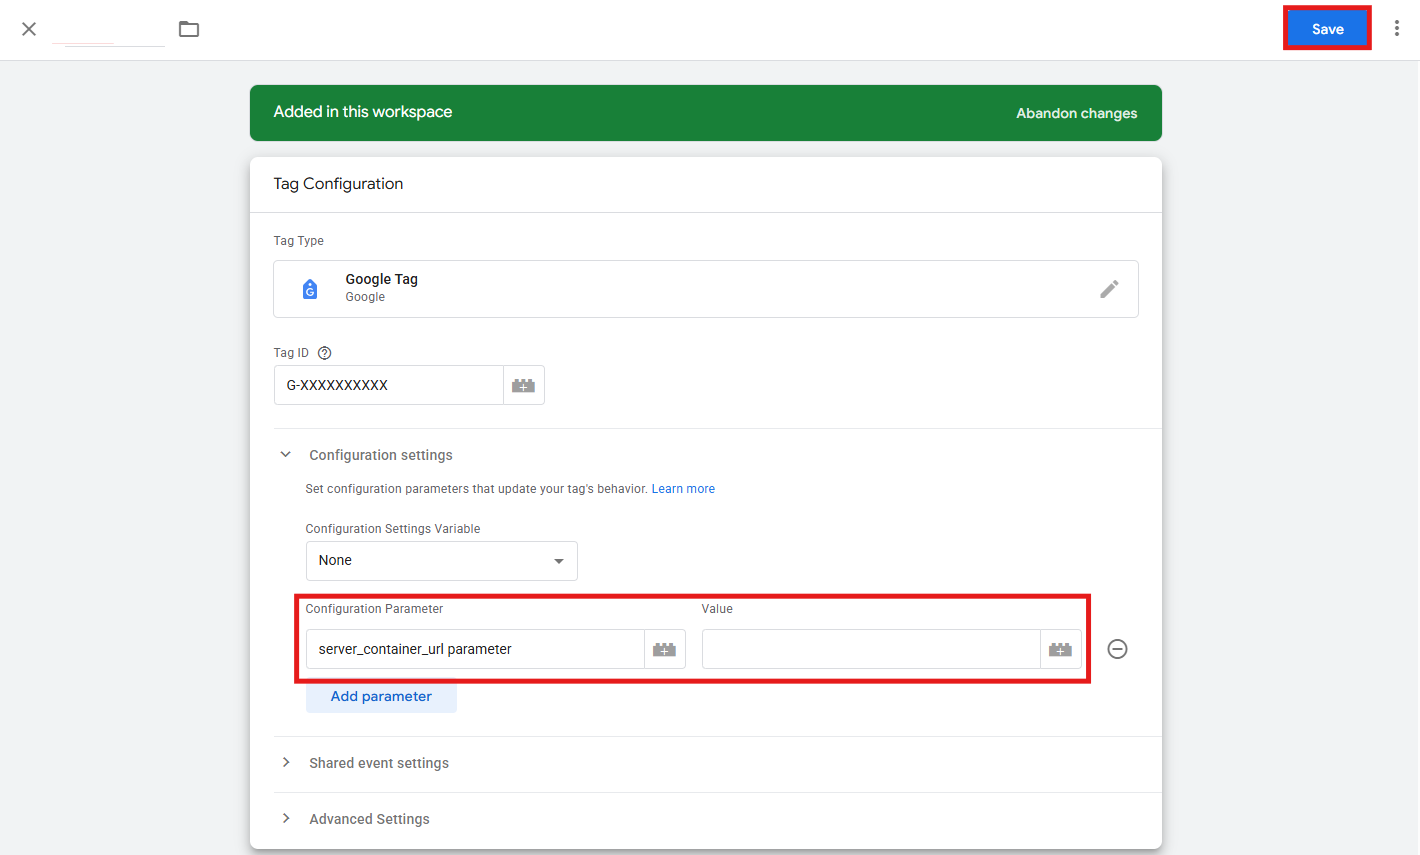
-
To guarantee that this configuration applies to all your GA4 events (so they inherit the server container URL), make sure your Google tag fires on Consent Initialization – All pages. If you must override on a specific event, you can also add server_container_url as an event parameter in that event tag.
-
Still in your web container, test in Preview mode (Tag Assistant). Then, open your server container and click Preview as well. You should see incoming requests from your pages.
4) Forward events to GA4
By now, your browser is already sending events to your server, so the server needs to understand what those events are and forward them to GA4. That’s where a GA4 client comes in. It’s designed to “listen” to requests reaching your server, extract details from those it recognizes as GA4 requests, and gather the information. When you create a server-side container in Google Tag Manager, the GA4 client is included by default – you can check this in the Clients section.
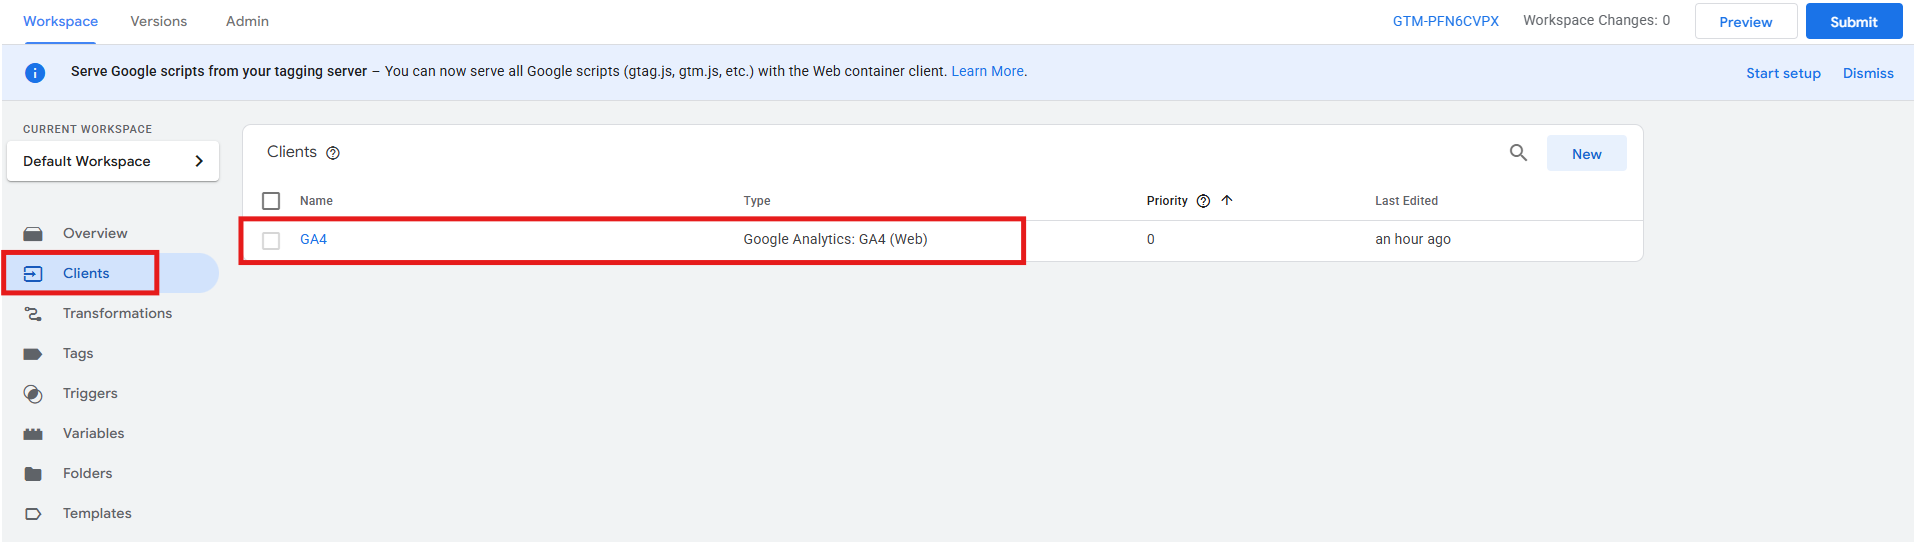
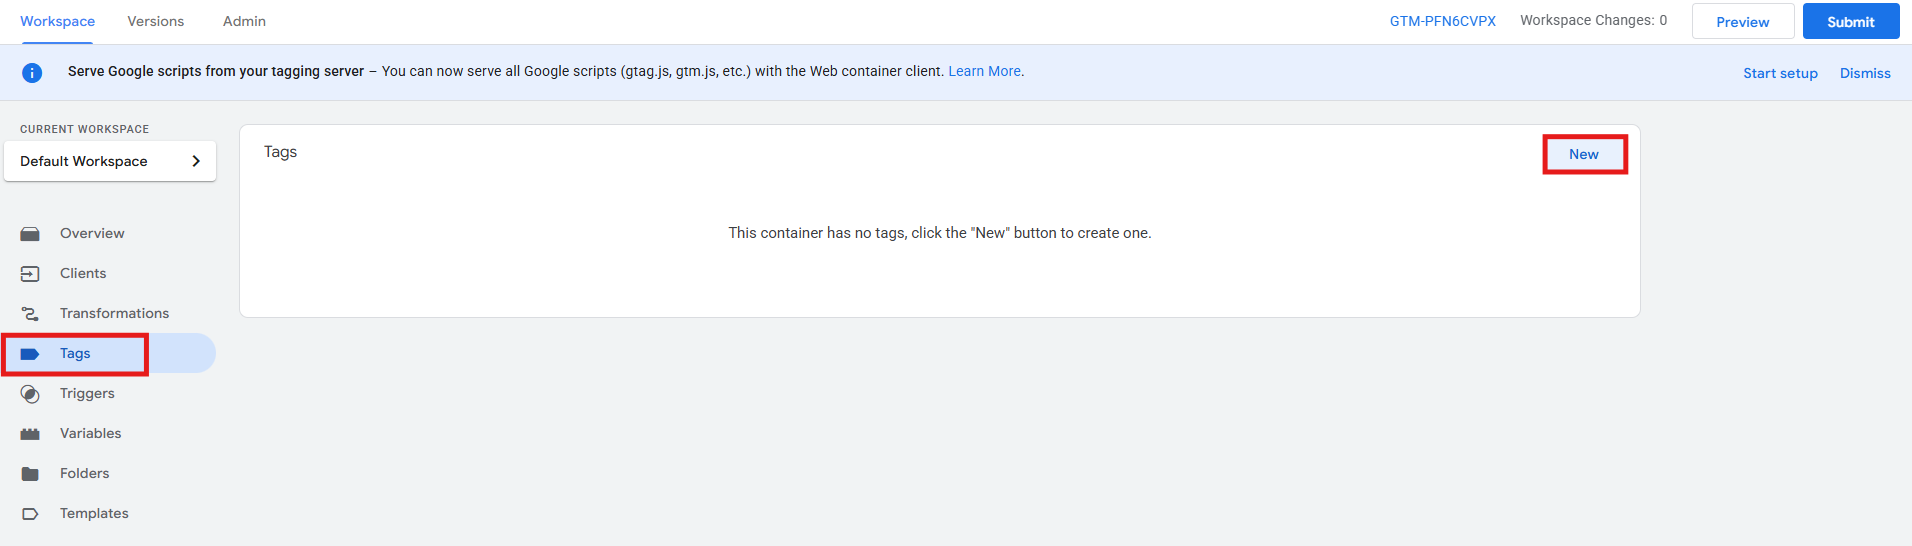
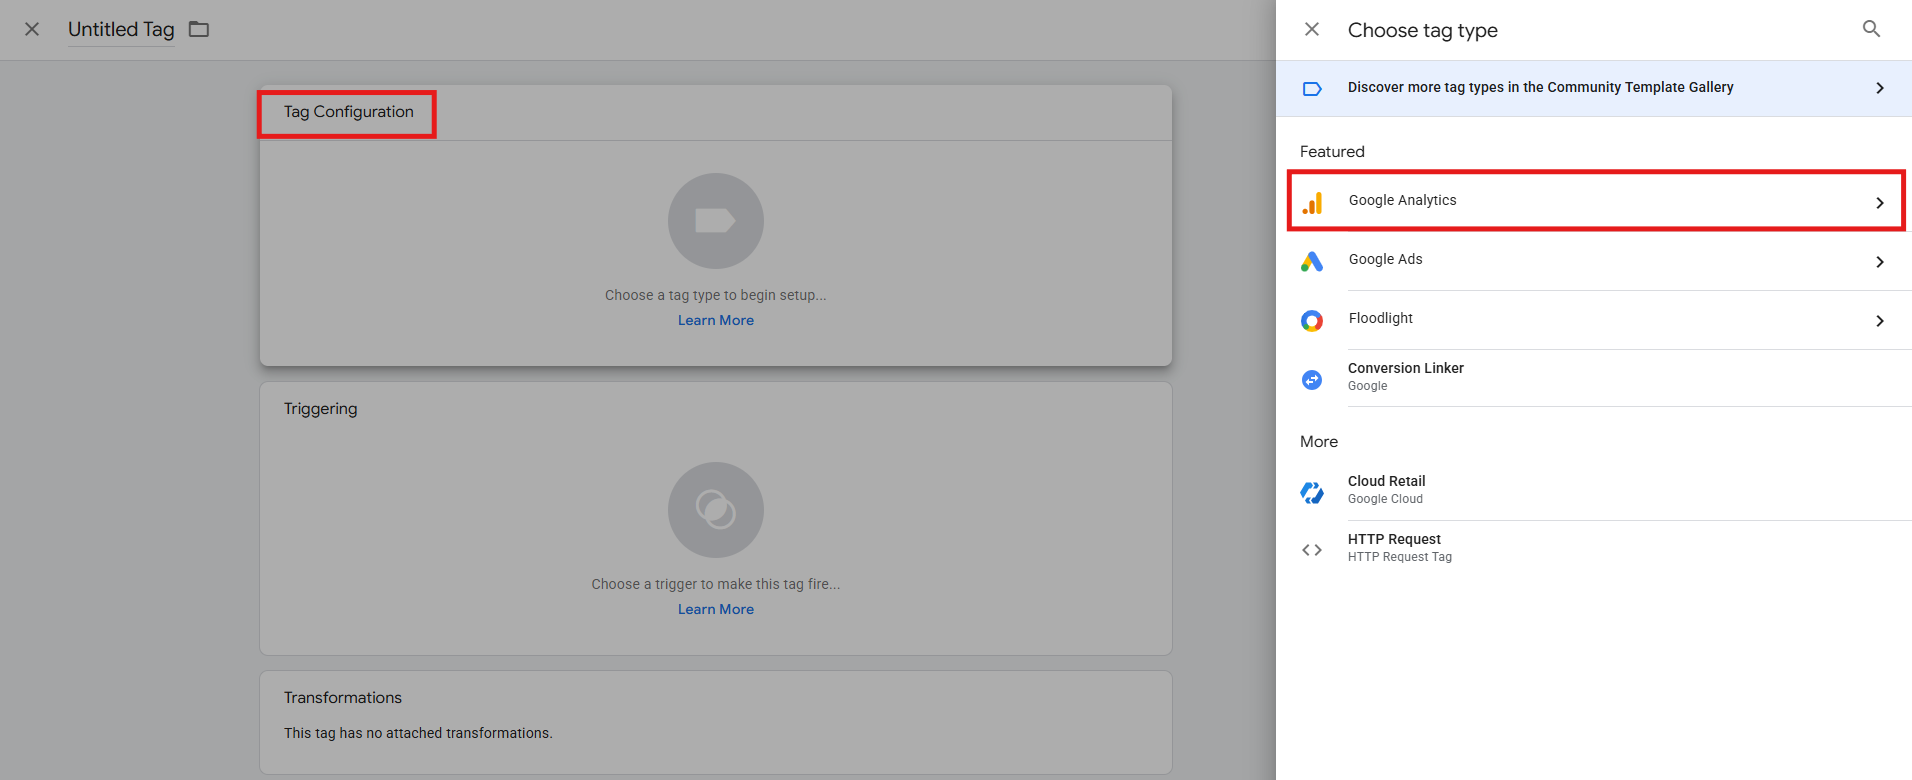
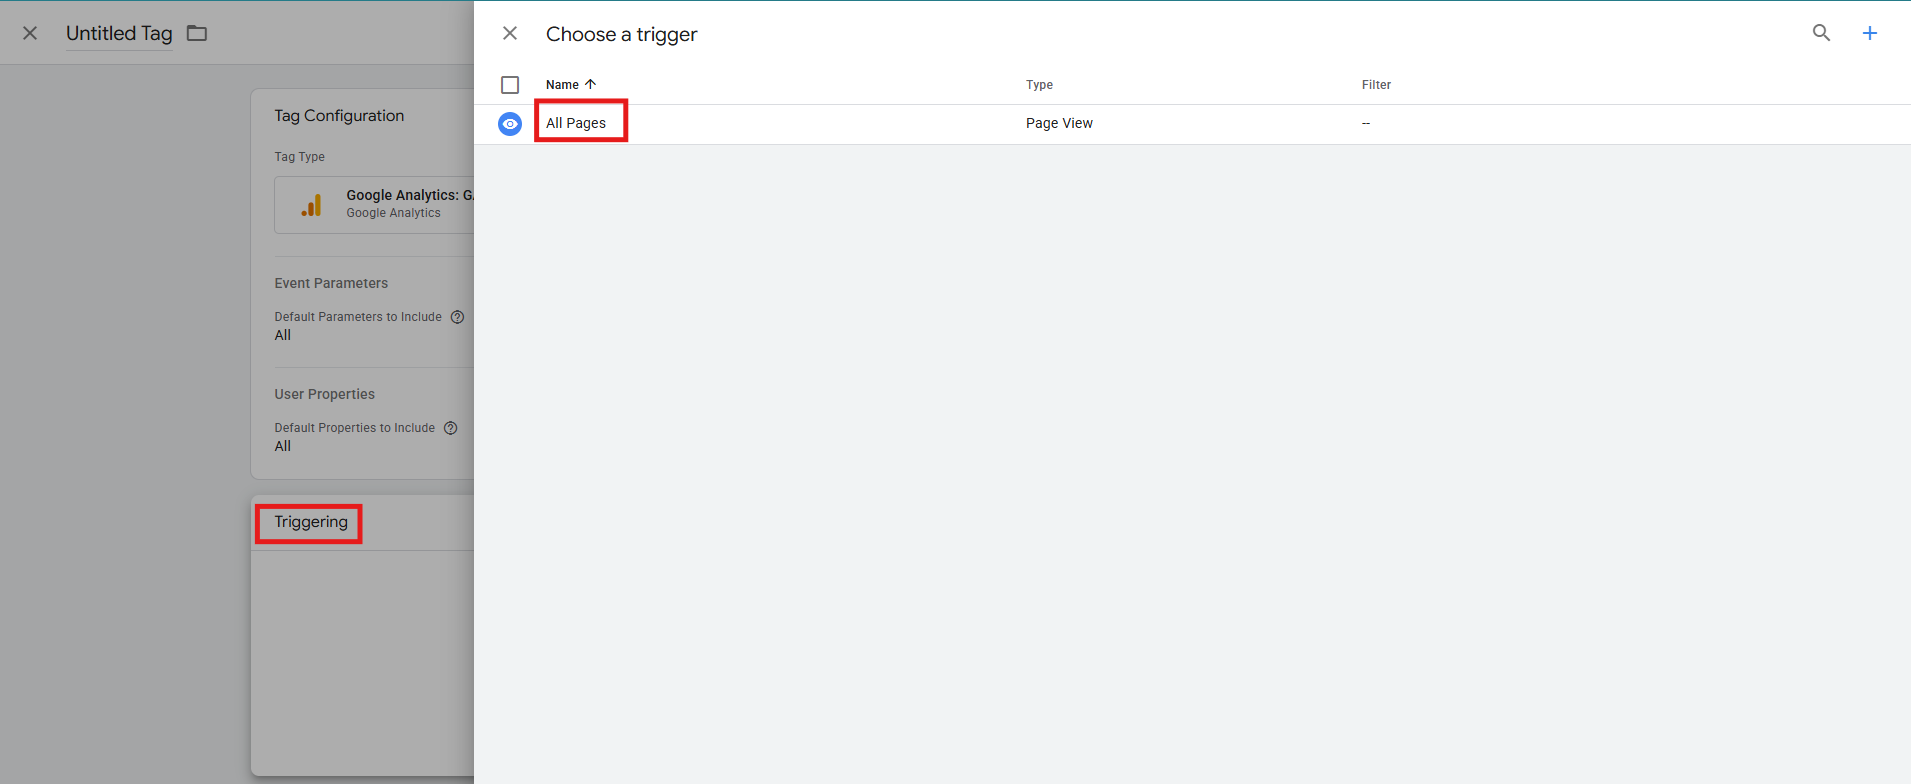
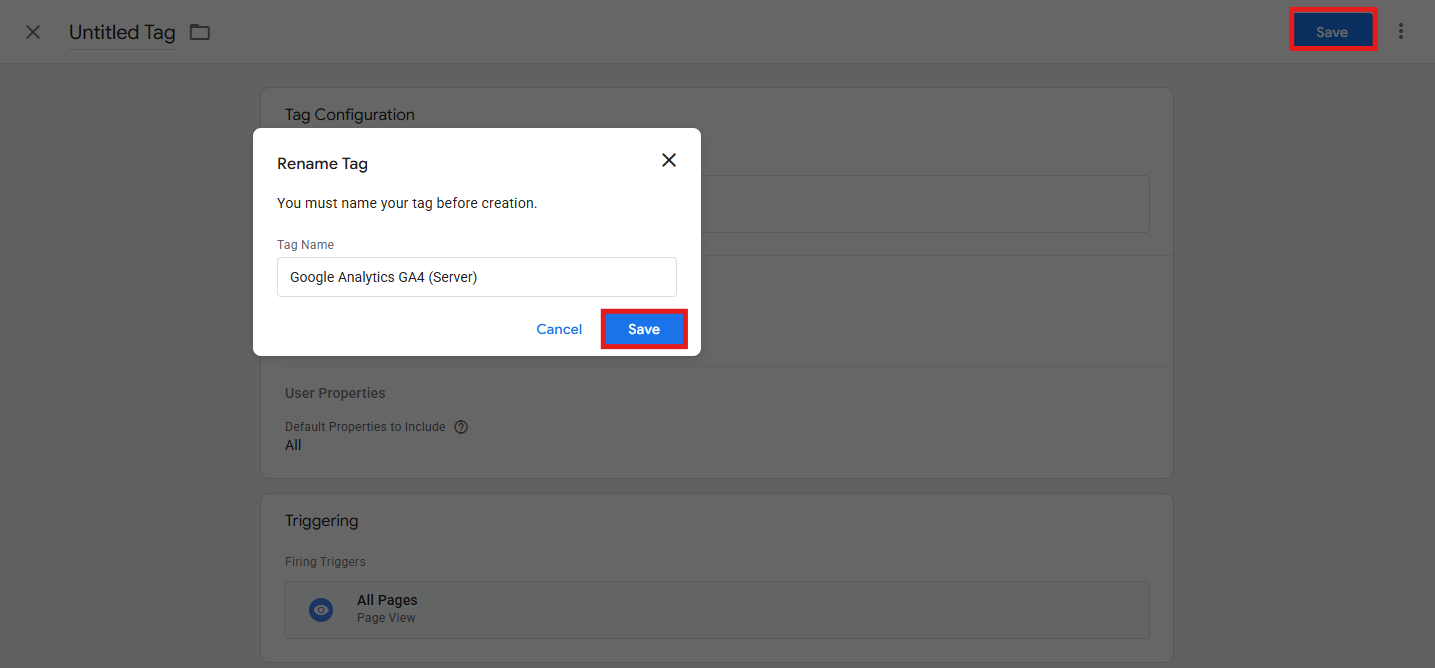
The next step, then, is to create the GA4 server tag:
-
Go to Tags > New.
-
Under Tag Configuration, choose the tag type Google Analytics: GA4.
-
You can simply create the tag and leave Measurement ID empty, so the tag forwards each request to whatever measurement_id came with the hit. Under Triggering, select All Pages.
-
Save and, if you haven’t done it before, set the tag name to something like Google Analytics GA4 (Server).
-
In the server container Preview, click an incoming request and verify the GA4 client has claimed it and that your GA4 server tag fired.
-
In GA4 > Admin > Data display > DebugView, confirm events appear.
Consent Mode management
Consent for tracking is still handled on the browser side (client-side). Your server container doesn’t decide on consent; it just receives the consent status the browser sent along with the data and passes it to GA4. So, continue to set and control consent in your web GTM container:
-
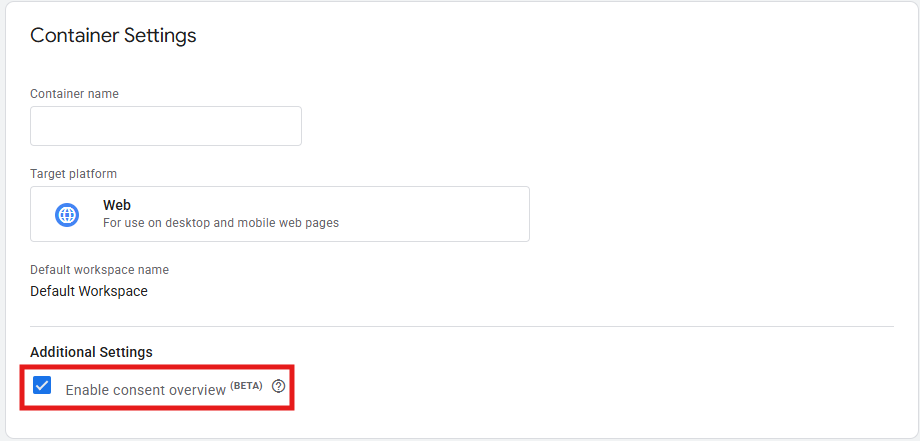
Start by enabling consent in the container. Go to Admin > Container Settings > make sure the option Enable consent overview is toggled.
-
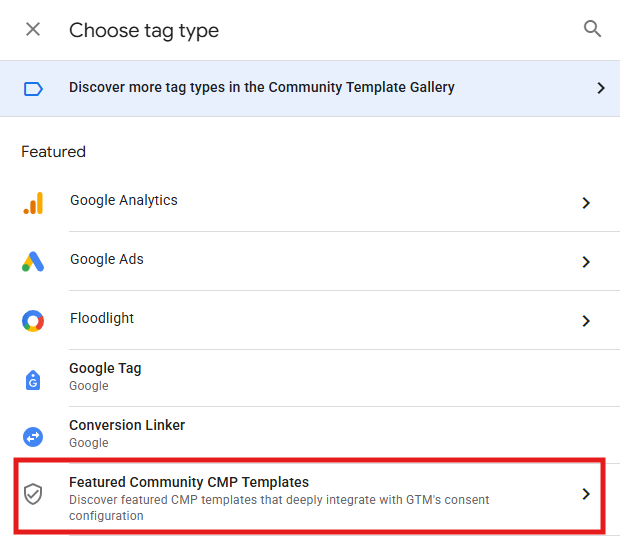
Now, use a Consent Management Platform (CMP) template to set defaults and updates. Go to Tags > New > Tag Configuration > Featured Community CMP Templates > Choose your CMP. If your CMP isn’t listed, use the vendor’s official GTM template or their documented GTM instructions for Consent Mode v2.
-
Follow the CMP template’s fields to enable Google Consent Mode v2 (it must include ad_storage, analytics_storage, ad_user_data, ad_personalization). Configure the template to send a default consent state (typically denied) and region rules, if applicable.
-
Back in Triggering, set the CMP tag’s trigger to Consent Initialization – All pages so it runs before the Google tag.

-
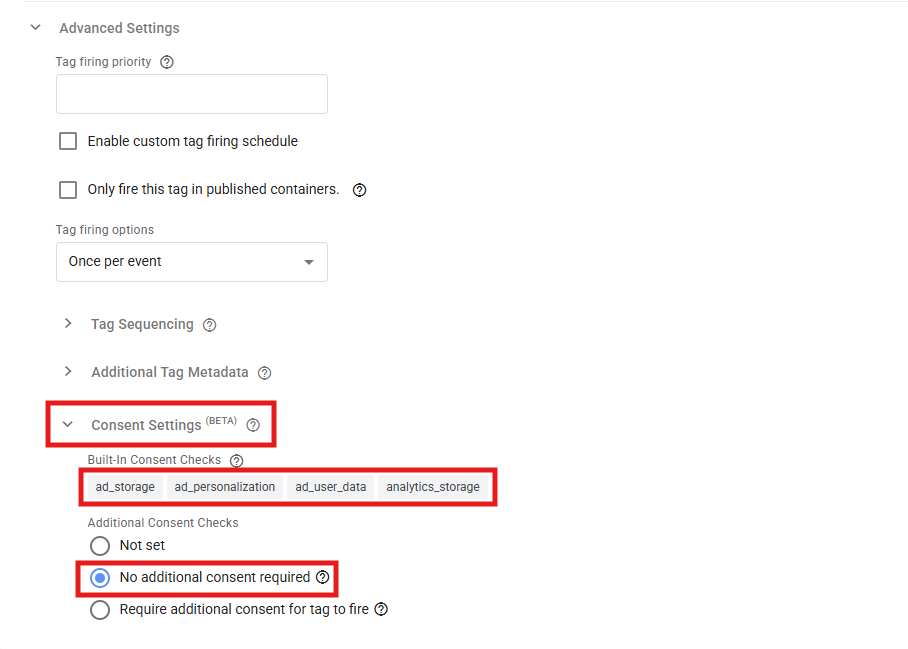
Now you have to make sure your Google tag respects consent. Go to Tags > Google tag > Tag Configuration > Advanced Settings > Consent settings > make sure the Built-in consent checks include ad_storage, analytics_storage, ad_user_data, ad_personalization. In Additional Consent Checks, you can opt for No additional consent required.
-
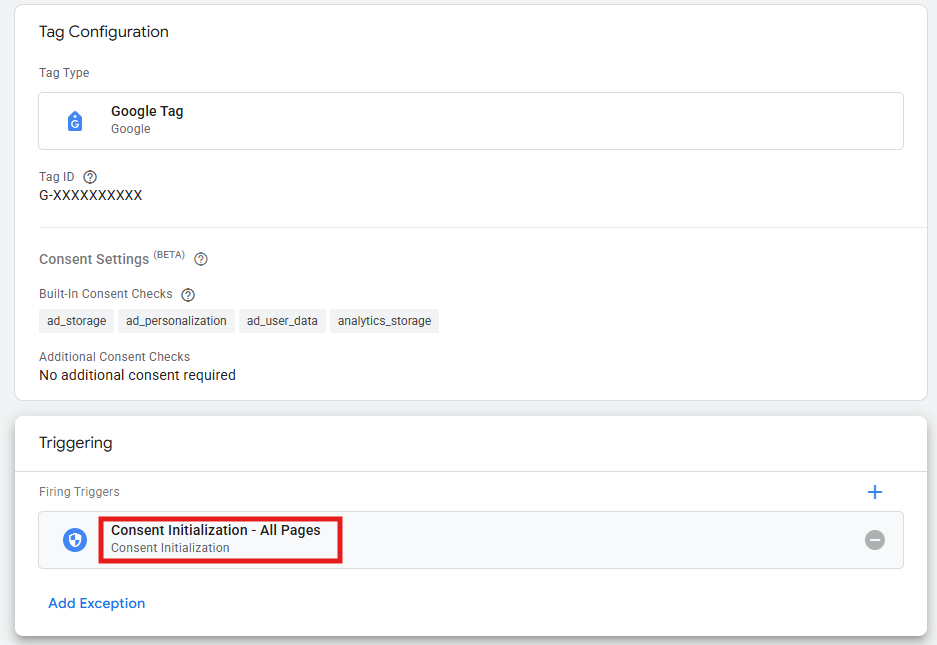
Back in Triggering, make sure the tag fires on Consent Initialization – All pages. In the end, save.
-
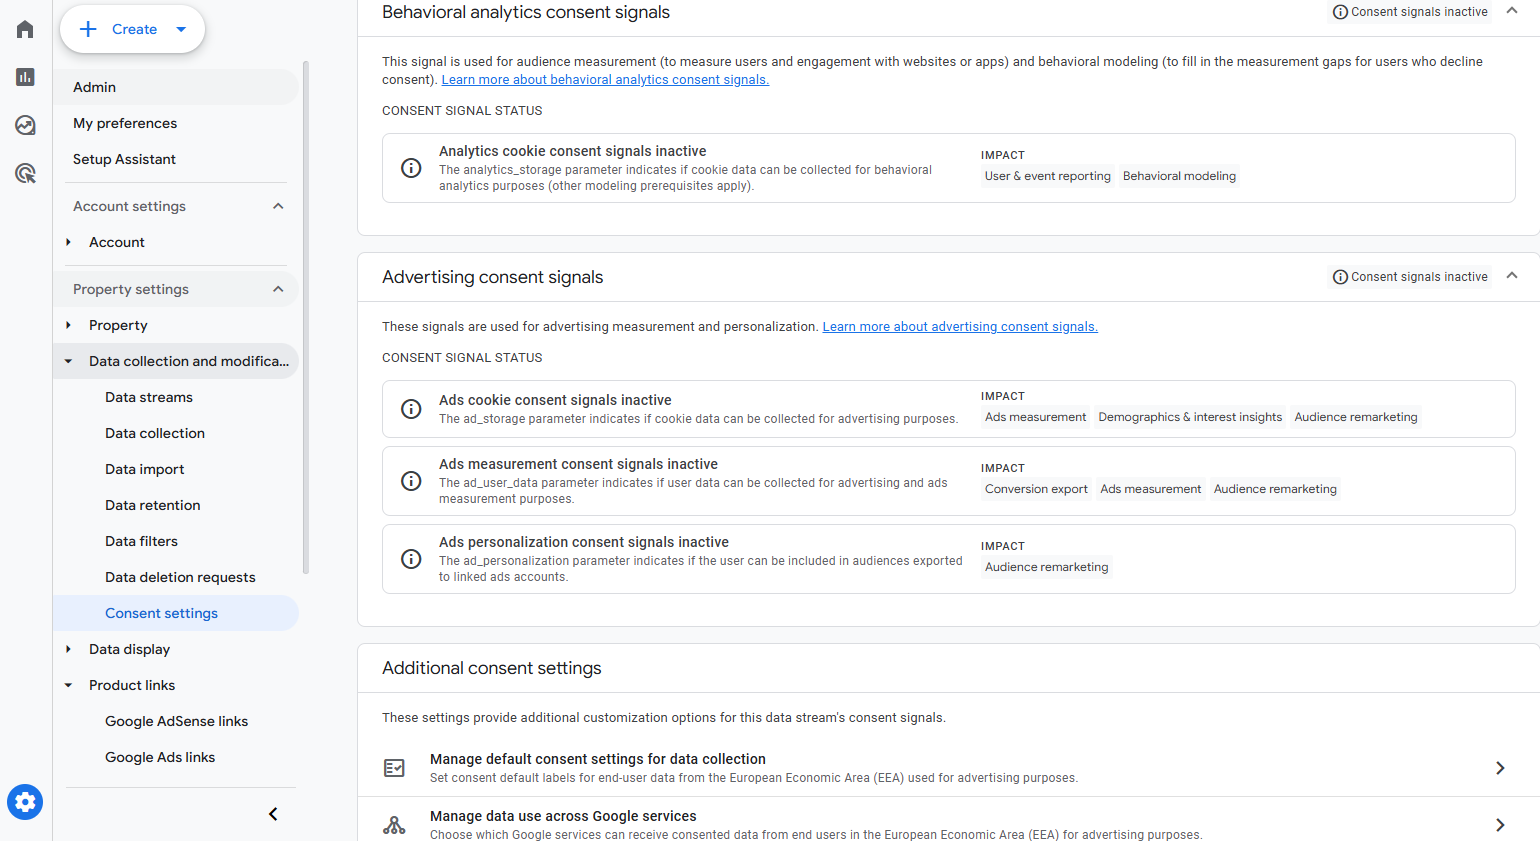
Then, in Preview mode (Tag Assistant) > Consent tab > You should see a default state (often “denied”) set by the CMP before the Google tag loads, and an update after the user chooses.
-
In GA4 > Admin > Data collection and modification > Consent settings, confirm that Consent Mode is detected for your property.
Migration plan
If you’re getting ready to switch from client-side only to server-side tracking, and want more specifics on how and when to do it, we suggest this approach:
Phase 1: Parallel run (1-2 weeks)
- Keep your current client-side GA4 tracing in place.
- Add server-side tagging (server container URL) and forward the data to a test GA4 property or a separate stream.
Phase 2: Compare and fix (during parallel run)
- Compare the numbers of purchases and key events.
- Fix missing parameters (e.g., currency, value).
- Deduplicate purchases by making sure each transaction has a unique transaction ID and that you aren’t firing a purchase event both client-side and server-side for the same order.
- If you’ve created custom tracking for page views, scrolls, or clicks in GTM, get rid of any overlap with GA4’s Enhanced Measurement by turning off the corresponding Enhanced Measurement item in GA4’s data stream settings.
Phase 3: Cutover (1 day)
- Switch your main reporting to the GA4 property or stream that’s receiving data from the server. If you used a test GA4 property, make sure the Admin settings (links, audiences, BigQuery export) match; if you used a separate stream, tell your reports and Explorations to use it (or point your dashboards at it).
- In Google Ads and similar platforms, go to your conversion settings. For each goal, mark exactly one source as “Primary” (either the GA4 conversion imported from your server, or the Google Ads tag itself) and keep the other as “Secondary” for two to four weeks. If you switched GA4 properties, reconnect GA4 to Google Ads, and republish your audiences.
- Pause or archive client-side GA4 event tags you replaced and keep the basic Google tag. Use version and notes in both GTM containers.
Phase 4: Post-cutover monitoring (2 weeks)
- Daily: monitor key events, revenue, unexpected spikes or drops in data, and 404 errors in server logs.
- Weekly: compare the total number of conversions from Ads with the total in GA4, broken down by campaign.
- If you need to go back to the old system: reactivate the previous client-side GA4 event tags; in Google Ads, restore the “Primary” source to what it was before; keep server-side tracking while fixing the issue, then repeat the checks from phase 2.
Quality Assurance (QA), security, and governance checklist
Once you’ve set up server-side tagging, here’s how to verify it’s working correctly and safely:
-
Preview your server container
In GTM, select your server container and use Preview mode to ensure the GA4 client receives the events you expect and that the GA4 forwarding tag fires only once per event.
-
Use GA4’s DebugView
Use this feature to be certain your events are showing up with the necessary parameters (such as value, currency, or transaction ID).
-
Watch out for duplicates
Make sure no page views, scrolls, or clicks are logged twice. This can happen if Enhanced Measurement is doing the same thing.
-
Ensure attribution parity
In the new server-side architecture, double-check that the lookback windows and counting methods are the same as before.
-
Don’t forget e-commerce items
If you have an online store, make sure product details are reflected in the event parameters (like purchase, add_to_cart, or view_item).
-
Use the Principle of Least Privilege (PoLP)
Give GTM users only the access they absolutely need, and don’t grant Admin access to many people.
-
Implement version control
Every time you publish a change, give it a descriptive name and add notes explaining who made it, why, and what changed.
-
Enforce PII policy
Don’t let personal information (like e-mail addresses, phone numbers, or names) appear in any of the data. Use server-side rules to remove that info and block anything that looks suspicious.
-
Audit regularly
Quarterly review your tags, clients, variables and, depending on which domain setup you used, either your DNS records or your proxy/rewrite configuration.
Troubleshooting guide
A few common issues may come up when you’re setting up server-side tagging. Discover why they happen and how you can quickly fix them:
| Symptom | Likely cause | Quick fix |
|---|---|---|
| sgtm. 404s or SSL error (option A) | DNS is not propagated or has wrong records. | Re-check DNS values. Wait for full propagation. Re-verify in GTM. |
| sgtm. 404s or SSL error (option B) | The rewrite isn't live, or the path is being caught by your website's own routing. | Check deployment logs, confirm the configuration file sits at the project root, and retest. |
| No events in Server Preview | Web container is not pointing to the server container. | Set Server Container URL (Google tag). |
| Google tag is still firing before the CMP sets the default. The browser blocks the request. | Ensure both the CMP tag and the Google tag fire on "Consent Initialization – All pages". | |
| Events show up in the server, but not in GA4 | GA4 tag missing/wrong Measurement ID. | Add the GA4 forwarding tag. Verify Measurement ID. Check tag trigger. |
| The GA4 client is paused or not claiming the request. | Publish the GA4 client, keep the default path, and ensure the request hits that path. | |
| Purchases missing value/currency | Not captured client-side. | Populate variables or add a data layer. Verify in Server Preview and DebugView. |
| Double page_view/scroll | Enhanced Measurement + custom. | Turn off overlapping Enhanced Measurement toggles. |
| Lower totals vs. client-only | Consent/ad blockers affecting pings. | Document Consent Mode impact. Verify modeled totals in GA4. |
Trade-offs to consider
There are a few unavoidable downsides to server-side tagging, and it’s good to be aware of them:
-
Complexity
At the end of the day, you’re adding infrastructure and governance, meaning you now have both the web GTM and the server GTM to manage, so start with a limited scope.
-
Cost and upkeep
You’ll run the server container on Google Cloud Platform (which works on a pay-as-you-go model), and you’ll need to spend time on ongoing maintenance of DNS and SSL (if you went with a custom subdomain) or of your hosting platform’s proxy configuration (if you went with same-origin), plus scaling and monitoring either way.
-
Consent rules still apply
You still have to respect Consent Mode and privacy regulations for different regions.
-
Team habits
Your team’s working practices will need to change if you want to reap all the benefits of server-side tagging – this means strong version control, QA, and regular audits.
Final thoughts
If you decide that GTM server-side tagging will help your business with its data, think of it as an upgrade, not a complete restart. Have a sensible migration plan, aim to achieve the same results you have now, test everything frequently, and document all changes clearly. If things go as they should, you’ll get cleaner data and faster loading webpages.