Giving the wrong person access to your GA4 account will bring nothing but problems. Too much access… someone might accidentally delete a key event or expose sensitive data. Too little access… and your marketing team can’t do their job properly.
GA4’s permission system solves this by letting you control exactly what each person can see and change, but only if you understand how the five user roles actually work and which one fits each team member’s needs.
Why are user permissions so important?
Managing who can access your GA4 account is both about safety and collaboration. When multiple people need access to your analytics, you’re facing competing needs:
- Your marketing team needs to see campaign data and create audiences.
- Your developers need to configure tracking.
- Your executives want high-level reports.
This means that the right permissions setup prevents accidental disasters (like someone deleting a key event) while making sure everyone can actually do their job.
It also protects sensitive business data – not every team member needs to see your exact revenue numbers or advertising costs.
How GA4’s permission structure works
GA4 uses a two-level hierarchy for permissions: account level and property level:
- Account-level access applies to everything in your GA4 account: all properties, all data streams. That’s why it should be used carefully. You can’t override this by giving someone less access at the property level. If someone has Editor access at the account level, they’re an Editor for all properties.
- Property-level access limits a user to a specific property (usually one website or app). This lets you give your blog manager access to the blog property without letting them see data from your e-commerce website, for example.
You can give someone more access at the property level than they have at the account level. So, if someone has Viewer access at the account level, you can make them an Editor for one specific property.
But keep in mind: the most permissive role always wins. If someone has Editor at the account level and you try to make them Viewer for a property, they’re still an Editor.
The five GA4 user roles
GA4 has five standard roles that determine what users can see and do. Here’s what characterizes each role:
1) Admin
Administrators have complete control over your GA4 account or property. They can:
- Add, remove, and change other users’ roles.
- Set data restrictions (e.g., hide cost or revenue metrics).
- Configure all account and property settings.
- Manage data streams and measurement protocols.
- Delete properties and accounts.
Since Administrators can lock other people out of the account, this role should be assigned carefully. Make sure you have at least two Administrators to avoid lockout situations, but don’t hand out admin access to just everyone.
2) Editor
Editors have broad permissions to configure GA4 but can’t manage users. They can change almost any setting in your property, making them suitable for technical team members who need to set up and maintain your tracking. An Editor can:
- Configure events, conversions, and custom definitions.
- Set up audiences and connect Google Ads.
- Configure data streams and measurement settings.
- Create calculated metrics.
- Manage filters and other data processing rules.
Editors can’t, however, manage users, delete properties, or set data restrictions. This makes the role safer than Administrator for people who need technical control but shouldn’t have access to user management.
3) Marketer
The Marketer role is perfect for marketing teams and agencies who need to manage campaigns without touching your core tracking setup. A Marketer can:
- Create, edit, and delete audiences.
- Manage key events (conversions).
- Create custom events.
- Configure attribution settings.
- Import key events into Google Ads.
Marketers can’t change data collection settings, modify data streams, or manage users. Basically, they have all the permissions of Analysts (coming right up) plus the ability to manage marketing-specific configurations.
4) Analyst
Analysts can work with data and create shared reports but can’t change any configuration settings. This role is designed for people who analyze data and create reports without needing to modify how data is collected. An Analyst can:
- View all reports and explorations.
- Create and share explorations, reports, and segments.
- Edit shared assets (reports others have shared).
- Use the GA4 interface and API.
Analysts can’t change property settings, create audiences, or modify events.
5) Viewer
Viewers have read-only access to reports and data. They can see everything but can’t change anything or share content with others. In other words, a Viewer can:
- View all reports and existing explorations.
- Use DebugView for testing (if debug mode is enabled).
- See property settings.
Since Viewers can’t create or edit explorations, configure settings, or share reports, this role is ideal for stakeholders, executives, or external partners who simply need to review performance.
Extra: the “None” role
You can also assign the “None” role, which removes all access to an account or property. This is useful for temporarily restricting someone’s access without fully removing them from the user list.
Data restrictions to hide sensitive metrics
GA4 also lets you restrict access to specific types of financial data. These restrictions work on top of user roles, meaning they apply even to Administrators. However, there’s a nuance: a property-level Administrator can remove or modify data restrictions they control at their own property level. The restriction is only truly locked if it was set at a higher level (e.g., account level) by another Administrator.
Data restrictions are useful when you want to give someone access to GA4 for analytics work but need to keep financial information confidential.
There are two data restriction options:
- “No Cost Metrics” hides all advertising cost data, including ad spend from Google Ads and other connected platforms.
- “No Revenue Metrics” hides all revenue data, including transaction revenue, e-commerce metrics, and any custom metrics you’ve identified as revenue metrics.
But here’s the catch: data restrictions are inherited from higher levels just like roles. If you apply “No Cost Metrics” at the account level, that user can’t see cost data for any property in the account. You can’t remove inherited data restrictions at the property level, but you can add additional restrictions.
Step-by-step: how to manage users and access levels in GA4
First consider that you need Administrator access to add users to GA4. Here’s how it works:
-
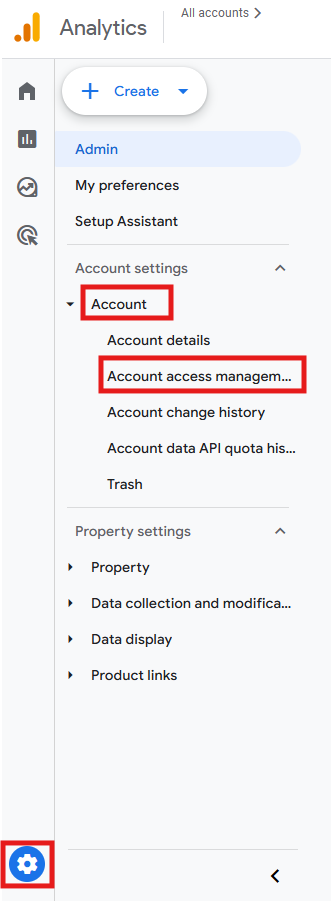
In GA4, go to Admin > Account > Account Access Management.
-
A list will show up with all users and their respective roles and data restrictions. To add a new one, click the blue + icon at the top-right and then Add users.

-
Enter the email address associated with the user’s Google Account. You can add multiple users at once by separating email addresses with commas. Check “Notify new users by email” if you want GA4 to automatically send them an invitation email.

-
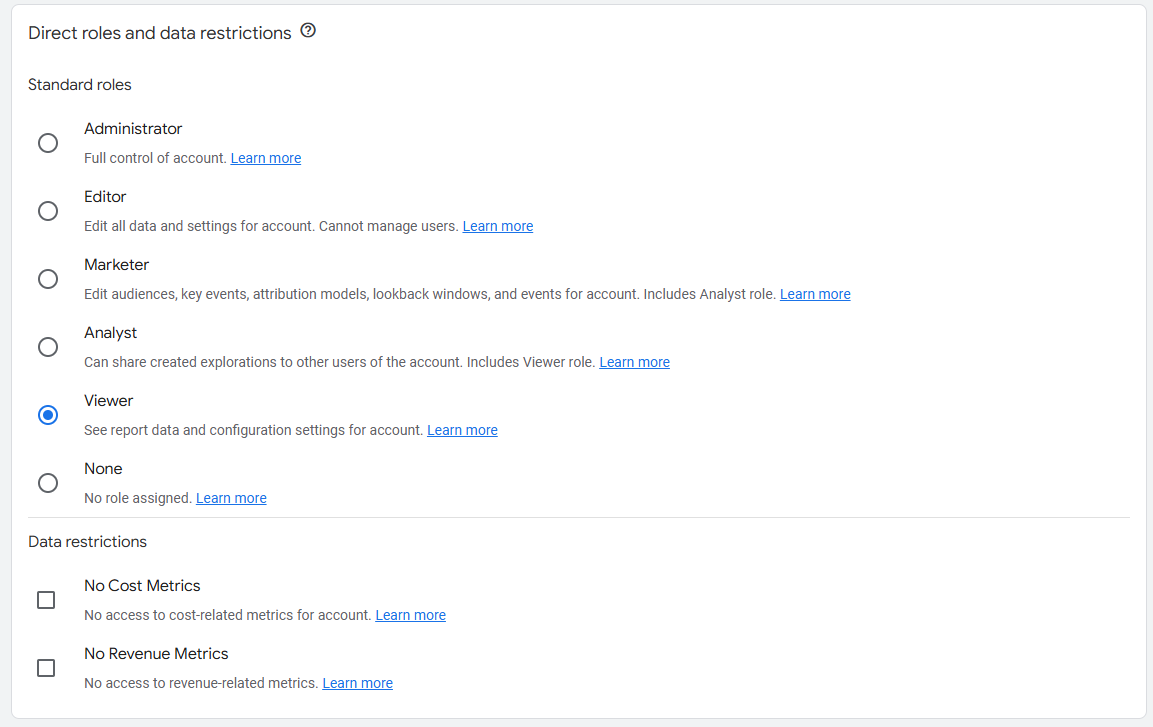
Select the appropriate role for that user: Administrator, Editor, Marketer, Analyst, Viewer, or None. If needed, check the boxes for “No Revenue Metrics” or “No Cost Metrics” to restrict financial data access.
-
Click Add in the top-right corner to complete the process. The user will receive an email invitation (if you enabled notifications) and will see the property or account appear in their GA4 interface the next time they log in.
User groups for team management
If you’re managing access for larger teams, GA4 also supports user groups – collections of users that inherit the same permissions. Instead of adding 10 people individually with the same role (e.g., members of a marketing team), you can create a group, assign the role to the group, and add all 10 people to it.
To use this feature, your GA4 account needs to be linked to a Google Marketing Platform Organization (which you can create for free). Once linked, you can create groups in Access Management by clicking the blue + icon and selecting Add user groups instead of Add users.
Best practices for managing GA4 permissions
Here are our recommendations for keeping your user permissions and access levels secure and organized:
-
Start with the least access necessary
It’s easier to give someone more permissions later than to deal with the consequences of giving them too much access up front. When in doubt, start with Viewer or Analyst and upgrade if they need more.
-
Maintain at least two Administrators
Don’t put yourself in a situation where only one person can manage users. If that person leaves the company or loses access to their Google Account, that’s a serious issue.
-
Use property-level access when possible
If someone only needs access to one website or app, give them property-level access instead of account-level.
-
Use data restrictions to protect sensitive information
If someone doesn’t need to see revenue or cost data to do their job, restrict it. This is especially important for temporary team members or external partners.
-
Review permissions quarterly
People change roles and projects get finished all the time. Regular audits ensure you’re not leaving old access in place unnecessarily.
-
Document who has what access and why
Keep a simple spreadsheet noting who has what role and the business reason for it. This makes audits easier and helps you track access over time.
-
Check Change History regularly
GA4 tracks who makes changes to your property. If you have multiple Editors or Administrators, periodically review Change History (under Admin) to make sure changes are expected and appropriate.
What to do when permissions aren’t working
If someone can’t access what they should, or can access what they shouldn’t, check these common issues and learn how to address them:
| Issue | What to check |
|---|---|
| User has less access than expected | Look at their effective permissions at the property level. They might have been granted a role at the property level but have no account-level access, or there’s a more restrictive setting somewhere blocking their access. |
| User has more access than expected | Check account-level permissions. Remember that account-level roles automatically apply to all properties, and the most permissive role always wins. |
| User can’t see cost or revenue data | Check if data restrictions are applied. These might be inherited from the account level and can’t be removed at the property level. |
| User can’t see the property at all | Make sure they’re logging in with the correct Google Account (the one you added). Also verify they’re looking in the right GA4 account if they have access to multiple accounts. |
| Unrecognized user appears in the list | Some automated users from connected services (like Google Ads) may appear in your user list. These are necessary for integrations to work and shouldn’t be removed. |
Final thoughts
Managing GA4 permissions requires planning ahead and thinking through who needs to do what. The role system makes sense once you understand the hierarchy and remember one key rule: account-level access flows down to all properties, and the most permissive role always wins.
Our advice is: start by mapping out your team’s actual needs. Who needs to analyze data? Who needs to configure tracking? Who just needs to see reports? Use the tightest permissions that still let people do their jobs, apply data restrictions where appropriate, and review everything periodically.