Have you ever created a tag in Google Tag Manager (GTM) and then discovered it can’t get the information you need? For example, you might want to track which pricing plan someone chose, or the product type when they add something to their shopping cart, but the details aren’t available. That’s where the data layer comes in.
It’s essentially a structured method for sending details from your website to GTM, allowing your tags to use them. Understanding the basics of the data layer will help you communicate more effectively with your developers and improve your tracking setup.
What is the data layer?
The data layer is a JavaScript array that holds information in objects about what’s happening on your website. It’s a place where data is held until GTM grabs it and sends it to Google Analytics 4 (GA4), Google Ads, Meta, or whatever tracking platforms you have.
Put it this way: your website generates a lot of information as people interact with it. If you don’t have a data layer, GTM can only “see” what’s in the HTML or the URL. A data layer allows you to access the information that isn’t shown directly, such as a user’s membership level, a product’s internal category, or whether a visitor is a returning customer.
This information is stored in the data layer as key-value pairs. The “key” is the name (e.g., pricing_plan), and the “value” is the data itself (e.g., premium). GTM then looks at these pairs and uses them in your tracking.
Why does it matter for marketers?
The data layer is a way to separate the information you’re tracking from the actual structure of your website. For simple things, getting data directly from the webpage’s HTML or the URL is sufficient, but that method stops being useful when you need a bit more detail. For example, if you’d like to track how many free users vs. paid subscribers are converting, this detail is stored in your system somewhere, but isn’t visible on the page itself. A data layer gives you access to this and doesn’t require changing what people see on the website.
And here’s a second situation: if a developer redesigns a form and therefore changes the webpage’s HTML, your GTM setup will stop working if it was scraping specific elements of that code. With a data layer, your tracking stays intact as expected because it’s getting the information from a consistent data structure.
Understanding the data layer will also make working with developers a lot easier. Instead of a vague request like “I need to track this button”, you can specifically ask: “Could you include a ‘form_type’ parameter with the value ‘newsletter_signup’ in the data layer when the form is submitted?” That’s a clear request, and it proves to developers that you understand how all of this is meant to work.
Pro tip: you can check what’s in the data layer yourself, without any special tools. Right-click anywhere on any webpage and select “Inspect”. Click the Console tab, type dataLayer, and press Enter. This displays everything currently in the data layer – an array with numbered items where each represents a data layer push. Click the triangles to expand them and see the keys and values inside. This is useful for checking whether your developer actually implemented what you requested.
How Google Tag Manager uses the data layer
GTM creates a basic data layer automatically when it loads. From that point on, the data layer can receive information in two ways: it can be pre-populated when the page loads, or information can be added to it as people interact with your website.
GTM watches the data layer constantly. When something gets pushed to it, GTM checks if any of your triggers care about that information – and if they do, the relevant tags fire.
You can grab this information in two ways:
- Using data layer variables to pull specific values from the data layer. For example, you might create a variable that reads the page_author key, then send that value to GA4 as a custom dimension.
- Using events as triggers. When something important happens (e.g., a successful form submission), your developer pushes an event to the data layer. GTM sees that event and fires whatever tags you’ve set up to respond to it.
Let’s start with variables, then we’ll cover events.
Setting up data layer variables in GTM
Once information is in the data layer, you need to tell GTM to pay attention to it. This happens through data layer variables.
Let’s say your developer has pushed page_category to the data layer, and you want to capture that in GA4. Here’s how to set it up:
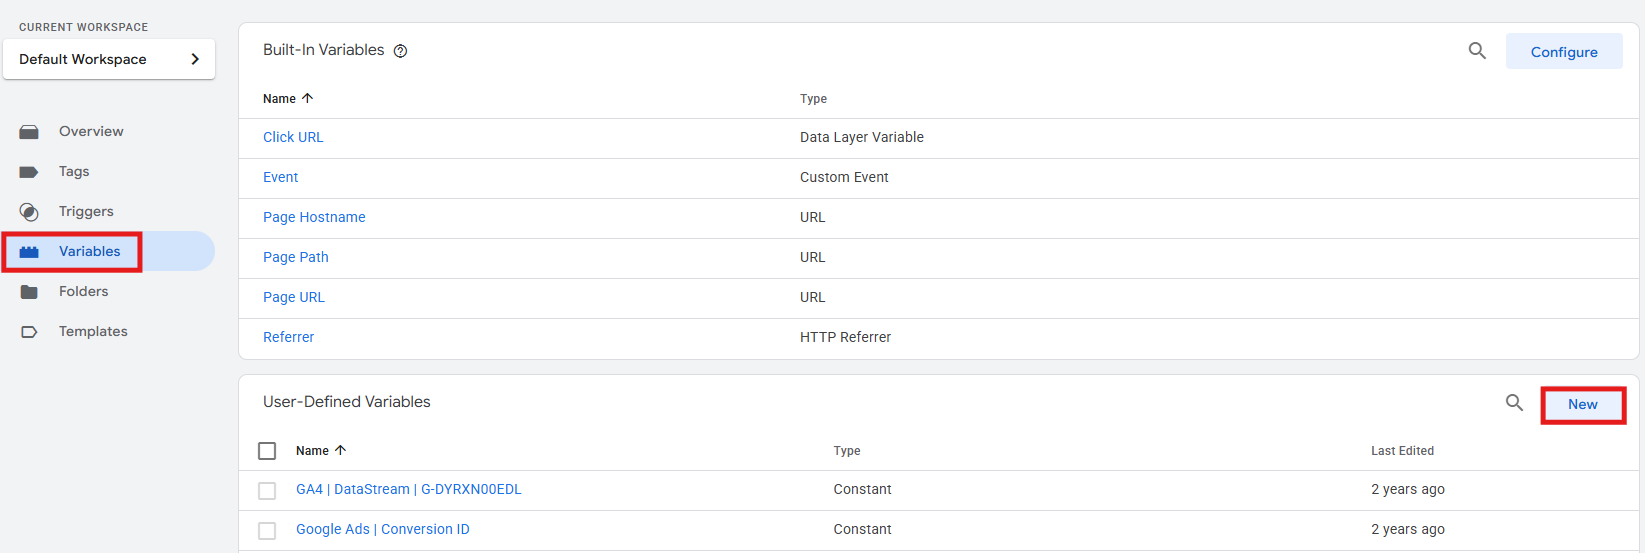
- In GTM, go to Variables and click New under User-Defined Variables.
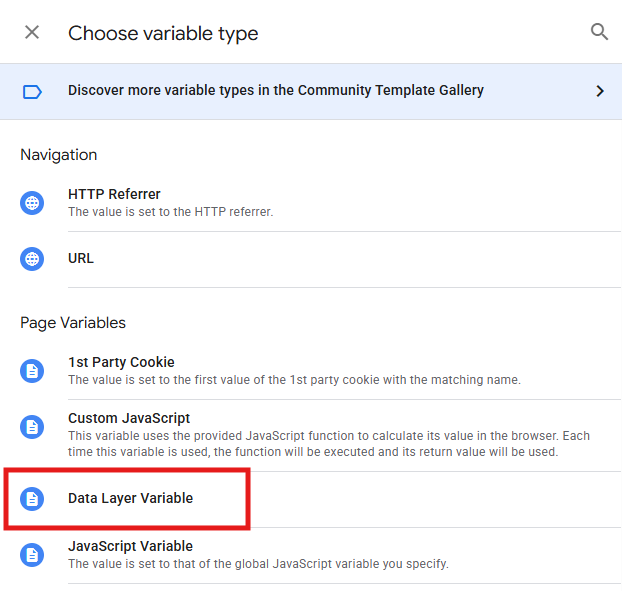
- Click the Variable Configuration box and choose Data Layer Variable.
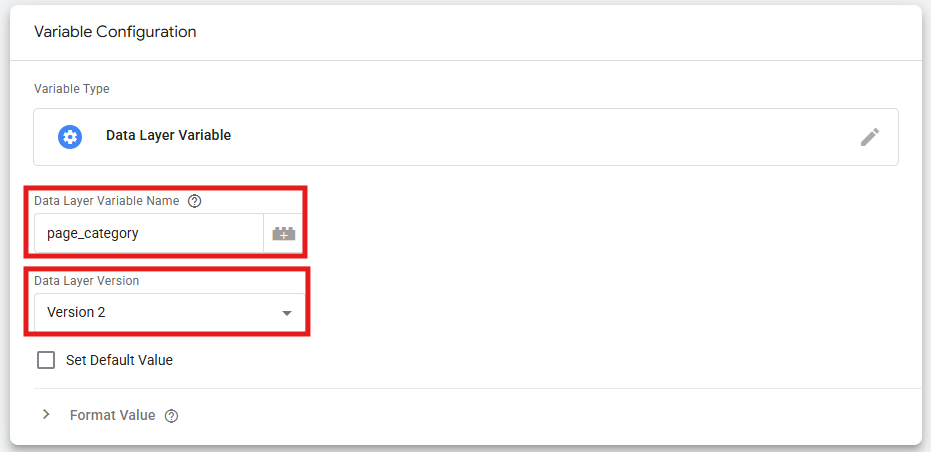
- In the Data Layer Variable Name field, enter the exact key from the data layer (e.g., page_category). This field is case-sensitive, so it must match exactly what your developer used in the code. Leave the Data Layer Version set to Version 2 (default).
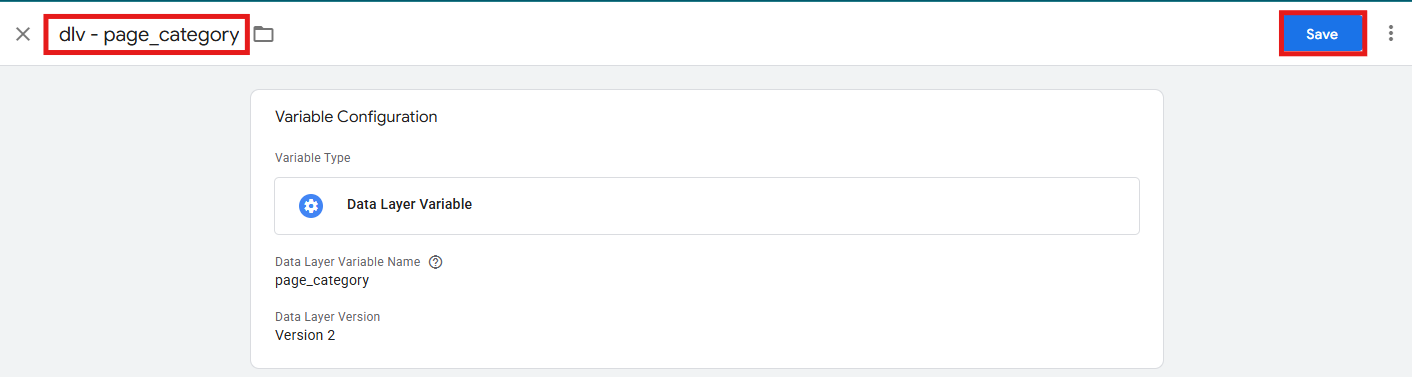
- At the top of the screen where it says “Untitled Variable”, give your variable a clear name. Use a consistent naming convention (e.g., “dlv - page_category”). This makes it easy to identify data layer variables at a glance. Click Save.
Verify the variable is working:
- Before you use this variable in a tag, you need to test it. Click Preview in GTM to enable Preview and Debug mode.

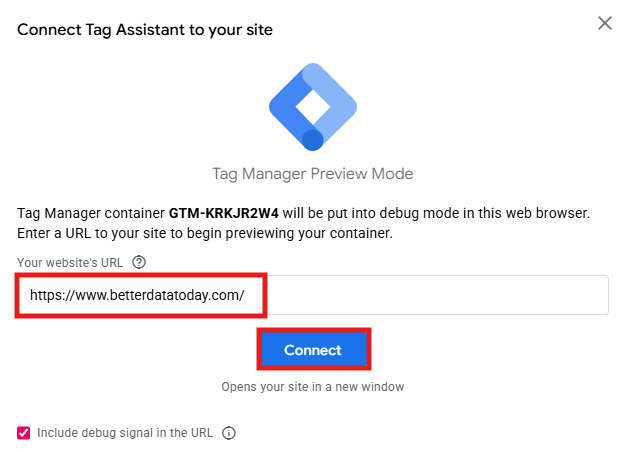
- Enter your website’s URL and click Connect.
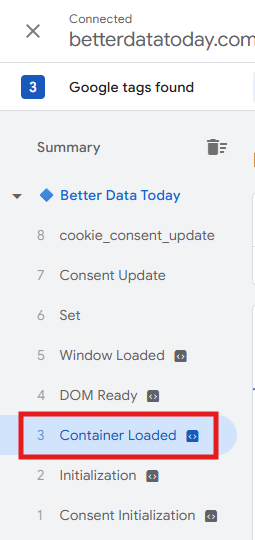
- In the Tag Assistant window, click any event (like Container Loaded).
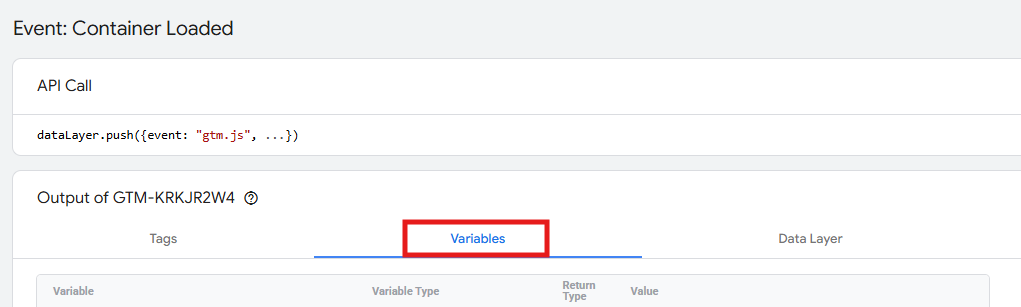
- Go to the Variables tab and scroll down to find your dlv – page_category variable.
- Check its value. If it shows the category’s name, you’re good. If it shows “undefined”, either the data isn’t in the data layer, the key name doesn’t match, or there’s a timing issue.
Use the variable in a tag:
- Now you can send this information to GA4. In GTM, go to Tags > click a GA4 Event tag or Google tag.
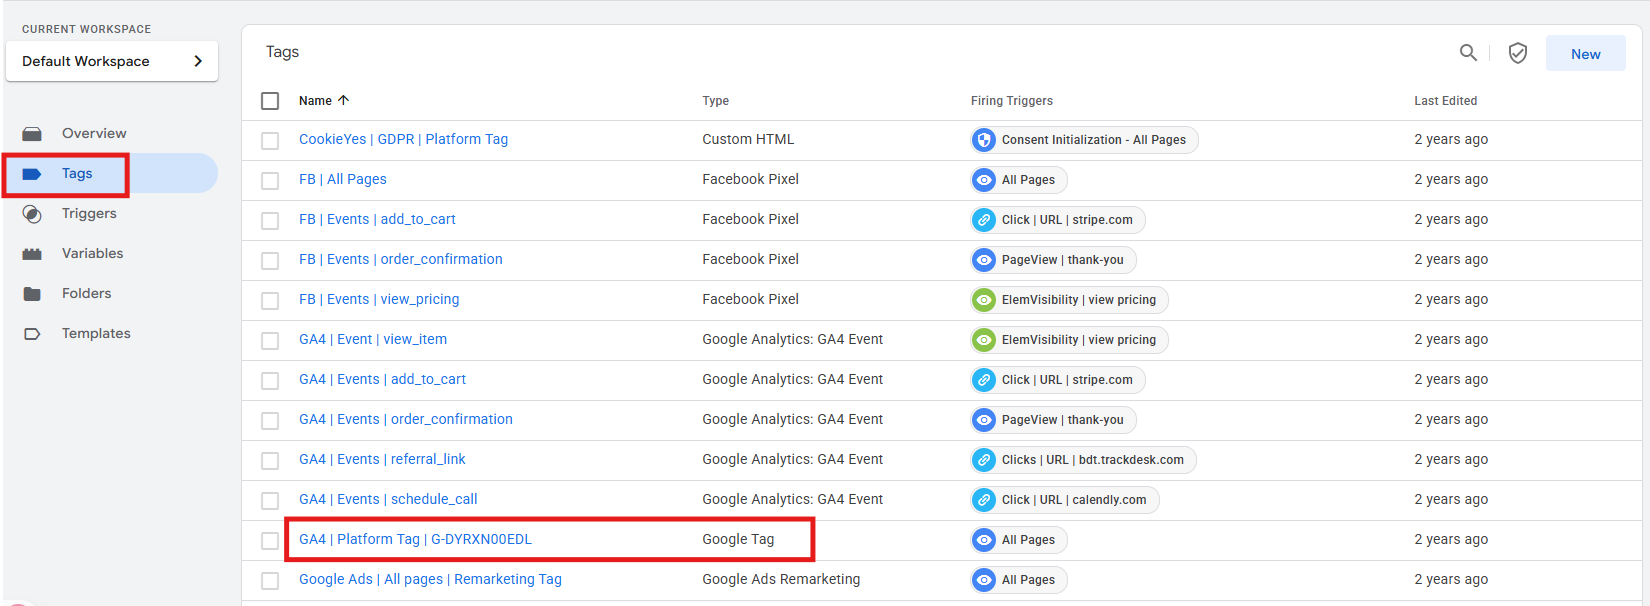
- For a GA4 Event tag, scroll to Event Parameters. For a Google tag, click Configuration settings.
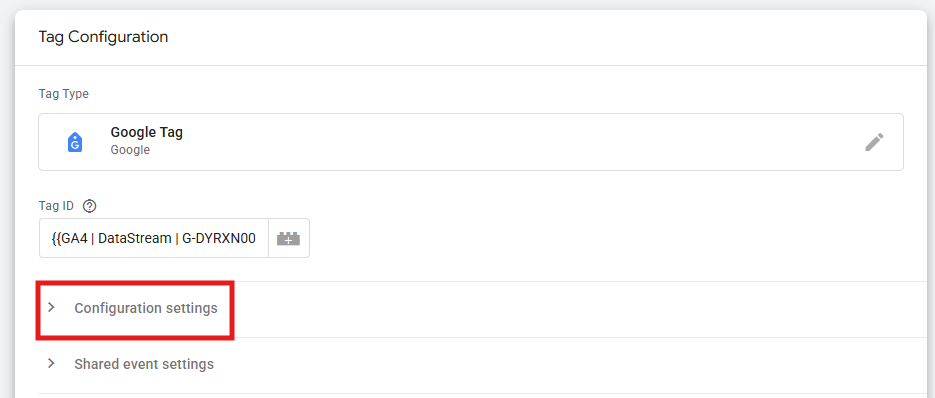
- Click Add row (for GA4 Event tag) or Add parameter (for Google tag).
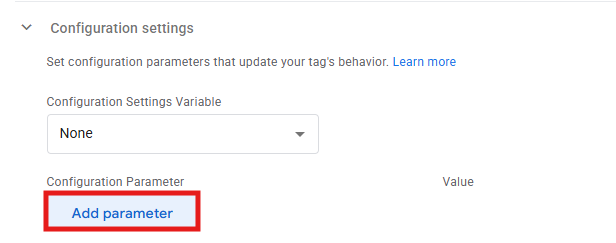
- Enter the parameter name (like page_category) and click the variable icon (looks like a building block) to select your dlv - page_category variable as the value.

- Save your tag.
Now, when the tag fires, it will grab the current value from the data layer and send it to GA4. Just remember to register page_category (or whichever event) as a custom dimension in GA4’s Admin settings, or it won’t show up in your reports.
Working with data layer events
When you push information to the data layer with an event key, you’re doing something different from just adding static values like page_category or user_type. Instead of GTM simply storing that information for variables to read, it recognizes the push as a distinct moment that can fire tags. So, GTM treats events differently from regular data, since they create a moment in time that you can use as a trigger.
Let’s say someone completes a purchase on your website. Your developer can fire this code:
window.dataLayer = window.dataLayer || [];
window.dataLayer.push({
  'event': 'purchase_complete',
  'order_value': 89.99,
  'order_id': '12345'
});
The event key tells GTM something happened, while the other keys provide context about what happened. In GTM, you would create a custom event trigger that listens for purchase_complete. When that event fires, your tags get access to the order value and ID through data layer variables.
You’ll see this pattern everywhere: newsletter signups, account creations, downloads, video plays, etc. Anytime you need to capture an interaction that GTM can’t detect on its own, you’re likely working with data layer events.
2 methods for adding data to the data layer
We’ve just covered the ways to use data once it’s in the data layer. But how does information actually get into the data layer in the first place? Your developer has two options, and knowing which is which helps you communicate your tracking needs more effectively and avoid common setup mistakes.
1) Data layer declaration
This method pre-populates data when the page loads by placing a snippet above the GTM container code. It looks like this:
<script>
dataLayer = [{
  'page_category': 'google-tag-manager-tips'
}];
</script>
<!-- Google Tag Manager -->
...
<!-- End Google Tag Manager -->
Use this for information that needs to be ready when GTM loads – page category, user type, or other details that don’t change as someone navigates the page.
But there’s a requirement: the code must be placed above the GTM container. If it’s placed below, GTM loads before the data exists, and your tracking breaks.
2) Using dataLayer.push (recommended)
This is a more flexible method, which adds information to the data layer after it already exists. This can go anywhere in your code – above or below the GTM container – and it won’t break your setup. Here’s what it looks like:
window.dataLayer = window.dataLayer || [];
window.dataLayer.push({
  'event': 'form_submission',
  'form_type': 'contact'
});
The first line checks if the data layer exists. If it does, great. If it doesn’t, it creates one.
The dataLayer.push method is especially useful for tracking interactions that happen after the page loads (like button clicks, form submissions, or when someone adds a product to their cart). It’s also the safer choice since there’s less that can go wrong.
What you need from developers
You’ll need help from a developer for most data layer work. Your job is to figure out what data you need and explain it clearly. So, start by asking yourself a few questions to identify what data would make your tracking more useful. Do you need to…
- … segment by customer type?
- … track which product categories drive key events?
- … understand which forms generate the most leads?
- … measure engagement by content author or topic?
- … track downloads by file type or resource category?
- … capture internal search queries and results?
- … measure video completion rates by video category?
- … distinguish between first-time and returning customers in your conversion data?
Make a complete list and then translate it into technical requirements. Instead of “I need to track premium users”, say: “When a premium user loads the page, can you push user_type: ‘premium’ to the data layer?” That specificity helps developers implement exactly what you need.
For events, describe the interaction and what should trigger the data layer push – for example, “when someone successfully submits the contact form, push an event called contact_form_submit with the form’s location on the page”.
Being this specific cuts down on back-and-forth and shows your dev team you know what you’re talking about – so, ultimately, it makes implementation smoother and more efficient.
Common issues to watch for
Data layer tracking rarely works perfectly on the first try. Here are the issues you’ll most likely encounter and possible ways to solve them:
| Issue | Why it happens | How to fix |
|---|---|---|
| Timing issues | The data hasn’t loaded into the data layer yet when GTM tries to read it. This commonly happens when using the Page View trigger (for all pages), since that fires the instant GTM loads (sometimes before your data layer information is ready). | Switch to a trigger that fires slightly later in the page load sequence. Try DOM Ready (which waits until the page structure is fully loaded) or Window Loaded (which waits until everything on the page, including images, has finished loading). |
| Naming mismatches | The key name in your Data Layer Variable doesn’t exactly match what’s in the actual data layer code. | Double-check the spelling and capitalization. If your developer used pageAuthor but you entered page_author in GTM, it won’t work – they must match character-for-character. |
| Missing the safety line | Your developer added a dataLayer.push without the “window.dataLayer = window.dataLayer || [];” line before it, and that code runs before GTM loads. | Make sure every dataLayer.push in your code starts with “window.dataLayer = window.dataLayer || [];”. This checks if the data layer exists and creates one if it doesn’t, preventing errors. |
| Undefined variables | In Preview mode, your Data Layer Variable shows “undefined” instead of a value. | This usually means one of three things: the data isn’t being pushed to the data layer at all; the key name is wrong; or you have a timing issue. Check the data layer tab in Preview mode to see if the key exists and what its value is at the moment your tag fires. |
When you don’t need a custom data layer
No, you don’t always need custom data layer work. GTM creates a basic data layer automatically when it loads, and many of GTM’s built-in triggers rely on it behind the scenes. For link clicks, basic form tracking, scroll depth, pageviews… GTM’s standard triggers handle all of that without any custom data layer.
You need a custom data layer only when you want to track information that GTM can’t see on its own – user attributes, backend data, custom events that don’t have visible triggers, e-commerce details, etc.
Where to go from here
Things become more interesting when you use the data layer in e-commerce tracking, custom dimensions in GA4, and advanced audience targeting (we cover these details in separate articles).
For now, remember: the data layer connects your website’s backend to GTM’s tracking. When you understand what it is and how it works, you can have much more productive conversations with developers and build much more efficient tracking setups.