Your business isn’t like everyone else’s business. To actually grow, you need to track something unique, data that GA4 won’t capture automatically. Custom dimensions are how you do that, whether you’re measuring product attributes, users’ membership tiers, content categories, or any other detail specific to how your business operates.
The setup requires two steps: sending the data through GTM and registering it in GA4’s interface. Only then will you be able to see your custom data in reports and analyze it properly. This article walks you through both steps, with a complete working example you can adapt to your own tracking needs.
What are dimensions?
Before jumping into custom dimensions, let’s clarify what a dimension actually is. A dimension is any attribute/parameter that describes your data, giving context to the numbers you’re looking at in reports.
When you view a report in GA4, the rows typically show dimensions while the columns show metrics – in other words, dimensions categorize your data, while metrics measure it.
Common GA4 dimensions include:
- Page path (which pages people visit).
- Device category (desktop, mobile, tablet).
- Traffic source (where visitors came from).
- Country (where they’re located).
- Event name (what actions they took).
This means that dimensions can describe different things:
- Events (what happened): form name, button text, etc.
- Users (who they are): subscription level, account type, signup date, etc.
- Products (what they bought): item color, item size, product availability, etc.
- Sessions (characteristics of the visit): traffic source, campaign name, landing page, etc.
GA4 includes dozens of dimensions automatically, but here’s the catch: Google can’t predict every dimension your specific business needs. That’s where custom dimensions come in.
How custom dimensions actually work
Custom dimensions let you track attributes that GA4 doesn’t capture by default. They’re built from parameters that you send along with your events, so they’re basically the way you make those parameters visible and useful in reports.
The process behind custom dimensions has two distinct steps, and both are required:
-
In GTM: send the parameter with your tracking
When you fire an event through GTM, you typically include additional parameters beyond just the event name to provide more context. For example, if someone clicks a button, you might send button_click as the event name, and then parameters like button_text (e.g., Get Started) and button_location (e.g., homepage).
-
In GA4: register the parameter as a custom dimension
Then, in GA4’s interface (we’ll get into the details ahead), you create a custom dimension that points to the parameter name. You’re essentially telling GA4 that parameter matters and that it should show up in reports.
Why do they matter more in GA4 than in Universal Analytics (UA)?
If you migrated from UA, you might remember custom dimensions as an advanced feature you’d set up occasionally, since you could automatically track most of what you needed with pageviews and other predefined hit types.
In GA4, they’re fundamental to almost any tracking, and that has to do with GA4’s event-based data model. Given that, in GA4, nearly everything is an event, to add context to these events, you use event parameters. And to see those parameters in reports, you need to register them as custom dimensions. This makes custom dimensions central to GA4 tracking.
In terms of scope, it works differently, too. While UA offered four scopes (hit, session, user, and product), GA4 reduces this to three: event, user, and item.
Another difference lies in custom parameters vs. custom dimensions. In UA, you created a custom dimension in the interface first, then sent data to fill it. GA4 reverts the logic: you send parameters first (through your tracking code), then register them as dimensions if you want them in reports. This approach gives you more flexibility, since you can send 200 parameters but only register 50 as dimensions, keeping your reports focused.
But let’s get real about what all of this means: if you’re doing serious GA4 implementation, you’ll be creating custom dimensions for nearly every custom event you track, in case you want to analyze them. That’s just how GA4 works: it does provide more flexibility, but it comes with more customization and implementation effort upfront.
The 3 types of custom dimensions
We mentioned the three scopes earlier, so let’s now understand their different use cases:
A) Event-scoped dimensions
These describe what happens during a specific interaction – they’re the most common type of custom dimension. Examples: when someone submits a form, you might send form_name and form_location as event parameters; when they click a button, you send button_text and button_position.
What truly distinguishes this type of dimension is that it applies only to that one event. So, if you track a video_start event with video_title as a parameter, that title doesn’t carry over to the next event the user triggers.
B) User-scoped dimensions
These describe characteristics of the person interacting with your website. In Google Tag Manager, these are called user properties. Common examples include subscription_level, signup_method, account_age_days, or preferred_language. Unlike an event-scoped dimension, once you set a user property, it applies to all future events for that user until you change it.
Here’s where GA4 differs from UA: user properties only apply forward, not backward. This means that events that happened before the update keep the old value.
C) Item-scoped dimensions
These work exclusively with e-commerce tracking, and they describe individual products. When you’re tracking purchases, cart additions, or product views, each item in the items array can have its own dimensions – for example, one product might have item_size: “Large” and item_color: “Blue”, while another in the same transaction has completely different values.
A crucial thing to keep in mind: these dimensions only work inside the items array.
GA4’s quota limits
When it comes to custom dimensions, GA4 establishes the following limits per property:
- 50 event-scoped dimensions.
- 25 user-scoped dimensions.
- 10 item-scoped dimensions.
So, what happens when you hit the limit? You need to archive an existing dimension before creating a new one. Keep in mind that archiving is permanent and cannot be undone, so you won’t be able to restore that dimension slot. However, the historical data collected under that dimension remains visible in your existing reports. Also, note that after archiving, you must wait 48 hours before you can create new custom dimensions.
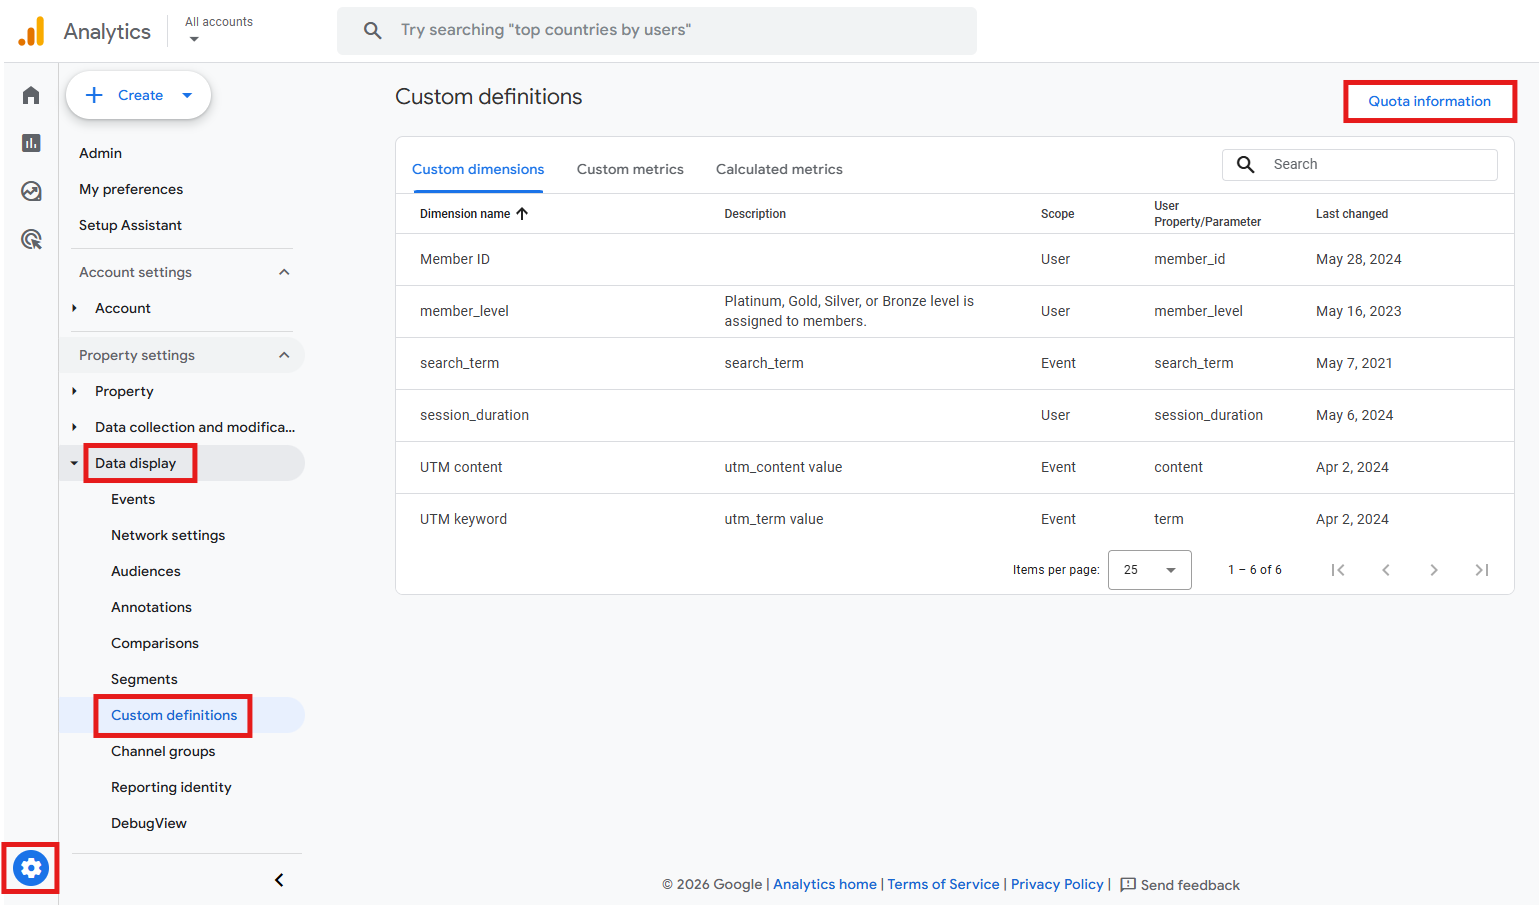
We recommend that, every once in a while, you check your remaining quota by going to Admin > Data display > Custom definitions and clicking “Quota information” right at the top. This shows exactly how many dimensions you’ve created in each category and how many slots remain open:
Our recommendation to navigate these limits is:
- Use predefined dimensions when they exist.
- Avoid creating dimensions for data you don’t actually analyze.
- Review your setup periodically to archive dimensions you’re no longer using.
Creating a concrete custom dimension
To show you how this works in practice, let’s go through a proper implementation example: we’ll track clicks on your website’s navigation menu, capturing which items get clicked and where they lead.
Step 1) Get GTM ready for click tracking:
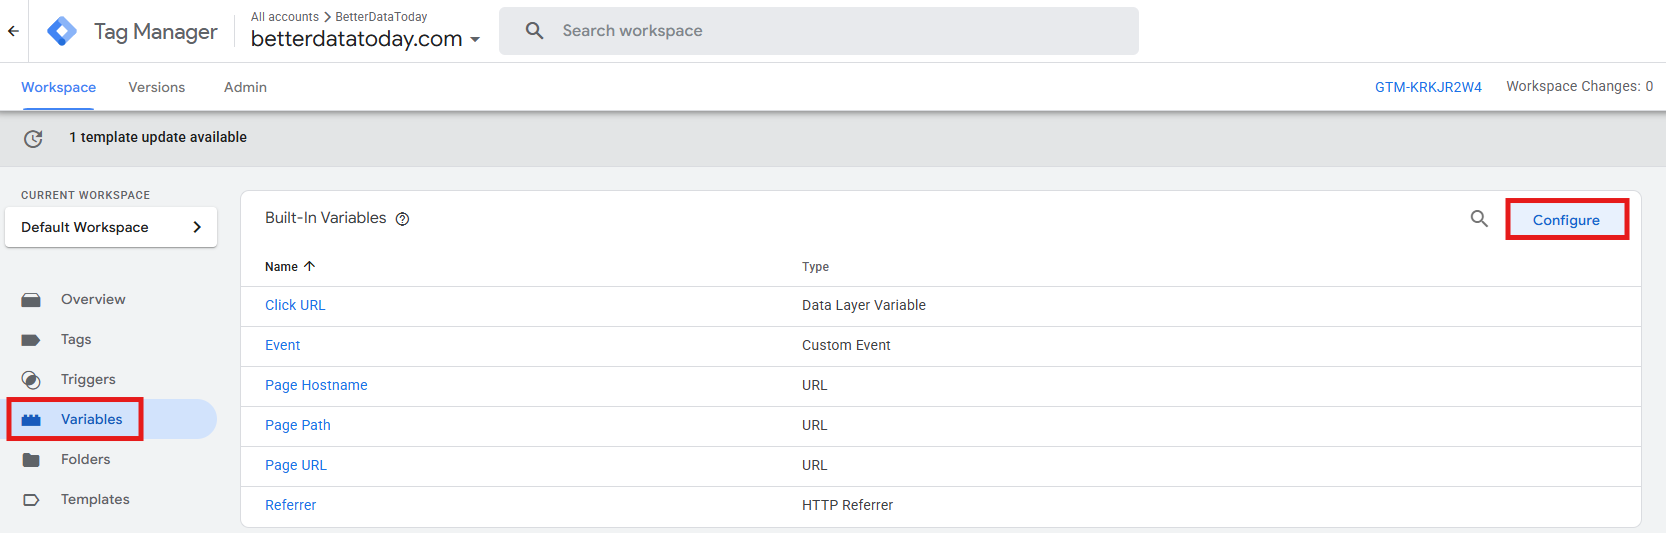
- Go to Variables > Built-In Variables > Configure.
-
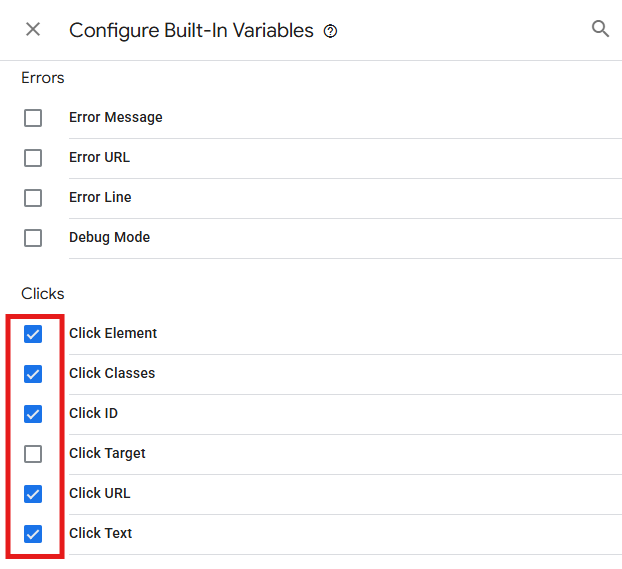
Enable these variables under the Clicks category:
- Click Element
- Click Classes
- Click ID
- Click URL
- Click Text
They give you access to information about whatever someone clicks.
-
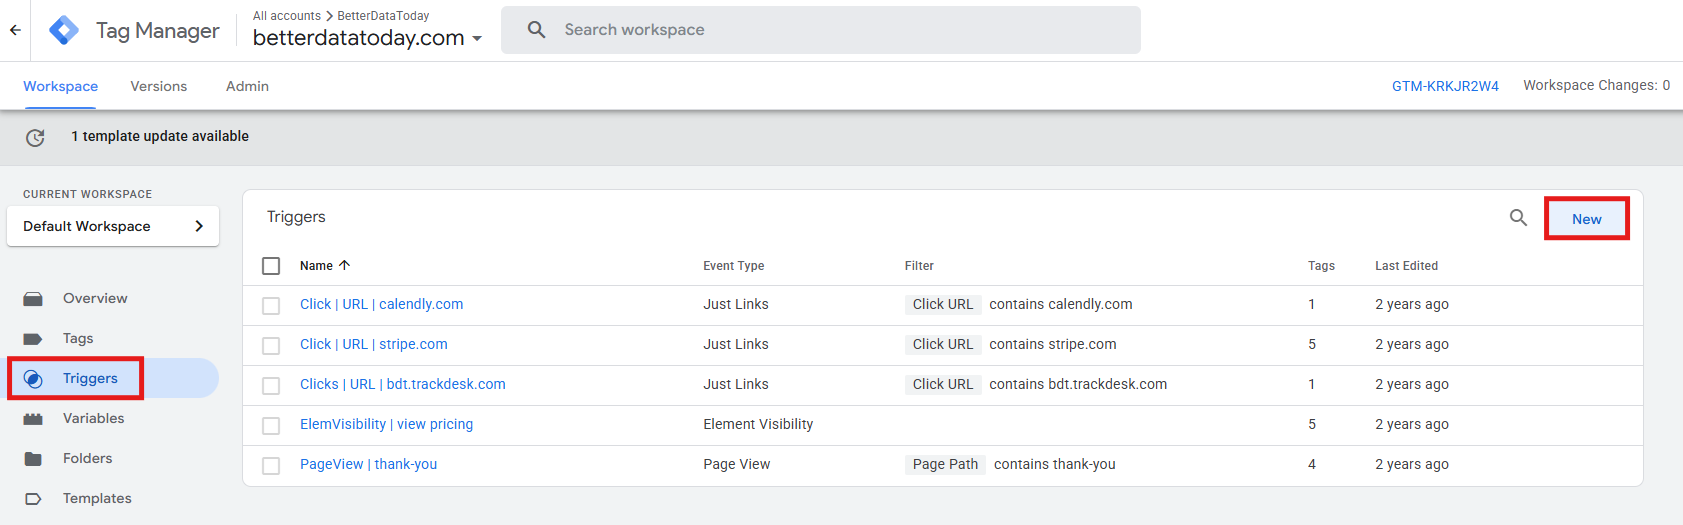
Next, you need to create a basic trigger that activates click tracking. Go to Triggers > New.
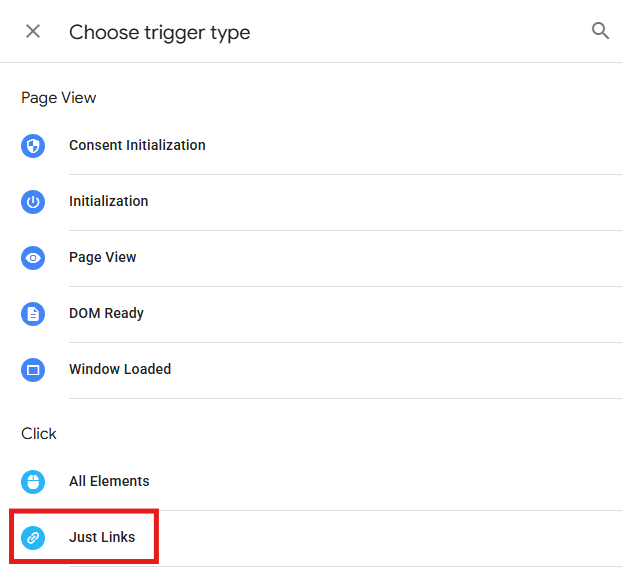
- Under Trigger Configuration, select Just Links as the trigger type.
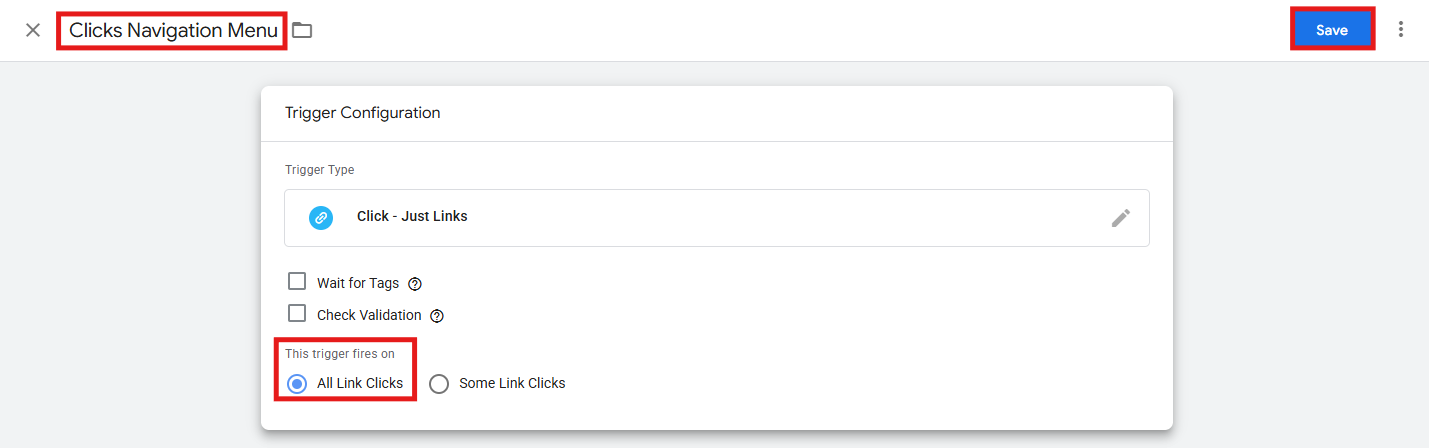
- Make sure the trigger fires on All Link Clicks. Give a clear name to this trigger (e.g., Trigger – Menu Link Clicks) and save.
Step 2) Find what sets menu clicks apart:
Start by going to Preview mode in GTM (button on the top-right) and clicking around on your navigation menu. Each click should generate a “Link Click” event in the Preview pane’s left sidebar.
Click on one of those events and switch to the Variables tab: the goal is to find out what distinguishes a menu click from any other link click on your page, so look through the click variables. Here are a few hints that may help your detective work:
- Maybe all your menu links share the same Click Classes (something like nav-link or main-menu-item).
- Maybe they all have Click IDs that start with “menu-”.
- Maybe the Click Element shows they’re all wrapped in a specific HTML structure.
In our example, let’s consider that every menu link has the Click Classes value “main-nav”.
Step 3) Create a trigger that fires only on menu clicks:
Now go back to that Just Links trigger you created earlier and edit it. Change it from All Link Clicks to Some Link Clicks and add this condition: Click Classes contains main-nav. Now your trigger fires only when someone clicks an element with that class in its Click Classes variable. And don’t forget to save the trigger.
Step 4) Build the GA4 event tag:
To start sending information to GA4:
- Go to Tags > New.

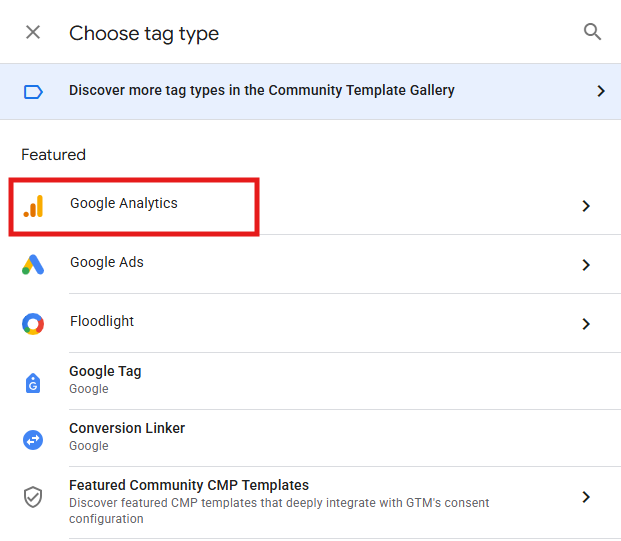
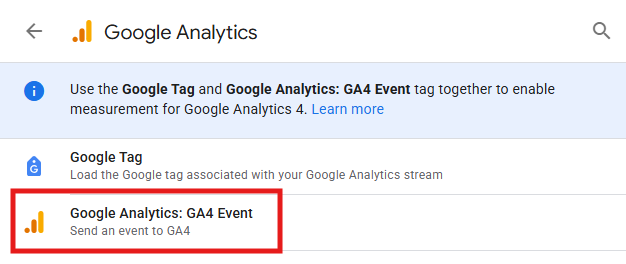
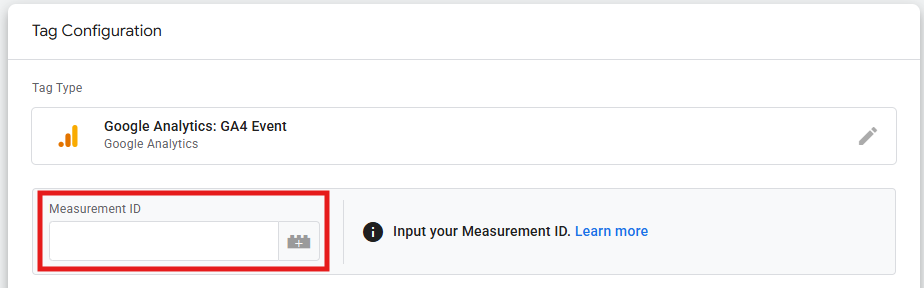
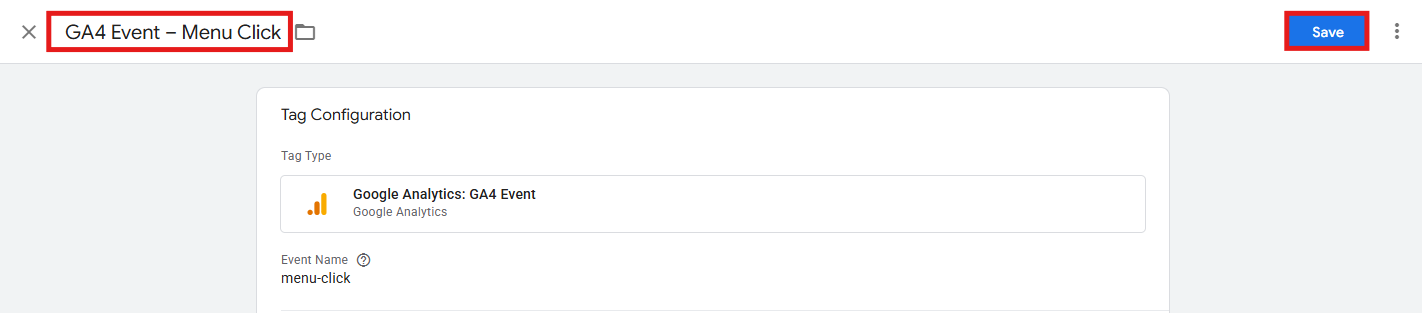
- Under Tag Configuration, select the tag type Google Analytics > Google Analytics: GA4 Event.
- Enter your Measurement ID (the format is G-XXXXXXXXXX and you can find it in GA4 > Admin > Data collection and modification > Data streams > Select your web data stream > the Measurement ID is in the “Stream details” section).
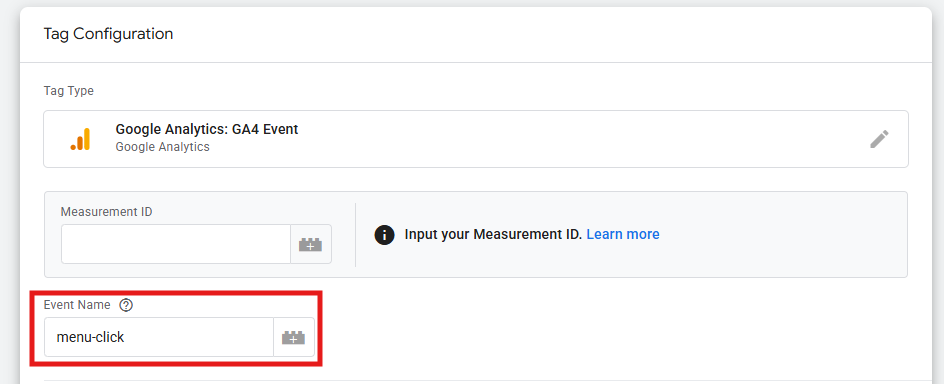
- Enter the event name (something like menu_click).
-
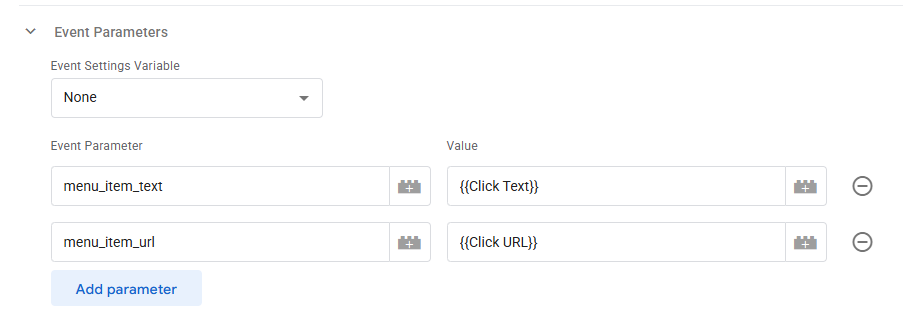
Expand the Event Parameters section and add each of the following:
-
Parameter name: menu_item_text
Value: {{Click Text}}
What it does: captures the actual text of the link someone clicked. -
Parameter name: menu_item_url
Value: {{Click URL}}
What it does: grabs the information about where the link was taking the user.
-
-
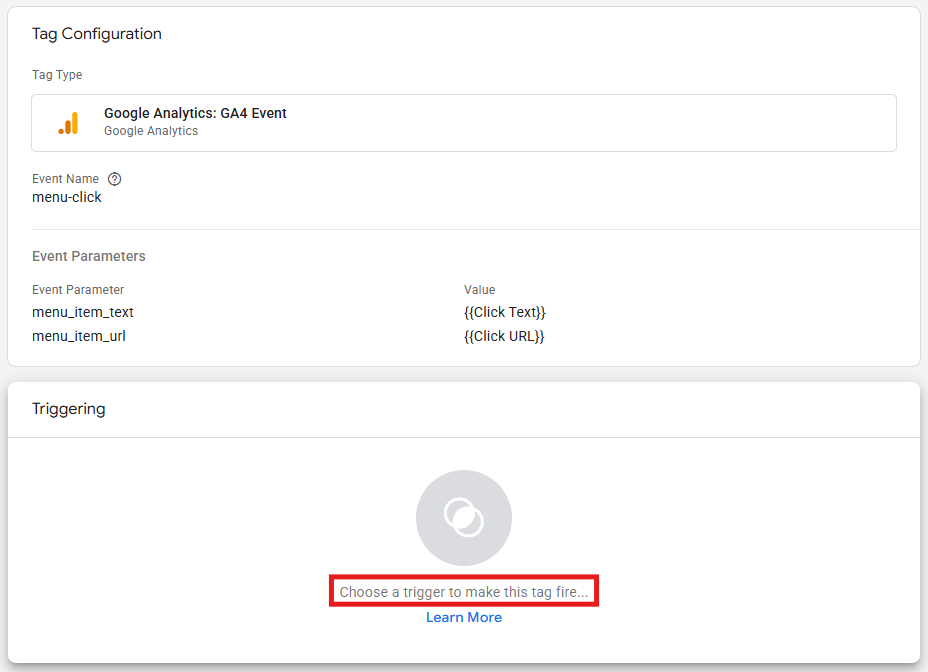
Now, under Triggering, attach the trigger you created to this tag.
- Give the tag a clear name (e.g., GA4 Event – Menu Click), then save.
Step 5) Test, test, test
We’re going to use GTM’s Preview mode and GA4’s DebugView combined to make sure everything is working as it should:
- Refresh Preview mode and click through your menu again. In the Preview pane, you should see your “GA4 Event - Menu Click” tag firing on those Link Click events.
- Click on the tag firing instance and check that both parameters (menu_item_text and menu_item_url) are passing through with the correct values.
- Now head over to GA4 > Admin > Data display > DebugView. You need to be in GTM’s Preview mode simultaneously for DebugView to show your test data.
- In DebugView, look for your menu_click events. Click on one and scroll down to the Event Parameters section to make sure both menu_item_text and menu_item_url appear there with their values.
- Everything looking good? Great! Then you can publish your GTM container. Click the Submit button on the interface’s top-right (next to the Preview button).
Step 6) Register the dimensions in GA4:
This is where custom dimensions become the central piece. By now, your parameters are flowing to GA4, but they won’t appear in reports until you register them. So:
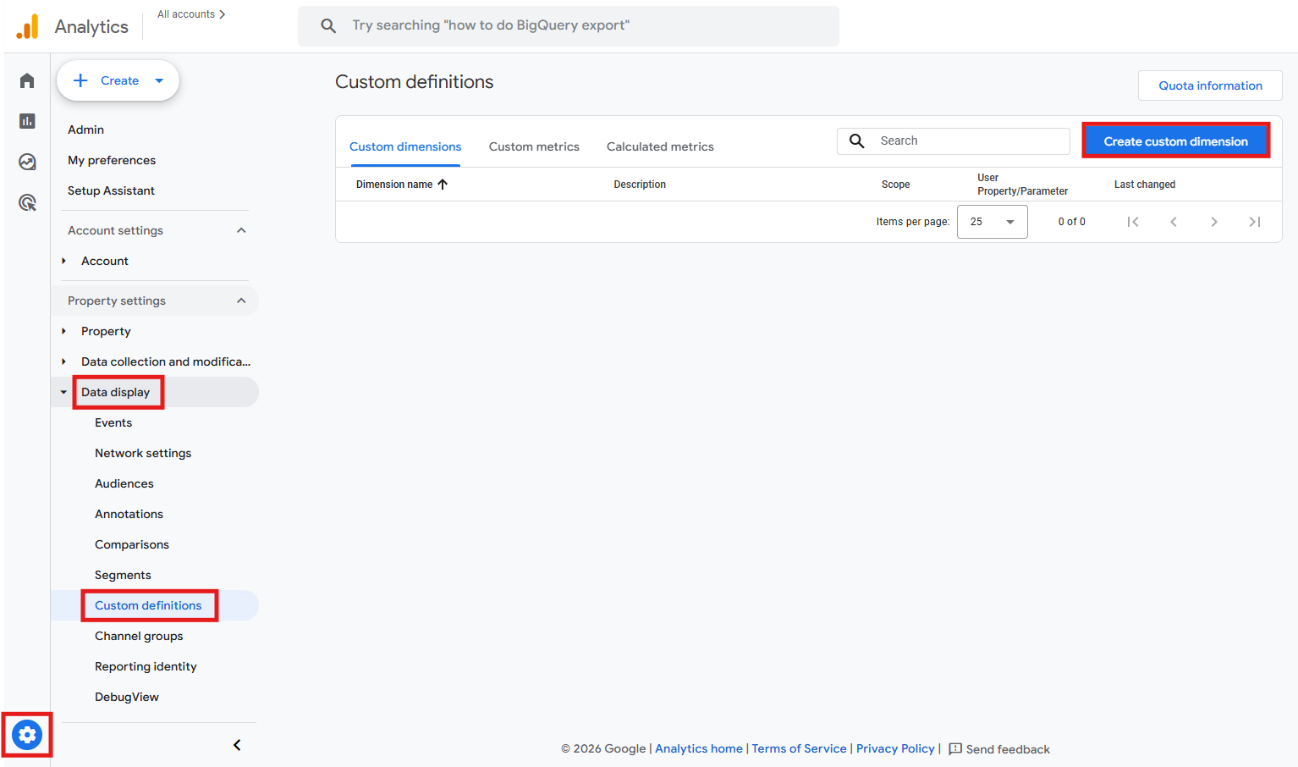
- In GA4, go to Admin > Data display > Custom definitions > Create custom dimension.
-
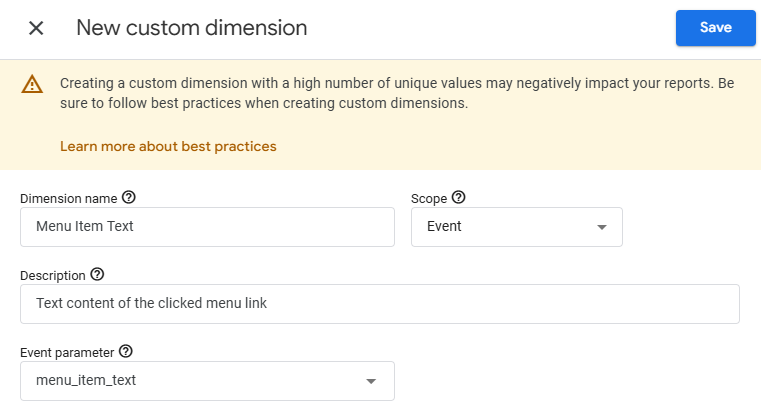
For the first dimension, fill in the details:
- Parameter name: Menu Item Text.
- Scope: Event.
- Description (optional): Text content of the clicked menu link.
- Event parameter: menu_item_text
Then save.
-
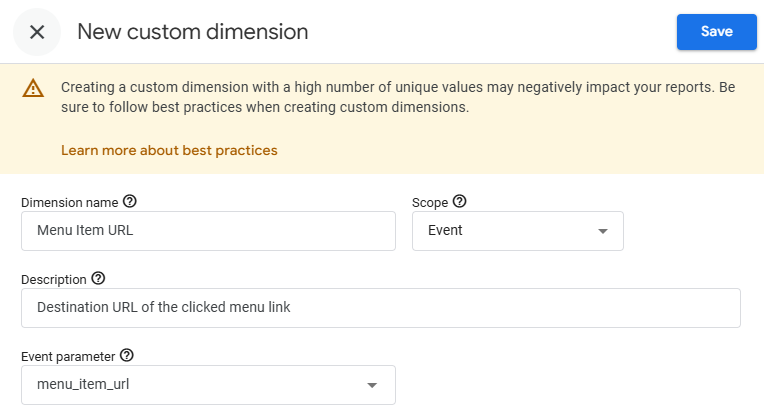
Repeat the process for the second dimension:
- Parameter name: Menu Item URL.
- Scope: Event.
- Description (optional): Destination URL of the clicked menu link.
- Event parameter: menu_item_url
Keep in mind: dimension names are limited to 40 characters and parameter values to 100 characters, so choose names that are descriptive but concise. Also, the Event parameter field is case-sensitive and must match your GTM parameter name exactly.
Step 7) Check and analyze custom dimensions
But first… you have to wait. GA4 needs processing time, so your dimensions typically appear in reports within 24 hours (though it can take up to 48 hours) after you’ve registered them.
Then, you can access them in two ways:
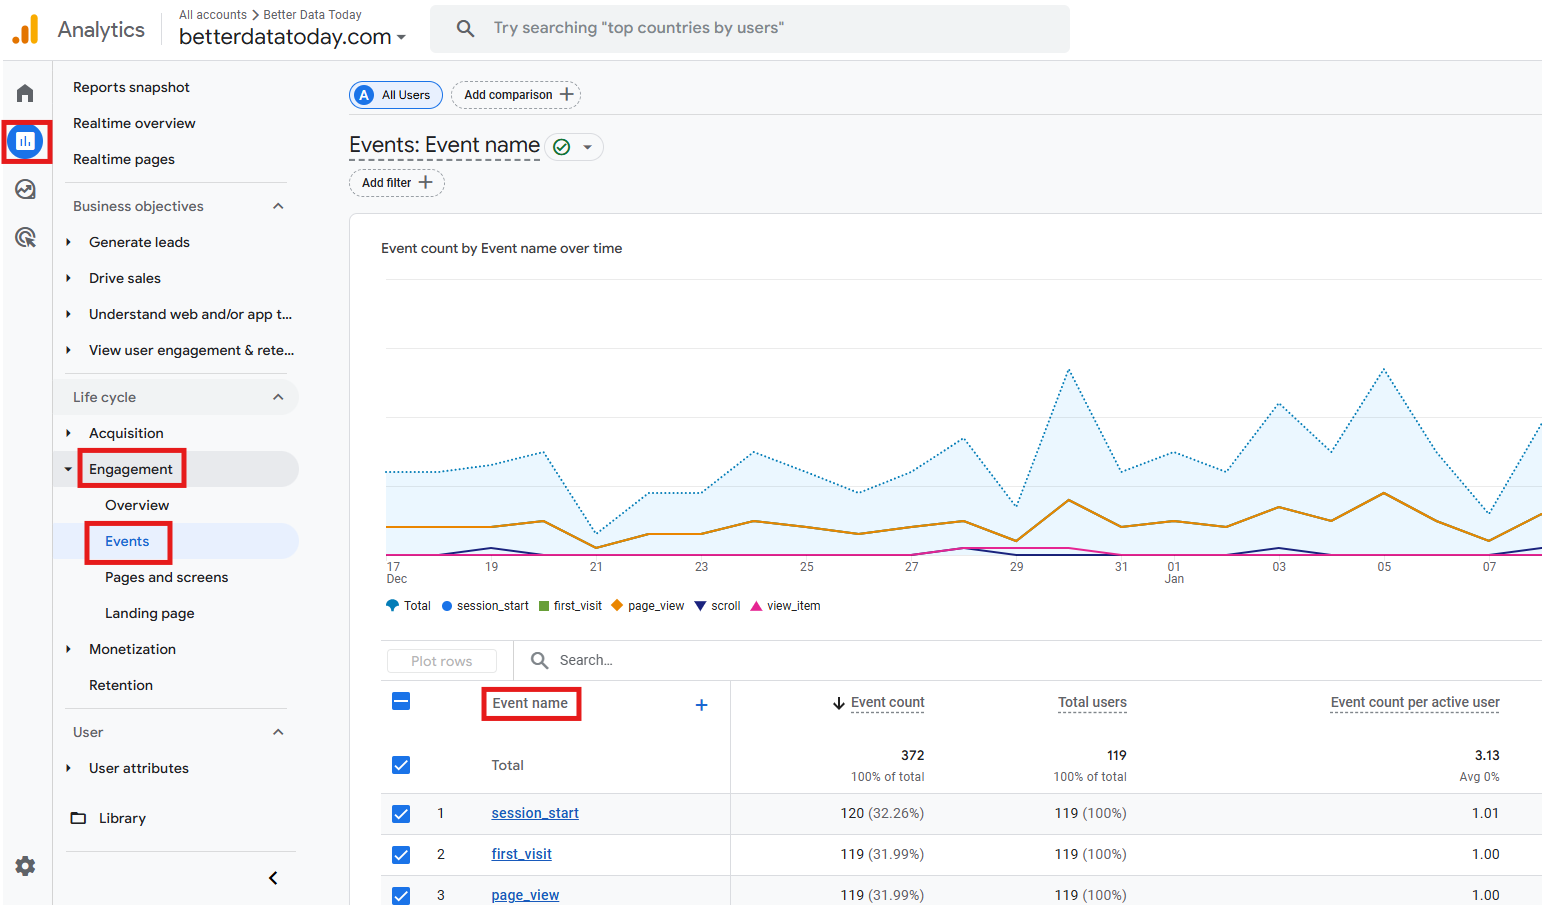
- Standard reports
Go to Reports > Engagement > Events and click on your event name (like menu_click) to see the details.
- Explorations
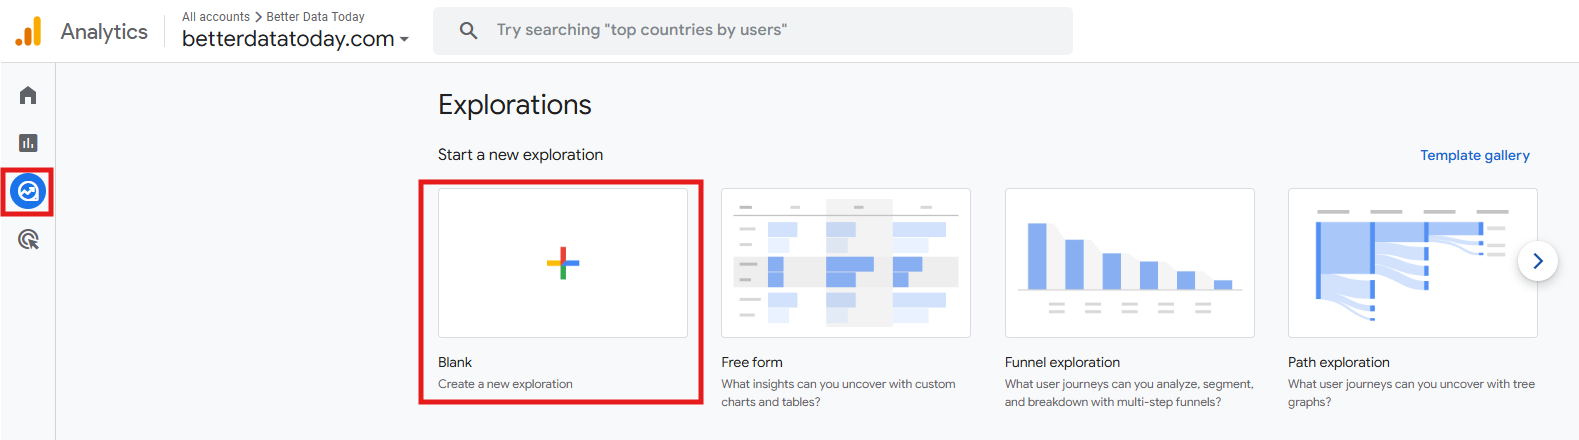
This is where you can use dimensions to build a custom, useful report. This is just an example of how you can proceed:-
Go to Explore > Blank.
-
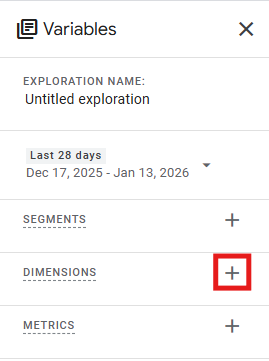
In the Variables section on the left, click the + next to Dimensions.
-
Search for your custom dimensions (in this example, Menu Item Text, Menu Item URL, and Device category for a specific kind of analysis) and click Confirm to add them to your report.

-
You also need to add a metric. In this example, let’s consider Event count. Click the + icon next to Metrics to do it.

-
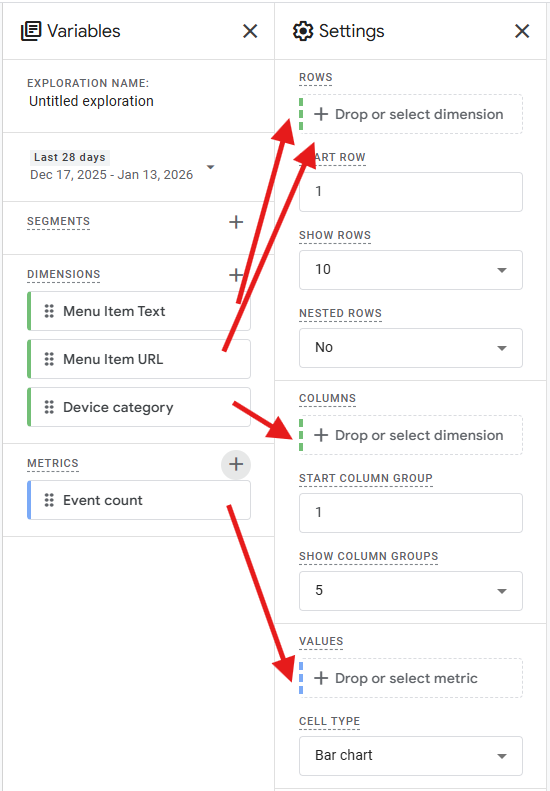
Now build your table like this:
- Drag in Menu Item Text and Menu Item URL to Rows.
- Drag Device category to Columns.
- Drag Event count to Values.
This report will show you which menu text gets clicked most, with the ability to expand each row and see the specific destination URLs.
-
Now you need to ensure you’re only analyzing menu click data, not all events in your property. To do this, you first need to make Event name available for filtering – click the + next to Dimensions, search for Event name, and add it.

-
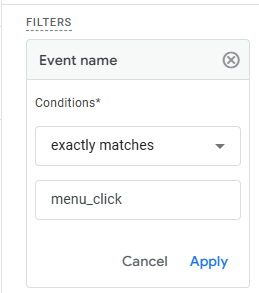
Then, in the Filter section at the bottom left, set the following condition: Event name exactly matches menu_click.
-
And that’s it! You’ve just created a report showing which menu items get clicked most on different devices. The good thing about Explorations is that it gives you the flexibility to focus on what you want to analyze, so imagine you only wanted to see which menu text gets clicked most by device type (without dragging the URL component into it), then you would only need to drag Menu Item Text to the Rows section.
What about user-scoped dimensions?
They work differently from event-scoped dimensions, because they describe people, not actions. Imagine you want to track which pricing plan each user has. Instead of manually adding user properties to every single GA4 tag (although you can do it if you only need a user property on specific events), your strategy should be to create an Event Settings Variable that automatically includes them:
- In GTM, go to Variables > New > Select Google Tag: Event Settings as the variable type.
- Expand the Google Analytics User Properties section and add a property:
- Property name: pricing_plan
- Value: {{DLV - User Pricing Plan}} (or whatever variable holds this data)
- Name this variable something like “GA4 Settings - User Properties” and save it.
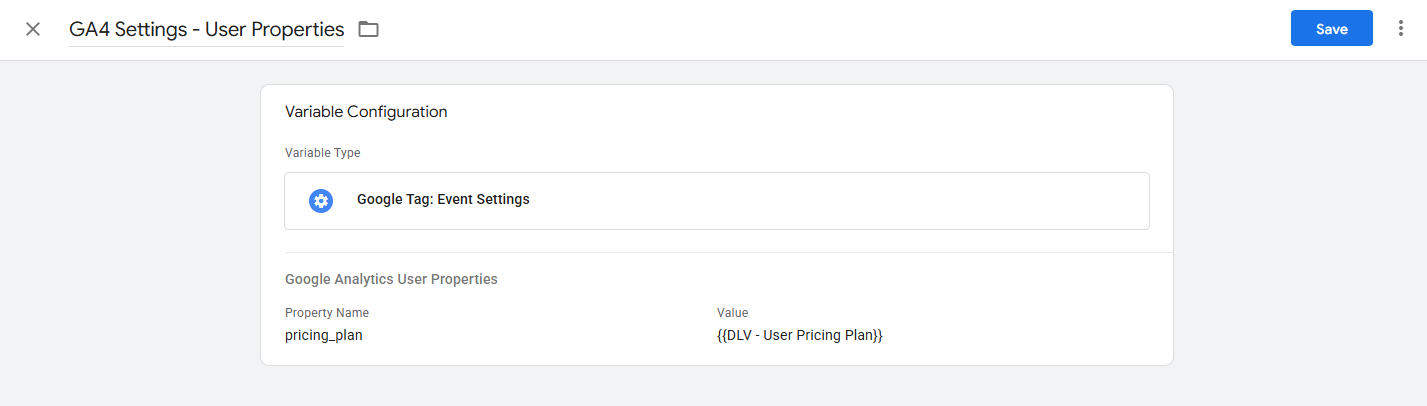
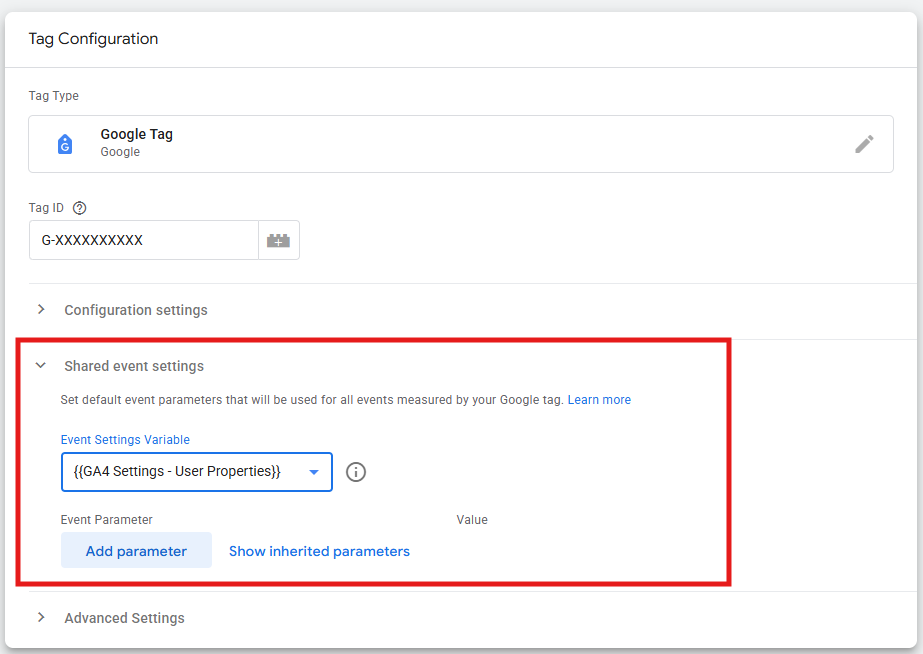
- Now go to Tags to apply this variable to your tags. Edit your Google Tag, open the Shared event settings section, in Event Settings Variable select your new variable and save.
-
Then go through your GA4 Event tags and do the exact same thing. From now on, every event associated with every tag will automatically include the pricing_plan user property. And if you add another user property to the Event Settings Variable later on, all your tags inherit it.
-
Now, to register a user-scoped dimension in GA4, go to Admin > Data display > Custom definitions > Create custom dimensions:
- Dimension name: Pricing Plan
- Scope: User
- Description (optional): User’s current subscription level
- User property: pricing_plan
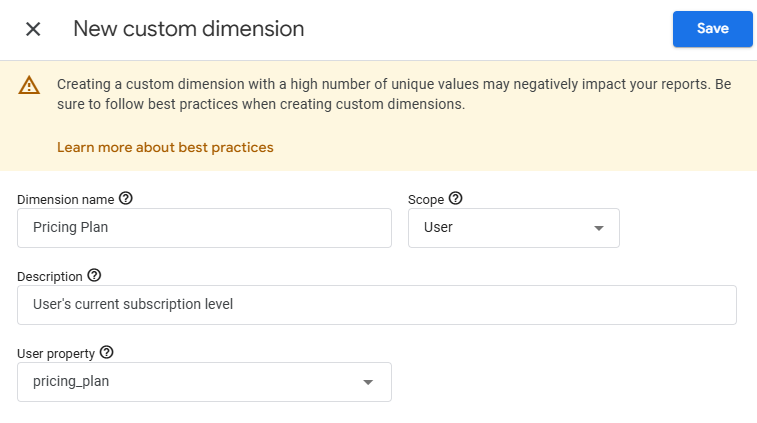
Keep in mind: user-scoped dimensions apply to all events for a user from the moment you first set the property.
Item-scoped dimensions for e-commerce
Item dimensions only make sense if you’re tracking e-commerce, since they describe individual products within a transaction or product view.
The key requirement is: your item data must already be structured in the items array format that GA4’s e-commerce tracking expects. You can learn more about this in our articles “What is the data layer in Google Tag Manager?” and “How to set up the data layer in GTM for GA4 e-commerce tracking”.
The connection to BigQuery
Every parameter you send to GA4 flows to BigQuery whether you register it as a custom dimension or not (you can dive deeper into this in our “Step-by-step guide to connecting GA4 to BigQuery”).
This means you can and should be strategic: register in GA4 only the dimensions your team needs to access easily for everyday reporting, and leave high-cardinality or rarely-used parameters unregistered for BigQuery analysis.
Final thoughts
Custom dimensions are what truly transform GA4 from a generic analytics tool into something that actually understands your business and helps it get to the next level. The setup involves both sending the data through GTM and registering it in GA4’s interface, but the real work isn’t technical – it’s strategic.
You’re basically deciding what matters enough to measure: is it which user behaviors actually predict success? What product attributes drive purchases? Which content characteristics keep people engaged? The point is: the businesses getting real value from GA4 aren’t the ones with the most custom dimensions, but the ones asking better questions and using the right custom dimensions to answer them.