For e-commerce tracking to work in GA4, your data layer must be perfectly set up. With basic page tracking, GTM can get most of the information it needs directly from the page itself, but e-commerce requires accurate product data, transaction and user interaction details. This information exists only in your store’s backend.
This guide walks you through a complete e-commerce data layer setup that captures every step of the customer journey.
Why does e-commerce need special data layer work?
If you’ve read our overview article on the data layer (“What is the data layer in Google Tag Manager?”), you know the basics: the data layer is a JavaScript array that holds information in objects about what’s happening on your website. But e-commerce tracking takes this to another level of complexity.
Most of the data you need for e-commerce tracking isn’t visible. Everything related to product IDs, prices, inventory status, cart contents, or transaction details is in your store’s database. So, the data layer is the link between your backend system and your tracking tools – without proper data layer implementation, you’re limited to tracking basic interactions like button clicks and page views. You won’t know which products people viewed, what they added to their carts, or how much revenue each transaction generated. Your GA4 reports will show activity but no actual e-commerce insights.
The complexity comes from needing to track multiple products at once, each with its own set of attributes. A single page view might need to send data about 20 different products, each with over 10 parameters. That’s where the items array comes in: it’s the structured format that lets you send all this product information in an organized way.
How GA4’s e-commerce data model works
Before you start writing data layer code (or asking your developer to write it), you need to understand how GA4 organizes e-commerce data. The heart of it is the items array: for every e-commerce event in GA4, it contains one or more product objects, where each object represents a single product with all its details.
Here’s what a simple items array looks like:
items: [{
  item_id: 'JKT-2210',
  item_name: 'Packable rain jacket',
  price: 68.00,
  quantity: 1
}]
Even if someone only interacts with one product, it still goes in an array. This keeps the structure consistent, whether you’re tracking one product or 50.
A) Event-level vs. item-level parameters
GA4 e-commerce data splits into two categories: event-level parameters and item-level parameters. The first describes individual products and goes inside each object in the items array. Examples are:
- item_id and item_name.
- price and quantity.
- item_brand and item_category.
- item_variant.
Event-level parameters, on the other hand, describe the overall transaction or interaction. These sit outside the items array, and could be:
- transaction_id.
- value (total transaction value).
- currency.
- tax and shipping.
B) Required vs. optional parameters
For any event involving products, you must include either item_id or item_name for each product (preferably both, because using only item_name means you lose some attribution capabilities in GA4 reports).
For purchase events specifically, you must include:
- transaction_id (unique identifier for the transaction).
- currency (three-letter currency code).
- value (total transaction value).
- The items array with at least one product.
For refund events, you only need:
- transaction_id (matching the original purchase).
- The items array with the refunded products.
Everything else enhances your data but won’t break your implementation if it’s missing.
C) The 14 e-commerce events GA4 recognizes
GA4 has specific event names for e-commerce tracking, and you must use them if you want e-commerce reports to be accurate. Here’s a list of all 14 events in the order they typically occur in a customer journey:
| Event name | What it tracks |
|---|---|
| view_item_list | User sees a list of products |
| select_item | User clicks a product from a list |
| view_item | User views product details |
| add_to_cart | User adds product to cart |
| remove_from_cart | User removes product from cart |
| view_cart | User views cart contents |
| begin_checkout | User starts checkout |
| add_shipping_info | User selects shipping method |
| add_payment_info | User selects payment method |
| purchase | User completes purchase |
| refund | Transaction is refunded |
| view_promotion | User sees a promotion |
| select_promotion | User clicks a promotion |
| add_to_wishlist | User adds product to wishlist |
Keep in mind: when you’re actually implementing these events, don’t follow the customer journey order. Start with the events that are the most critical to your tracking, like purchase and add_to_cart. Only after testing and monitoring for a couple of weeks, add view_item and begin_checkout. Then expand to the remaining events.
The anatomy of an e-commerce data layer push
There are many components to an e-commerce data layer push. Let’s take a look at why each of them matters:
- Event key: it tells GTM that something happened. Without this, GTM won’t know when to fire your tags.
- E-commerce object: it holds all your e-commerce data. This is what GTM looks for when pulling e-commerce information.
- Event-level parameters: these describe the overall action (e.g., currency and value).
- Items array: it contains one object per product. Each object in the items array can include these parameters:
| Parameter | Description | Type |
|---|---|---|
| item_id | Internal product identifier. | Required (at least one of them) |
| item_name | The product name as shown to customers. | |
| price | Unit price (just the number, no currency symbol). | Standard product detail |
| quantity | How many units. | |
| item_brand | The product's brand. | |
| item_variant | Size, color, or other variant identifier. | |
| discount | Any discount amount applied to this product. | |
| coupon | Coupon code applied to this product. | |
| item_category | GA4 splits categories into five separate parameters. Example: if your website shows "Electronics > Audio > Headphones", you'd set "item_category: Electronics"; "item_category2: Audio"; "item_category3: Headphones". | Category information |
| item_list_name | Name of the list where this item appeared (e.g.: "Search results" or "Featured products") | List and promotion attribution |
| item_list_id | Unique identifier for that list | |
| promotion_name | If this action came from clicking a promotion | |
| promotion_id | Unique identifier for the promotion | |
| creative_name | The creative or banner name | |
| creative_slot | Where the creative appeared | |
| affiliation | Store or affiliate name | Other details |
| location_id | Physical location | |
| index | Item's position in a list (0 for first item, 1 for second, etc.) |
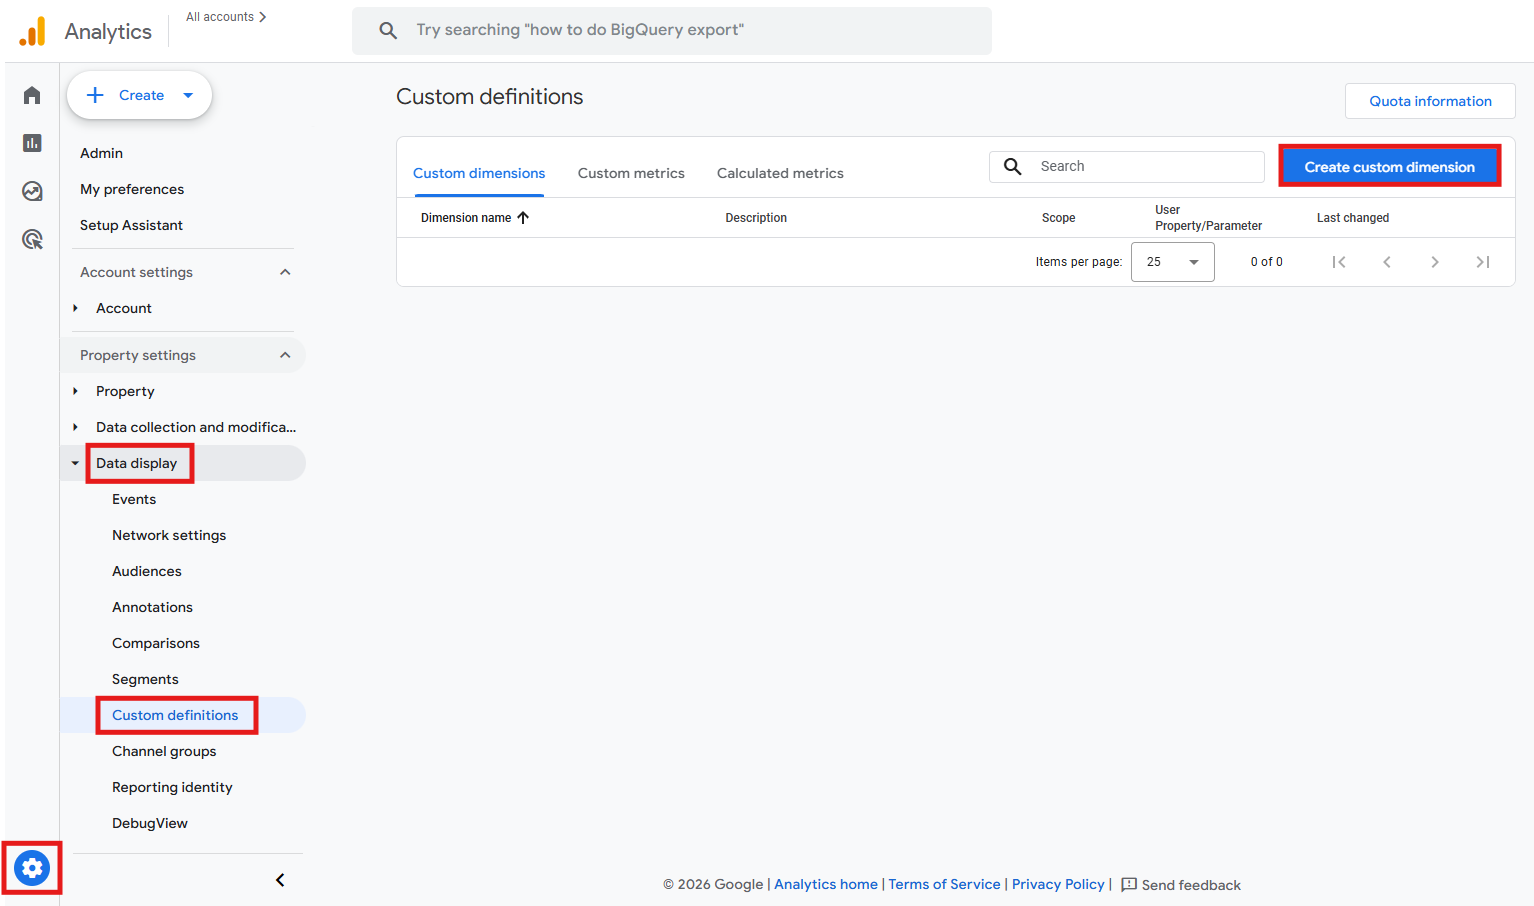
You can add up to 27 custom parameters per item. GA4 collects all of them, but to use them in GA4 reports, you need to register them as custom dimensions. To do that:
-
In GA4, go to Admin > Data display > Custom definitions > Create custom dimension.
-
Enter your parameter name (it must match exactly what’s in your data layer) and choose the scope “Item”. Choose the item parameter it refers to from your list, then save.
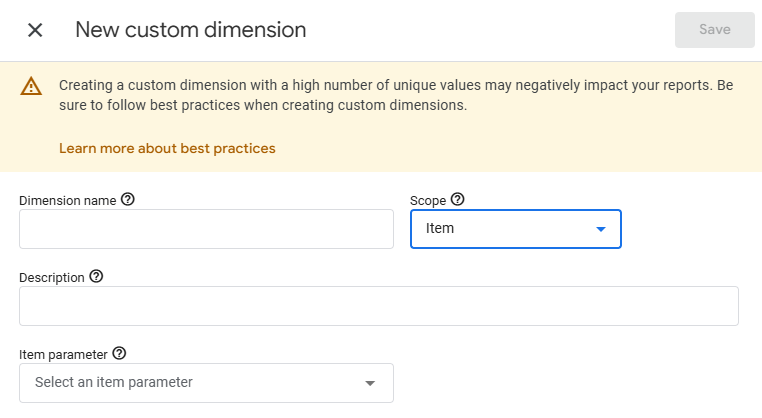
Tip: only register parameters as custom dimensions if you need to use them in reports. GA4 still collects them even if not registered.
Keep in mind: the free version of GA4 lets you register 10 custom parameters as item-scoped custom dimensions, while GA4 360 (the paid, enterprise version) allows 25. Unregistered parameters still flow to BigQuery (if you’ve connected it), but they won’t appear in the GA4 interface.
Implementing key e-commerce events
Now let’s get into the specifics of each major e-commerce event. The 14 events below follow the customer journey order to help you understand how they connect and what data flows from one stage to the next. For each event, we’ll show you when to fire it, what data to include, and what to watch out for.
But remember: although we’re now focusing on the information that should be pushed, before actually pushing any e-commerce event, you must clear the previous e-commerce object to prevent old data from contaminating new events. We provide more detail into this in the best practices section ahead.
A) view_item_list
This event fires when someone sees a list of products (including search results, category pages, or any other product listing).
- Data layer structure
window.dataLayer = window.dataLayer || [];
window.dataLayer.push({ ecommerce: null });
window.dataLayer.push({
  event: 'view_item_list',
  ecommerce: {
    item_list_id: 'cat_running_gear',
    item_list_name: 'Running gear',
    items: [{
      item_id: 'TR-8801',
      item_name: "Men's trail running shoes",
      affiliation: 'Northline Online Store',
      item_brand: 'Northline',
      item_category: 'Footwear',
      item_category2: 'Running',
      item_variant: 'Size 10 / Charcoal',
      price: 129.99,
      item_list_id: 'cat_running_gear',
      item_list_name: 'Running gear',
      index: 0
    },{
      item_id: 'BTL-4415',
      item_name: 'Insulated stainless water bottle 24oz',
      affiliation: 'Northline Online Store',
      item_brand: 'Northline',
      item_category: 'Hydration accessories',
      item_variant: '24oz / Forest Green',
      price: 34.99,
      item_list_id: 'cat_running_gear',
      item_list_name: 'Running gear',
      index: 1
    }]
  }
});
- What to include
All visible products in the list, up to a reasonable limit.
- What to keep an eye on
Don’t forget to give each list type a consistent name (in other words, set item_list_name). Without this, you won’t be able to see which lists drive the most engagement in GA4 reports.
B) select_item
This event fires when someone clicks a product from a list to view its details.
- Data layer structure
window.dataLayer = window.dataLayer || [];
window.dataLayer.push({ ecommerce: null });
window.dataLayer.push({
  event: 'select_item',
  ecommerce: {
    item_list_id: 'cat_running_gear',
    item_list_name: 'Running gear',
    items: [{
      item_id: 'TR-8801',
      item_name: "Men's trail running shoes",
      affiliation: 'Northline Online Store',
      item_brand: 'Northline',
      item_category: 'Footwear',
      item_category2: 'Running',
      item_variant: 'Size 10 / Charcoal',
      price: 129.99,
      item_list_id: 'cat_running_gear',
      item_list_name: 'Running gear',
      index: 0
    }]
  }
});
- What to include
Only the product that was clicked. Keep the same item_list_name from the view_item_list event so GA4 can track the list’s click-through rate.
- What to keep an eye on
Don’t forget to include the list attribution (item_list_name and index). Without these, you can’t analyze which lists or positions drive the most clicks.
C) view_item
This event fires when someone lands on a product detail page.
- Data layer structure
window.dataLayer = window.dataLayer || [];
window.dataLayer.push({ ecommerce: null });
window.dataLayer.push({
  event: 'view_item',
  ecommerce: {
    currency: 'USD',
    value: 89.00,
    items: [{
      item_id: 'BAG-5520',
      item_name: 'Leather crossbody bag',
      affiliation: 'Northline Online Store',
      item_brand: 'Northline',
      item_category: 'Bags & accessories',
      item_category2: 'Crossbody bags',
      item_variant: 'Tan',
      price: 89.00,
      quantity: 1
    }]
  }
});
- What to include
Complete details about the product. If your product has variants (colors, sizes, etc.), make sure item_variant updates when someone selects a different option.
- What to keep an eye on
Get the parameters and categories right here, by including all levels that apply to your product. This data feeds into GA4’s item category reports.
D) add_to_cart
This event fires when someone adds a product to their cart.
- Data layer structure
window.dataLayer = window.dataLayer || [];
window.dataLayer.push({ ecommerce: null });
window.dataLayer.push({
  event: 'add_to_cart',
  ecommerce: {
    currency: 'USD',
    value: 42.50,
    items: [{
      item_id: 'KIT-7702',
      item_name: 'Stainless steel French press',
      affiliation: 'Northline Online Store',
      item_brand: 'Northline Home',
      item_category: 'Home & kitchen',
      item_category2: 'Coffee & tea',
      item_variant: '34oz',
      price: 42.50,
      quantity: 1
    }]
  }
});
- What to keep an eye on
If someone clicks “Add to cart” three times on the same product, fire three separate events with “quantity: 1” each. Or, if your cart interface has a quantity selector, use the selected quantity. The key is that quantity represents how many units are being added in this specific action, not the total in the cart.
E) remove_from_cart
This event fires when someone removes a product from their cart or decreases the quantity.
- Data layer structure
window.dataLayer = window.dataLayer || [];
window.dataLayer.push({ ecommerce: null });
window.dataLayer.push({
  event: 'remove_from_cart',
  ecommerce: {
    currency: 'USD',
    value: 54.00,
    items: [{
      item_id: 'ACC-8850',
      item_name: 'Merino wool scarf',
      affiliation: 'Northline Online Store',
      item_brand: 'Northline',
      item_category: 'Apparel & accessories',
      item_category2: 'Scarves',
      item_variant: 'Charcoal grey',
      price: 54.00,
      quantity: 1
    }]
  }
});
- What to keep an eye on
If someone has 3 units in the cart and decreases to 2, fire this event with “quantity: 1”. If they remove all units, set the quantity to however many were removed.
F) view_cart
This event fires when someone views their cart contents.
- Data layer structure
window.dataLayer = window.dataLayer || [];
window.dataLayer.push({ ecommerce: null });
window.dataLayer.push({
  event: 'view_cart',
  ecommerce: {
    currency: 'USD',
    value: 85.00,
    items: [{
      item_id: 'LMP-6630',
      item_name: 'Ceramic desk lamp',
      affiliation: 'Northline Online Store',
      item_brand: 'Northline Home',
      item_category: 'Home & office',
      item_category2: 'Lighting',
      item_variant: 'White',
      price: 58.00,
      quantity: 1
    },{
      item_id: 'BRD-6631',
      item_name: 'Bamboo cutting board',
      affiliation: 'Northline Online Store',
      item_brand: 'Northline Home',
      item_category: 'Home & kitchen',
      item_category2: 'Prep tools',
      item_variant: 'Medium',
      price: 27.00,
      quantity: 1
    }]
  }
});
- What to include
Every item currently in the cart with its current quantity. The value parameter should match the sum of “(price × quantity)” for all items.
G) begin_checkout
This event fires when someone starts the checkout process.
- Data layer structure
window.dataLayer = window.dataLayer || [];
window.dataLayer.push({ ecommerce: null });
window.dataLayer.push({
  event: 'begin_checkout',
  ecommerce: {
    currency: 'USD',
    value: 62.00,
    coupon: 'WELCOME10',
    items: [{
      item_id: 'SCK-1123',
      item_name: 'Merino wool hiking socks (3-pack)',
      affiliation: 'Northline Online Store',
      item_brand: 'Northline',
      item_category: 'Apparel & accessories',
      item_category2: 'Socks',
      item_variant: 'Size M',
      price: 24.00,
      quantity: 1
    },{
      item_id: 'TOT-1124',
      item_name: 'Canvas utility tote',
      affiliation: 'Northline Online Store',
      item_brand: 'Northline',
      item_category: 'Bags & accessories',
      item_category2: 'Totes',
      item_variant: 'Natural',
      price: 38.00,
      quantity: 1
    }]
  }
});
- What to include
Just like view_cart, include all items going through checkout. If someone applied a coupon, include it at the event level.
H) add_shipping_info
This event fires when someone selects a shipping method.
- Data layer structure
window.dataLayer = window.dataLayer || [];
window.dataLayer.push({ ecommerce: null });
window.dataLayer.push({
  event: 'add_shipping_info',
  ecommerce: {
    currency: 'USD',
    value: 65.00,
    shipping_tier: 'Standard Shipping',
    items: [{
      item_id: 'SKL-9901',
      item_name: 'Cast iron skillet 10-inch',
      affiliation: 'Northline Online Store',
      item_brand: 'Northline Home',
      item_category: 'Home & kitchen',
      item_category2: 'Cookware',
      item_variant: '10-inch',
      price: 46.00,
      quantity: 1
    },{
      item_id: 'MIT-9902',
      item_name: 'Silicone oven mitts (pair)',
      affiliation: 'Northline Online Store',
      item_brand: 'Northline Home',
      item_category: 'Home & kitchen',
      item_category2: 'Cookware accessories',
      item_variant: 'Charcoal',
      price: 19.00,
      quantity: 1
    }]
  }
});
- What to keep an eye on
Use consistent names like “Standard Shipping”, “Express Shipping”, “Next Day”, etc.
I) add_payment_info
This event fires when someone selects a payment method.
- Data layer structure
window.dataLayer = window.dataLayer || [];
window.dataLayer.push({ ecommerce: null });
window.dataLayer.push({
  event: 'add_payment_info',
  ecommerce: {
    currency: 'USD',
    value: 128.00,
    payment_type: 'Credit Card',
    items: [{
      item_id: 'EAR-3341',
      item_name: 'True wireless earbuds',
      affiliation: 'Northline Online Store',
      item_brand: 'Northline Audio',
      item_category: 'Electronics',
      item_category2: 'Audio',
      item_variant: 'Black',
      price: 99.00,
      quantity: 1
    },{
      item_id: 'DOC-3342',
      item_name: 'Wireless charging dock',
      affiliation: 'Northline Online Store',
      item_brand: 'Northline Audio',
      item_category: 'Electronics',
      item_category2: 'Chargers',
      item_variant: 'White',
      price: 29.00,
      quantity: 1
    }]
  }
});
- What to keep an eye on
Track the payment method type like “Credit Card”, “PayPal”, “Apple Pay”, etc. Don’t capture sensitive payment details, just the method type.
J) purchase
This event fires on the order confirmation page load, after the payment has been successfully processed. This is the event you absolutely cannot mess up, since your revenue reports, attribution models, ROI calculations, and Google Ads bidding strategies all rely on accurate purchase data. So, double-check every parameter, test with real transactions, and monitor it closely.
- Data layer structure
window.dataLayer = window.dataLayer || [];
window.dataLayer.push({ ecommerce: null });
window.dataLayer.push({
  event: 'purchase',
  ecommerce: {
    transaction_id: 'T_88231',
    value: 141.31,
    currency: 'USD',
    tax: 9.20,
    shipping: 5.99,
    coupon: 'WELCOME10',
    affiliation: 'Northline Online Store',
    items: [{
      item_id: 'BLK-4470',
      item_name: 'Weighted blanket 15lb',
      affiliation: 'Northline Online Store',
      item_brand: 'Northline Home',
      item_category: 'Home & bedding',
      item_category2: 'Blankets',
      item_variant: '15lb / Grey',
      price: 89.00,
      quantity: 1,
      coupon: 'WELCOME10',
      discount: 8.90
    },{
      item_id: 'PIL-4471',
      item_name: 'Linen pillowcase set (2-pack)',
      affiliation: 'Northline Online Store',
      item_brand: 'Northline Home',
      item_category: 'Home & bedding',
      item_category2: 'Pillowcases',
      item_variant: 'Standard / Sage',
      price: 42.00,
      quantity: 1
    }]
  }
});
- What to include
These are all the required parameters:
- transaction_id: it must be unique for each order. Use your order ID from your e-commerce system.
- value: total transaction value including tax and shipping. This should match exactly what the customer paid.
- currency: three-letter ISO currency code (USD, EUR, GBP, etc.).
- items: at least one product.
Also, include tax and shipping separately, so you can see them broken out in reports.
- What to keep an eye on
If someone refreshes the “thank you” page or clicks a link in an email that takes them back to it, you don’t want to record the same purchase twice. The most reliable solution is server-side implementation (only push the purchase data layer when the page loads for the first time after a successful payment). If server-side implementation isn’t possible, you can use GTM trigger conditions to check the referrer. Only fire the purchase tag if the previous page was your payment processor or checkout page, not if someone navigated directly to the “thank you” page. GA4 also automatically deduplicates purchases with the same transaction_id, but don’t rely on this as your only prevention method.
K) refund
This event fires when you process a refund for a transaction. This almost always needs server-side implementation, since refunds typically happen in your admin panel rather than on your website.
- Data layer structure for full refund:
window.dataLayer = window.dataLayer || [];
window.dataLayer.push({ ecommerce: null });
window.dataLayer.push({
  event: 'refund',
  ecommerce: {
    transaction_id: 'T_88231',
    value: 141.31,
    currency: 'USD',
    items: [{
      item_id: 'BLK-4470',
      item_name: 'Weighted blanket 15lb',
      item_brand: 'Northline Home',
      item_category: 'Home & bedding',
      price: 89.00,
      quantity: 1
    },{
      item_id: 'PIL-4471',
      item_name: 'Linen pillowcase set (2-pack)',
      item_brand: 'Northline Home',
      item_category: 'Home & bedding',
      price: 42.00,
      quantity: 1
    }]
  }
});
- Data layer structure for partial refund:
window.dataLayer = window.dataLayer || [];
window.dataLayer.push({ ecommerce: null });
window.dataLayer.push({
  event: 'refund',
  ecommerce: {
    transaction_id: 'T_88231',
    value: 89.00,
    currency: 'USD',
    items: [{
      item_id: 'BLK-4470',
      item_name: 'Weighted blanket 15lb',
      item_brand: 'Northline Home',
      item_category: 'Home & bedding',
      price: 89.00,
      quantity: 1
    }]
  }
});
- What to keep an eye on
The transaction_id must exactly match the original purchase. This is how GA4 knows which purchase to adjust.
L) view_promotion
This event fires when a promotion becomes visible to the user.
- Data layer structure
window.dataLayer = window.dataLayer || [];
window.dataLayer.push({ ecommerce: null });
window.dataLayer.push({
  event: 'view_promotion',
  ecommerce: {
    items: [{
      promotion_id: 'SPRING_CLEARANCE_24',
      promotion_name: 'Spring clearance',
      creative_name: 'spring_banner_hero',
      creative_slot: 'homepage_hero',
      item_id: 'POT-2210',
      item_name: 'Ceramic plant pot',
      item_brand: 'Northline Home',
      item_category: 'Home & garden'
    }]
  }
});
M) select_promotion
This event fires when someone clicks on a promotion banner or link.
- Data layer structure
window.dataLayer = window.dataLayer || [];
window.dataLayer.push({ ecommerce: null });
window.dataLayer.push({
  event: 'select_promotion',
  ecommerce: {
    items: [{
      promotion_id: 'BTS_BACKPACK_24',
      promotion_name: 'Back to school sale',
      creative_name: 'bts_sidebar_banner',
      creative_slot: 'category_sidebar',
      item_id: 'BPK-3390',
      item_name: 'Everyday backpack',
      item_brand: 'Northline',
      item_category: 'Bags & accessories'
    }]
  }
});
- What to keep an eye on
Use promotion events for marketing banners and calls-to-action that aren’t specifically product listings. If you’re showing a grid of featured products, use view_item_list instead.
N) add_to_wishlist
This event fires when someone adds a product to a wishlist.
- Data layer structure
window.dataLayer = window.dataLayer || [];
window.dataLayer.push({ ecommerce: null });
window.dataLayer.push({
  event: 'add_to_wishlist',
  ecommerce: {
    currency: 'USD',
    value: 64.00,
    items: [{
      item_id: 'SPK-5501',
      item_name: 'Portable Bluetooth speaker',
      affiliation: 'Northline Online Store',
      item_brand: 'Northline Audio',
      item_category: 'Electronics',
      item_category2: 'Audio',
      item_variant: 'Black',
      price: 64.00,
      quantity: 1
    }]
  }
});
- What to keep an eye on
The data layer structure is identical to add_to_cart (only the event name changes). If your website allows adding multiple items to a wishlist at once, include all items in the items array. If users can add items to multiple wishlists, consider adding a custom parameter to distinguish between them.
Setting up GTM to read e-commerce data
Now that you know what data to push to the data layer, you need to configure GTM to read that data and send it to GA4.
Note for Universal Analytics (UA) users: if you’re currently using Enhanced Ecommerce with UA, you can migrate gradually rather than rebuilding everything from scratch. GA4 can read the Enhanced Ecommerce data layer structure with some limitations. However, this article focuses on implementing the full GA4 data structure to take advantage of new features.
A) The ecommerce.items variable
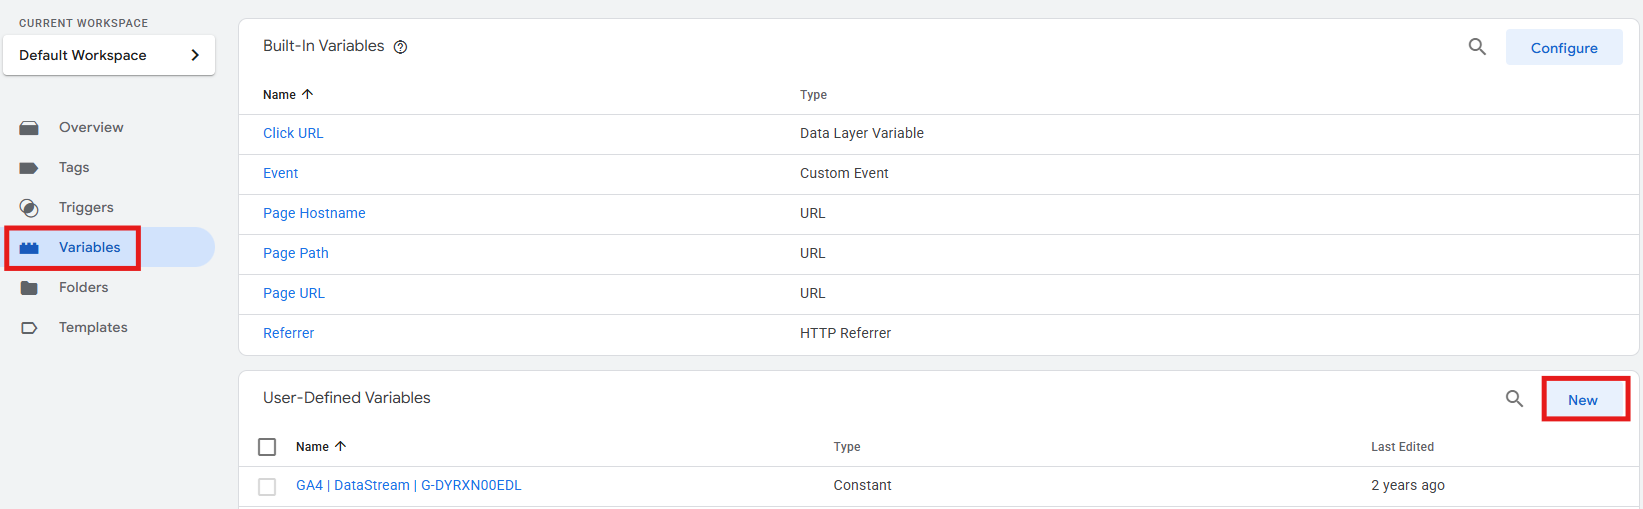
You’ll need variables in GTM that point to your e-commerce data, and the most important one is the ecommerce.items variable. Here’s how to create it:
-
In GTM, go to Variables > User-Defined Variables > New.
-
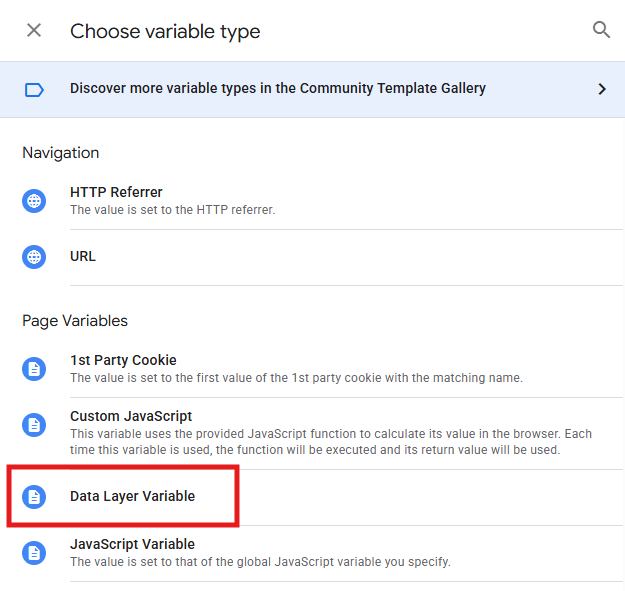
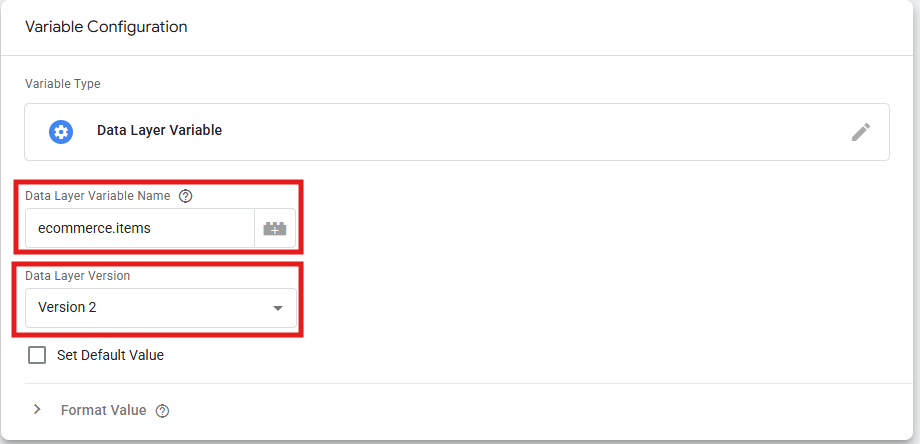
Under Variable Configuration, choose Data Layer Variable.
-
Fill in the Data Layer Variable Name with something like ecommerce.items. Leave the Data Layer Version with the default Version 2.
-
At the top, name the variable something clear, like dlv - ecommerce.items, then save. This variable now contains your entire items array and can be used directly in your GA4 tags.
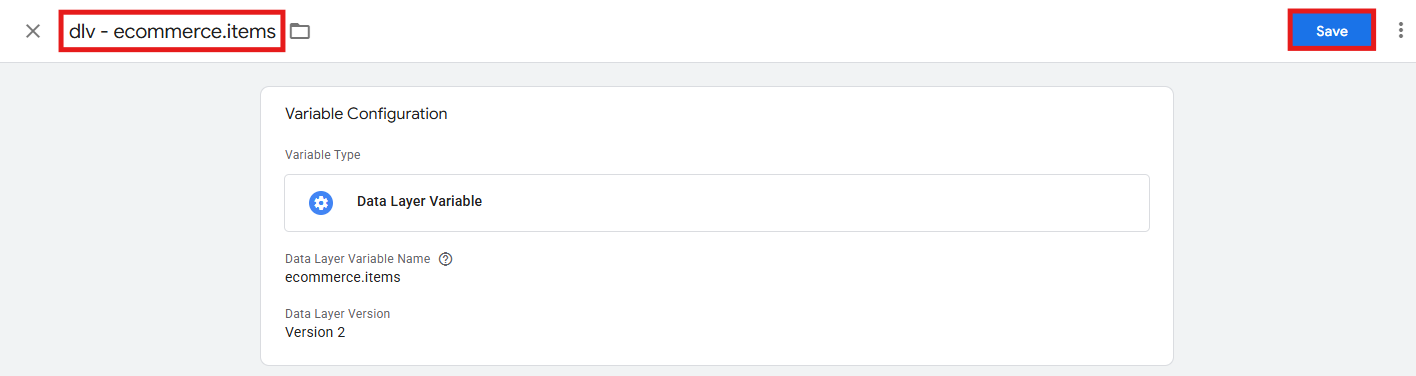
Keep in mind: we recommend using Version 2 here, because Version 1 can’t read nested values like ecommerce.items.
B) Event-level parameter variables
For parameters outside the items array, create separate variables. Examples include:
-
Transaction ID
Name: dlv – ecommerce.transaction_id
Data Layer Variable Name: ecommerce.transaction_id -
Value
Name: dlv – ecommerce.value
Data Layer Variable Name: ecommerce.value -
Currency
Name: dlv – ecommerce.currency
Data Layer Variable Name: ecommerce.currency -
Coupon
Name: dlv – ecommerce.coupon
Data Layer Variable Name: ecommerce.coupon
Note: advanced users can also use a custom JavaScript variable that returns the entire e-commerce object, avoiding the need to create multiple individual variables. However, the approach shown here is more straightforward for testing and debugging.
C) Creating the GA4 event tags
Now let’s build the tags that send this data to GA4. First, if you don’t already have a Google Tag, create one (this process is described in detail in the article “How to set up Google Tag Manager on your website”).
Then create your e-commerce event tags like this:
-
Go to Tags > New.

-
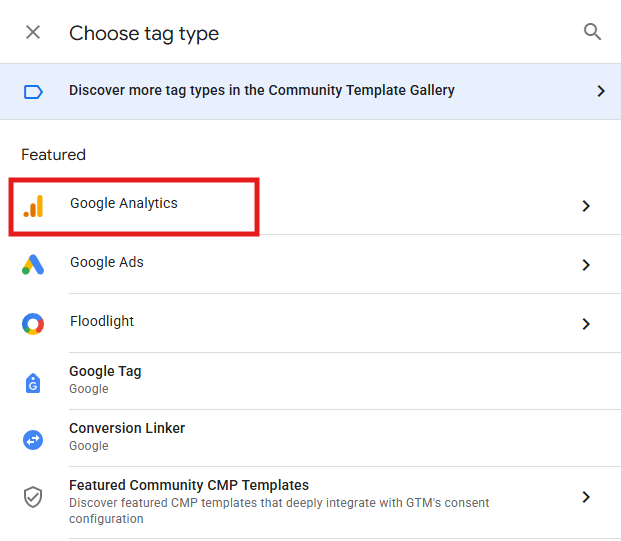
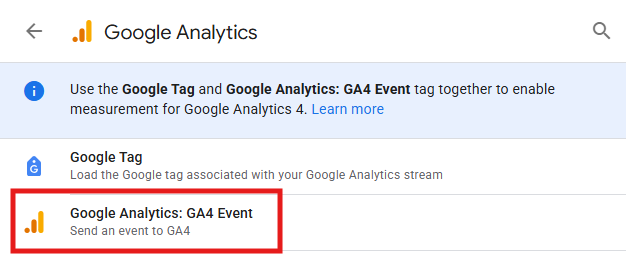
Under Tag Configuration, select the tag type Google Analytics > Google Analytics: GA4 Event.
-
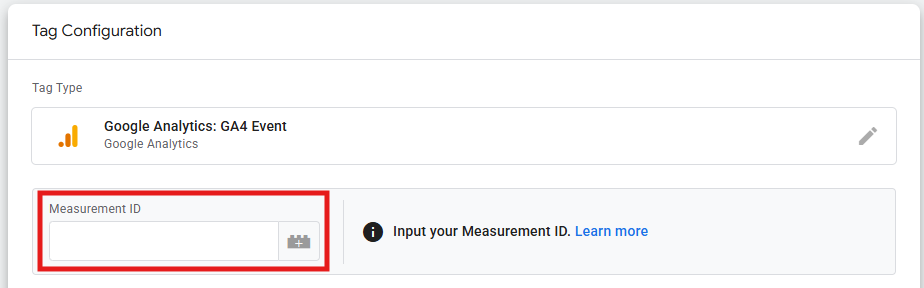
Enter your Measurement ID (the format is G-XXXXXXXXXX and you can find it in GA4 > Admin > Data collection and modification > Data streams > Select your web data stream > the Measurement ID is in the “Stream details” section).
-
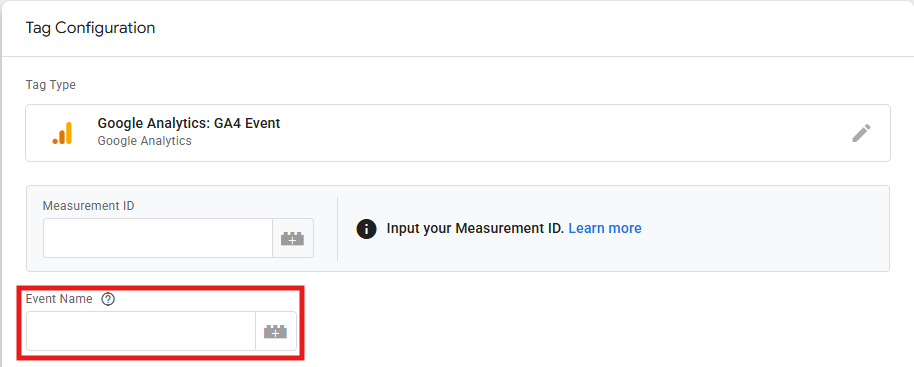
Enter the event name (like purchase, add_to_cart, etc.).
-
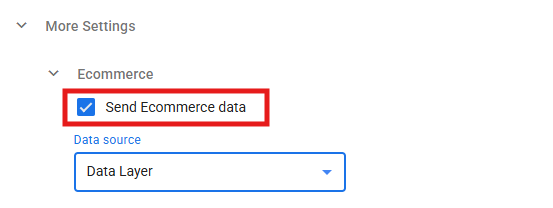
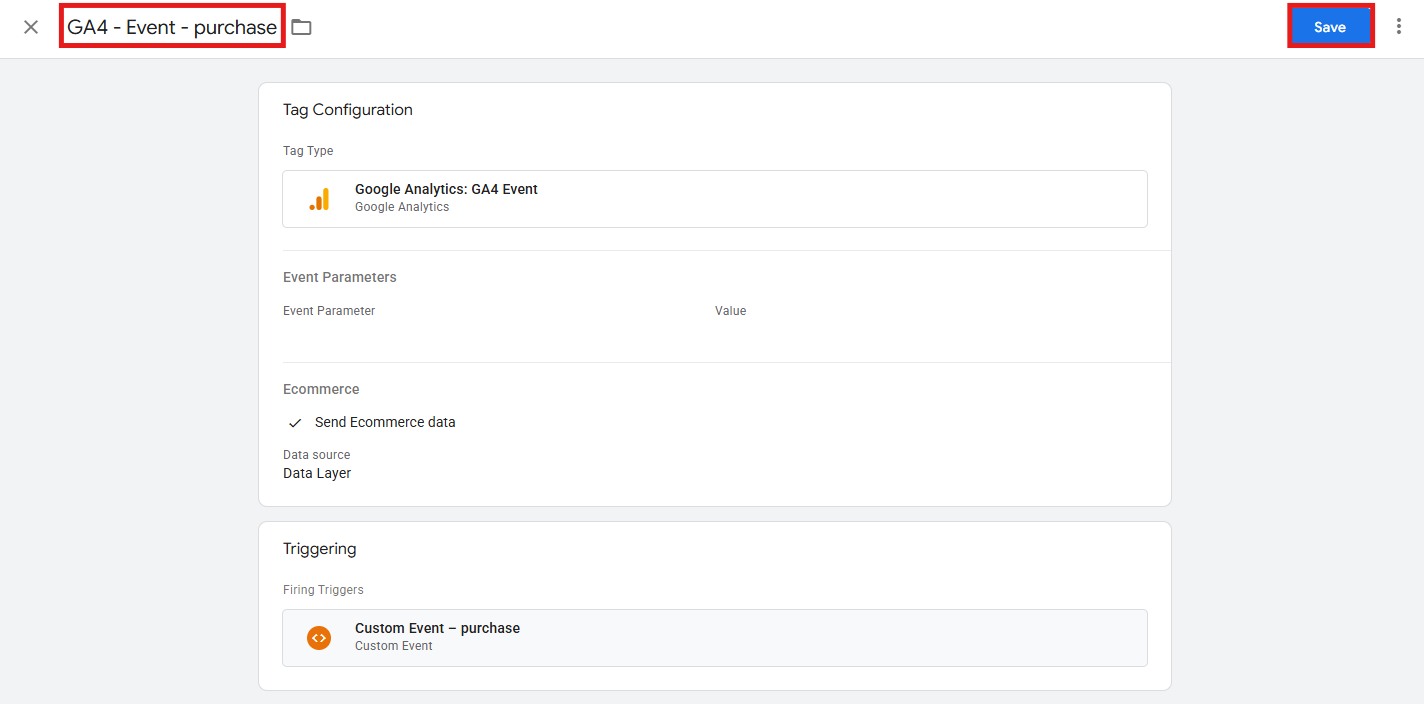
Expand the More Settings section and check the box Send Ecommerce data. This is very important, because it tells GTM to automatically look for ecommerce.items and other e-commerce parameters in your data layer and include them in the event.
-
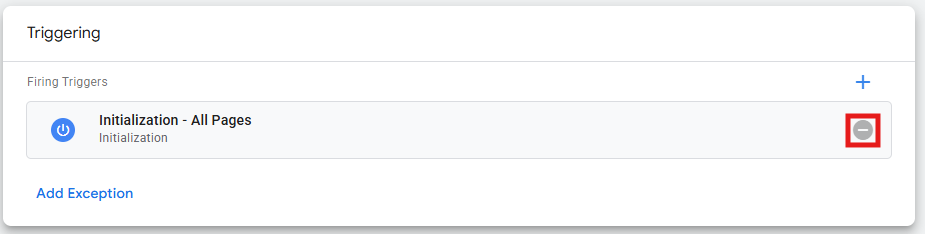
Under Triggering, click the minus (-) button to remove the current trigger (Initialization - All Pages).
-
Now click on that same section and select the plus (+) icon in the top right to create a new trigger.

-
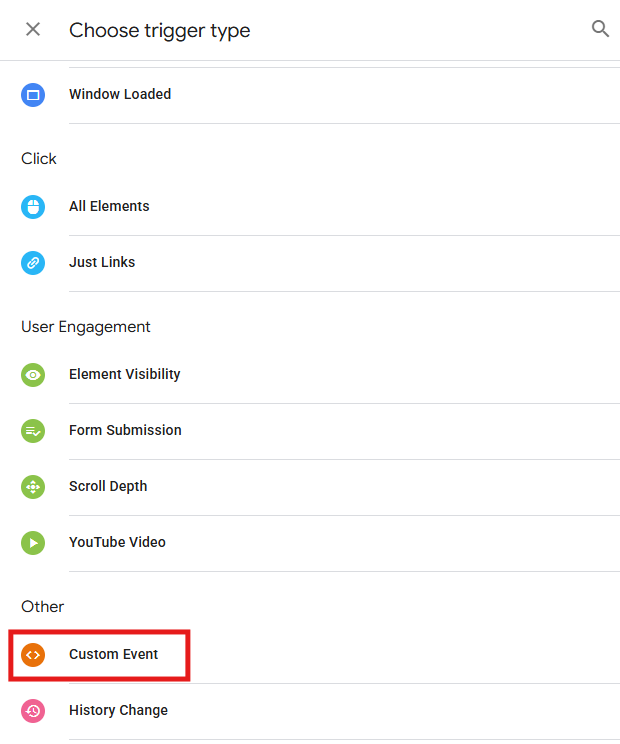
Under Trigger Configuration, scroll all the way down and choose Custom Event.
-
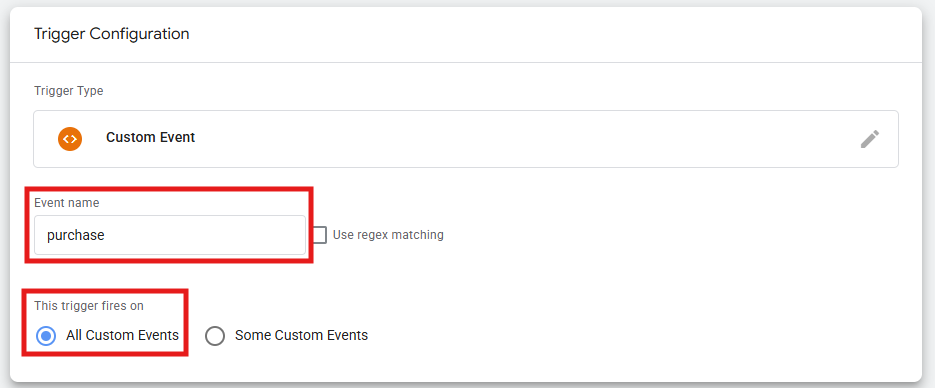
In Event name, type the e-commerce event this tag is for (e.g., purchase). Leave “This trigger fires on” set to All Custom Events.
-
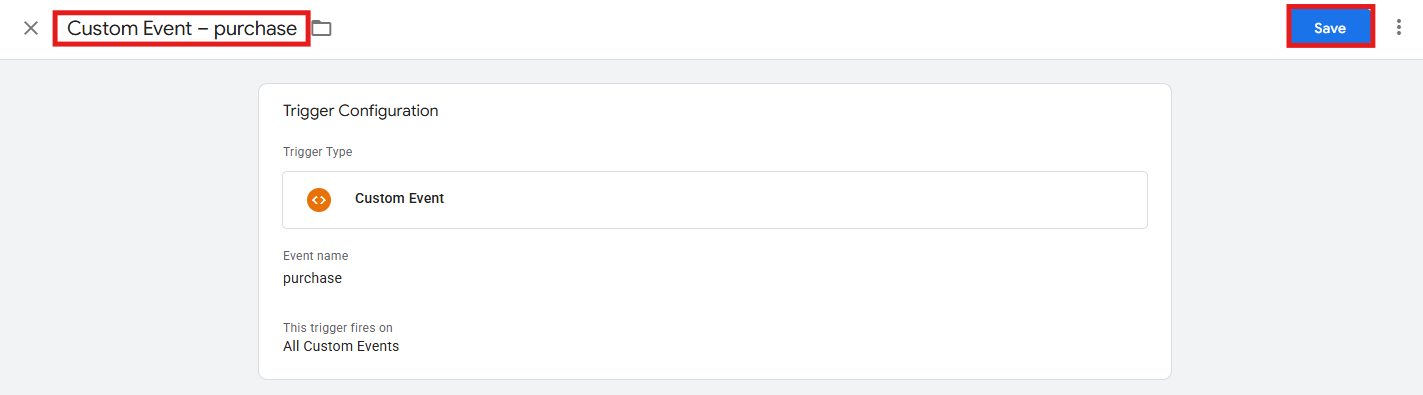
Name your trigger at the top (e.g., Custom Event – purchase) and then save.
-
Now, back to your tag, name it clearly (e.g., GA4 - Event – purchase) and save.
Tip: you have two approaches for managing e-commerce tags – either create one tag per event type, or create a single GA4 Event tag that uses a variable for the event name and dynamically pulls all parameters. We recommend starting with one tag per event, because it’s more straightforward, especially when you’re testing and debugging.
Verifying your implementation
Once you’ve configured your GTM tags, test them before publishing anything:
A) Test in GTM Preview mode
In GTM, click Preview in the top right corner. Enter your website URL and browse to a page where an e-commerce event should fire (like a product page or cart). In the Tag Assistant panel on the left, you’ll see events as they fire. Click on an event (like view_item) and check that your GA4 event tag appears under “Tags Fired”. If it’s under “Tags Not Fired”, check your trigger configuration.
B) Verify data reaches GA4
GTM Preview mode shows that tags fired, but you also need to confirm that GA4 actually received the data. In GA4, go to Admin > Data display > DebugView. With GTM Preview mode still active, browse your website and trigger e-commerce events. You should see these events appear in real-time in DebugView, so click on any event to see the associated parameters, items, and user properties. Check that all expected parameters appear with correct values. If something’s missing or incorrect, go back to your data layer code or GTM configuration.
C) Check live data
After publishing your GTM container, wait 24-48 hours and check GA4 Reports > Monetization > Ecommerce purchases (for purchase events) or Reports > Monetization > Overview for other e-commerce activity. If data appears in DebugView but not in reports after 48 hours, double-check that you published your GTM container and that the Measurement ID in your tags matches your GA4 property.
Data layer structure best practices
Follow these tips and you’ll be able to avoid the most common implementation problems:
-
Always use dataLayer.push()
For e-commerce events, always use the dataLayer.push() method, because it can add data dynamically after the page loads. It looks something like this:
window.dataLayer = window.dataLayer || []; window.dataLayer.push({ event: 'add_to_cart', ecommerce: { /* ... */ } }); -
Include the event key
Every e-commerce data layer push must include an event key. GTM Custom Event triggers listen for this event value, so without it, your tags won’t fire:
window.dataLayer.push({ event: 'add_to_cart', ecommerce: { /* ... */ } }); -
Clear the e-commerce object
Before pushing a new e-commerce event, clear any previous e-commerce data. This is critical because GTM’s Data Layer Variable, Version 2 specifically, merges each new push with whatever’s already stored instead of replacing it – basically, values from an earlier event persist unless explicitly cleared, causing incorrect data to reach GA4. This two-step push (clear, then add) should happen before every single e-commerce event. It looks like this:
window.dataLayer.push({
  ecommerce: null
});
window.dataLayer.push({
  event: 'add_to_cart',
  ecommerce: { /* new data */ }
});
Keep in mind: if your GTM variables are set to data layer version 1 instead, this merge behavior doesn’t apply. Version 1 only ever reads the most recent push, so it won’t inherit values from a previous event.
-
Maintain consistent product data
If you send a parameter for a product in one event, make sure you send it in all events. This matters because GA4’s reports group and filter by these parameters, so inconsistent data means products won’t group correctly in reports. The best approach to ensure consistency is pulling product data from a single source for all events.
-
Format values correctly
GA4 expects specific data formats for certain parameters. For example: numbers/prices must be included without currency symbols; quantity represents whole units, so it must be a whole number; product names, IDs, and other text values should be in single quotes (not double quote marks).
Working with developers on the e-commerce data layer
Most of the data layer implementation requires developer help – the key here is to communicate your vision and goals as effectively as possible. How?
Make a specific request. Don’t just generally say “I need e-commerce tracking”. Give your developer exactly what they need to implement, so:
-
A list of which events to implement and when: it could take the form of a table like this one.
Event name When to fire Page/action Priority purchase ”Thank you” page load (first time only) /order-confirmation Critical view_item Product page load /product/* High add_to_cart Click “Add to cart” button Any page High begin_checkout Checkout page load or “Proceed to checkout” click /cart or /checkout High -
Exact data layer structure needed: now that you’ve learned about it, provide complete code examples for each event you need to track.
-
Testing requirements: specify how you intend to verify the implementation – for example, using GTM Preview mode and/or GA4’s DebugView, testing with real transactions in sandbox/test mode, etc.
Next steps
Now that you’ve learned the basics of working with the data layer, here’s how you can put it into practice in a thoughtful way:
-
Implement in phases
Don’t implement all 14 e-commerce events at the same time, and don’t follow the customer journey order. Start with purchase and add_to_cart, because these are the most important events to get in place. After you’ve got these working and are sure the revenue tracking matches your actual sales, add view_item and begin_checkout. Then you can move onto all the other events.
-
Keep monitoring data quality
Make sure to do weekly checks on your e-commerce reports in GA4 (to detect anomalies), regularly compare GA4 revenue to your e-commerce platform, verify transaction count, and look for products showing as “(not set)” or missing dimensions. You can also create alerts in GA4 for unusual patterns, such as revenue drops, transaction spikes, etc.
-
Perform regular audits
Do it quarterly or whenever your website undergoes major changes. In these audits, re-test all e-commerce events in Preview mode, check for new JavaScript errors affecting the data layer, verify that new products or categories are tracking correctly, and update documentation.
-
Use BigQuery for deeper analysis (optional, but a big plus)
As we’ve seen in the article “BigQuery for marketers: what is it and how can it help you?”, BigQuery gives you access to raw, event-level data. So, if you’re serious about e-commerce analytics, use it to analyze customer purchase patterns with SQL, build custom funnel reports (beyond GA4’s limitations), combine e-commerce data with other business data, and create predictive models for customer lifetime value.
-
Consider server-side tagging (optional, for larger operations)
Server-side GTM moves data processing from the browser to your own server infrastructure. As we’ve seen in the article “How to set up GA4 via GTM server-side tagging”, benefits include improved data accuracy (no ad blockers), better page load performance, enhanced data security, and extended cookie lifespans. This requires technical infrastructure and ongoing costs, so it’s more relevant for larger e-commerce operations or those with strict data governance requirements.
E-commerce data layer implementation takes effort, but it’s worth the investment and it sure takes your tracking to a whole new level. Our recommendation is: follow the phased approach above, verifying each stage thoroughly before expanding.
With proper data layer implementation, you’ll see exactly which products people viewed before purchasing, how list placement affects conversion rates, and which checkout step loses the most customers. That’s the kind of business intelligence that drives real growth.